
Operating instructions
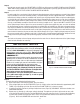

Step 11
Plug the control valve into a properly grounded 110/120V 60 Hz non switched electrical outlet. Check with your local
code enforcement offi ce to determine if it meets local codes.
Step 12
Turn back on the power source to well pump and slowly open the shut off valve to pressurize the water system. If on
a public or community water supply open the main shut off valve to the dwelling.
Step 13
Set the time of day by referring to Section 3 INSTALLATION “How to set the Time of Day”.
Step 14
Open the valve on the water supply as required to pressurize the water lines to the dwelling or fuel source. The power
to the water heater or boiler needs to be established once water has been allowed to fl ow back into the device, if it
was drained at any time during the installation. Turn back on the power or fuel source to either the water heater or
boiler if it was drained at any time during the installation. Check for leaks on all connections before leaving the job
site, correct as required.
Step 15
Manually initiate regeneration of the Iron Filter by referring to the “How To Manually Initiate Regeneration”
section of Control Valve settings in Section 3
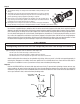
Step 16
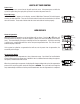
Once the valve is in the backwash position (C1 appears on the display) slowly open the inlet side of the bypass valve
to allow water to fl ow into the fi lter vessel. Water should start to fl ow into the drain. Allow for any air that might have
been trapped to leave the fi lter and go to drain. This will be detected by changes in noise in the drain line or is visible
in the semi-transparent tubing. Once the air is entirely gone slowly increase the water fl ow to drain by opening the
inlet side of the bypass valve until fully open. Refer to Figure 3 for correct positioning. At the end of C1 position the
water should be clear. If not, allow the valve to complete the manual regeneration process and initiate once again.
It is very important to allow the unit to purge all fi nes to the waste drain from the media in the fi lter vessel prior to
using the water. Once the fl ushing process has been completed you now can open the outlet side of the bypass valve
to allow for fi ltered water to fl ow into the dwelling.
Step 17
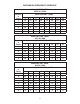
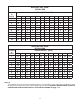
The frequency of backwash is factory preset at every 4 days. If the Iron content is greater than 5 ppm, is red water or
bacterial iron the unit should be washed more frequently. See tables to determine the frequency. Also if the water has
tannin-lignin or hydrogen sulfi de present, the fi lter should backwash every day. Refer to Section 5 for backwashing
instructions and frequency.
3-6
IMPORTANT NOTES
Due to the nature of the Chem-Free Iron Reduction media, on start up it sometimes requires 2 or 3
days for the Chem-Free Iron Filter to reduce Iron and Manganese below staining levels. Do not be
alarmed if this occurs. During the initial start up and subsequent fi rst couple automatic regenera-
tion cycles, a small amount of fi ne white and beige media may be observed in the drain water and
or drain area. This is normal and benefi cial for the effi cient operation of your Chem-Free Iron Filter
Reduction System.