
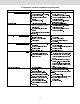
Specifications


3
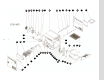
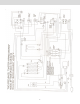
C. INSTALLATION
OPERATING INSTRUCTIONS
A. PREPARATION / WARM-UP
1. Place the toaster on approved toaster table and
insure that the unit's vents are not blocked. Air
must circulate under and through vents provided
on the bases left side and at the rear of the unit. A
minimum clearance of one (1") (2.6 CM) is
required on the bases both sides and rear of the
unit. Overhead clearance should allow heat to be
dispelled adequately. Insure cooling fan is
unobstructed.
1. Main Power: Turn toaster on by pressing the
Main Power switch to the right (1). Turn the
toaster off by pressing the Main Power
switch down to the left (0).
2. Temperature: Set the Top Heat knob to MAX.
and the Bottom Heat knob to MIN. set
ting (mid range) for warm-up. (Power to the
top rear (6) and bottom heating elements is
off when these knobs are in the off position.
Top front (3) elements remain on).
3. Speed: Set the Conveyor Speed knob to the
6 setting for warm-up.
4. Warm-up Time: Warm-Up Time is approxi-
mately 20 min.
Toaster Control Suggested Setting
Top Heat Control Between #8 & #9
Bottom Heat Control #2
Bagel Speed Control #5
Muffin Speed Control #2
GENERAL INFORMATION
B. USE / SPECIAL FEATURES
1. Product: Place product on the wire feeder. It
will automatically be drawn through the
toaster at a speed determined by the
Conveyor Speed setting.
Do
1. Heating & Toasting Recommendations: The
darkness or lightness of the toasting is
determined by the and
a. Speed 1 is slowest setting and will help
produce the darkest toast. "9" is the fastest
setting and will help produce the lightest
toast.
b. Temperature:
- The MIN. setting will help
produce the lightest- top toast The MAX.
setting will help produce the darkest toast.
- The MIN. setting will
help produce the lightest bottom - toast.
The MAX. setting will help produce the
darkest bottom toast. Off turns the heating
elements off.
TOP HEAT
BOTTOM HEAT
C. CLEANING AND MAINTENANCE
CLEANING DAILY
1. Turn all heat controls off and allow toaster to
cool. Turn the conveyor speed up to "5". NOTE:
TOASTER DOES NOT COMPLETELY SHUT
OFF WHEN HEAT CONTROLS ARE OFF.
FRONT (3) THREE ELEMENTS WILL REMAIN
ON.
2. Using a plastic abrasive pad, wipe the conveyor
belt in a back and forth motion (side to side or
front to back) to remove baked on product. Wipe
the conveyor in the same manner with a hot
damp cloth.
3. Turn the main power switch off.
4. Remove the reflector/crumb tray and/or the
feeder by lifting slightly and pulling forward.
water. Dry tray and replace in toaster.
5. Remove the bread drawer by lifting up and
pulling out of toaster. Dispose of the crumbs
and wash drawer in soapy water. Wipe the
excess crumbs from inside of the toaster with a
hot damp rag. Place the Tray back into the
toaster.
6. Wipe the exterior surfaces of the toaster with
a hot damp rag.
The conveyor belt and drive motor do not
require lubrication.
Dispose of the crumbs and wash in hot soapy
NOTE: