
Technical information

2/4 LS PRO OWNER'S HANDBOOK
Getting Started
Chapter 2
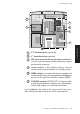
6. Plug the mouse into the mouse port on the system unit.
Never connect either the keyboard or the mouse while
the system unit is turned on.
7. Where appropriate, connect the computer to the
network. See Chapter 4, “Networking”, for guidance
on connecting the computer to Ethernet networks.
8. Connect the monitor power cord between the monitor
and the AC power outlet on the rear of the system unit.
9. Connect the system unit power cord between the AC
power inlet on the rear of the system unit and a nearby,
grounded AC power outlet.
10. Where appropriate, connect power cords between your
peripherals and nearby, grounded AC power outlets.
11. If your AC power outlets have switches, set them to
their On positions.
The computer is now ready to use. The rest of this chapter
tells you how to turn the computer on and off, and how to
configure it using the BIOS Setup utility.
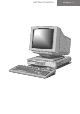
Turning on and booting the computer
Turning the power on
To turn on the computer, simply press the POWER button. The
green indicator next to the POWER button lights to show that the
system unit is powered. Remember that the monitor has its own
power control; see the monitor’s User’s Guide for details.
If the computer does not start when the POWER button is
pressed, check that the system unit and monitor power cords
are securely connected and that the AC power supply is
switched on.
In the United Kingdom, and some other countries, AC plugs
contain fuses. If the fuse in the system unit’s AC plug blows
when you turn it on, this may be caused by an AC power surge,