
Technical information

LS PRO OWNER'S HANDBOOK 2/3
Getting Started
Chapter 2
Transporting”, for instructions on how to do this. It is likely
that the monitor’s voltage setting will also need adjusting;
consult the User’s Guide that accompanies the monitor, or ask
your supplier for help.
The “Safety and Regulatory Notices” section at the start of this
Owner’s Handbook includes advice about suitable power cords.
Installing add-on options
If your computer arrived with uninstalled add-on options, (such
memory modules) consult Chapter 9, “Upgrading”, for step-
by-step instructions for installing them. Some items may have
their own documentation that supplements or overrides the
instructions in this manual.
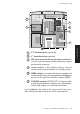
Connecting the components
Having assured yourself that the voltage settings and the AC
power cords of the computer, the monitor and any other
peripherals are correct, use the procedure below to connect
these components together. It is important that you take each
step the in order indicated.
1. If your AC power outlets have switches, set them to
their Off positions.
2. Ensure that the system unit, the monitor, and any
peripherals are turned off.
3. Connect the monitor signal cable between the monitor
and the monitor port on the rear of the system unit.
If the monitor signal cable is connected after the
computer is turned on, the display may appear in
monochrome (or not at all).
4. Where appropriate, connect other signal cables between
your peripherals and their respective ports on the system
unit. Make sure the signal cables are connected securely.
5. Plug the keyboard cable into the keyboard port on the
system unit. Be careful not to plug it into the mouse
port by mistake.