
Technical information


9/14 LS PRO OWNER'S HANDBOOK
Upgrading
Chapter 9
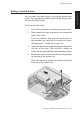
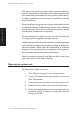
5. Secure the hard disk drive to the mounting bracket using
the four fixing screws. Fit pair “A” first, then “B”.
A
B
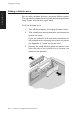
6. There should be three spare power cables coming
from the power supply unit (including the one you
disconnected from the diskette drive at Step 3). The
cable with the largest connector is the hard disk drive
power cable; connect it to the rear of the hard disk
drive. The connector will only fit in one orientation.
7. Attach the signal cable to the rear of the hard disk
drive. It’s easier to attach the power and signal cables
now, rather than later when the drive is in place.
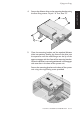
8. Coax the mounting bracket and attached drives back into
position and secure the bracket to the base of the system
unit using the screw you removed at Step 4.
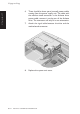
9. Attach the hard disk drive’s signal cable to the
motherboard.
10. Re-attach the diskette drive’s signal and power cables.
Check your installation against the following
illustration.