
Technical information

LS PRO OWNER'S HANDBOOK 9/9
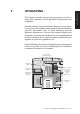
Upgrading
Chapter 9
See Appendix A, “Inside the System Unit”, for more
information about locating and adjusting motherboard
jumper settings.
6. Replace the system unit cover.
Adding an external cache
An external cache is an area of dedicated memory with significantly
faster access times than the computer’s main random-access
memory (RAM). A cache controller ensures that the cache
contains copies of the most recently accessed areas of RAM, so
that the processor is able to read it much more quickly.
An external cache is sometimes called a second-level cache,
to distinguish it from the first-level cache contained within the
processor itself.
The addition of a 256 Kbyte external cache can significantly
improve the performance of your computer.
To fit the external cache:
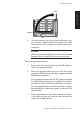
1. Turn off the computer and unplug all power cords.
2. Take suitable anti-static precautions and remove the
system unit cover.
If you are unfamiliar with anti-static precautions or
the procedure for removing the system unit cover,
see Appendix A, “Inside the System Unit”.
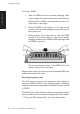
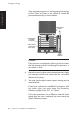
3. Use the illustration at the start of this chapter to
locate the cache socket.
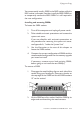
4. Take the cache upgrade out of its anti-static packaging.
Hold it by its edges and avoid touching the metal contacts.
Notice that the cache upgrade is not symmetrical;
there is a small notch in one edge.
5. Insert the cache upgrade into its socket with the
notched edge towards the rear of the system unit.
Keep the upgrade level as you insert it.
6. Replace the system unit cover.