
Technical information

9/6 LS PRO OWNER'S HANDBOOK
Upgrading
Chapter 9
Removing and fitting a processor
To remove the existing processor:
1. Turn off the computer and unplug all power cords.
2. Take suitable anti-static precautions and remove the
system unit cover.
If you are unfamiliar with anti-static precautions or
the procedure for removing the system unit cover,
see Appendix A, “Inside the System Unit”.
3. If the computer was turned on prior to commencing
this procedure, wait for at least 15 minutes for the
processor to cool down before proceeding.
Warning
The processor can get very hot. You may burn your fingers
if you attempt to remove the processor before it has cooled
down. Also, the processor’s pins expand slightly when hot
and this can prevent it being removed from the socket.
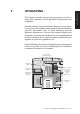
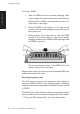
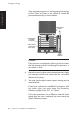
4. Use the illustration at the start of this chapter to
locate the ZIF processor socket.
A lever attached to the socket secures the processor
in the socket.
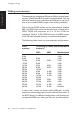
5. Lift the lever from the locked position until it is upright
(at right-angles to the motherboard). The first and last
15
o
of movement may require significant effort. Apply
just enough pressure to overcome the resistance
offered by the lever.