
Technical information

9/4 LS PRO OWNER'S HANDBOOK
Upgrading
Chapter 9
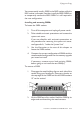
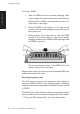
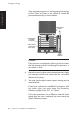
To install a SIMM:
1. Take the SIMM out of its anti-static packaging. Hold
it by its edges and avoid touching the metal contacts.
Notice that the SIMM is not symmetrical; there is a
small notch in one edge.
2. Place the SIMM in the socket at a 15
o
angle to the
vertical, with the notched edge towards the rear of
the system unit.
3. Pushing gently on its top corners, lean the SIMM
upright in the socket until the pegs of the socket
engage the holes on the SIMM and the metal clips hold
the SIMM in position.
Do not use excessive force. If the SIMM will not fit
easily, remove it and start again.
Repeat these steps if you want to install a second SIMM, then
replace the system unit cover.
Reconfiguring the system
The first time you turn on the computer after adding or
removing SIMMs a POST error message appears, indicating
that the amount of memory does not match the value stored
in CMOS.
The BIOS Setup utility will be invoked automatically to allow
you to confirm the new memory configuration. See Chapter
3, “Using the BIOS Setup utility”, for more information.