
Technical information

LS PRO OWNER'S HANDBOOK 9/3
Upgrading
Chapter 9
You cannot easily install a SIMM in the MM2 socket while the
MM1 socket is occupied. So either install the MM2 SIMM first,
or temporarily remove the MM1 SIMM if it is still required in
the new configuration.
Installing and removing SIMMs
To locate the SIMM sockets:
1. Turn off the computer and unplug all power cords.
2. Take suitable anti-static precautions and remove the
system unit cover.
If you are unfamiliar with anti-static precautions or
the procedure for removing the system unit cover,
see Appendix A, “Inside the System Unit”.
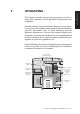
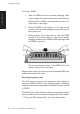
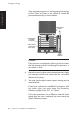
3. Use the illustration at the start of this chapter to
locate the SIMM sockets.
4. Compare the current configuration of SIMMs with the
recommended configuration for the memory upgrade
you intend to install.
If necessary, remove one or both existing SIMMs,
before going on to install the new SIMM(s).
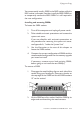
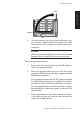
To remove a SIMM:
1. Disengage the metal holding clips on each side of the
socket using your forefingers. Place your thumbs on
the top edge of the SIMM and tilt the SIMM to about
15
o
to the vertical.
2. Lift the SIMM out of its socket. Hold the SIMM by its
edges and avoid touching the metal contacts.