
Installation Instructions


Instructions LR-911, Part 2 14 September 2005 Page 5 of 8
3. Wiring the Reader
Cable between the LR-911 reader and the controller panel should be –
• 6 conductors
• 22 gauge
(18 gauge is OK)
• Stranded wire
• Not twisted-pair *
• Color-coded insulation
• Overall 100% shielded
• High quality
• Maximum length – 500 ft
* If the cable is twisted pair, combine ground (black wire) with one data line (green or white wire) in one twisted pair, and
combine DC power (red wire) with the other data line in a second twisted pair. This prevents crosstalk on the data lines.
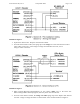
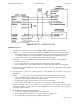
Æ See the wiring diagram, Figure 2, and notes (on page 8).
4. Aiming the Reader
This step should be taken before the tags are installed on the vehicles. Use the SP-6820-LR test unit and
the GMWS windshield tag mounted on glass (parts of the LRIN installation kit) and the wiring diagram.
The reader does not have to be interfaced with the host system (but they may be connected). Use the DC
power module from the LRIN installation kit only if the independent DC power supply is not yet connected.
Æ See the wiring diagram, Figure 1, and notes (on page 7).
Procedure:
a. With no vehicle present, hold the GMWS or MT tag in the approximate location of tags after
they are finally attached to the vehicles. For best read range, see Section B.5, Holding the Tag.
b. With the tag held as described above, adjust the pan and tilt angles of the reader until
the SP-6820-LR test unit indicates most robust reading. (Occasional reads will be missed normally
because of the frequency-hopping feature of the LR-911 reader.)
c. Map the extent of the reader’s surveillance zone by moving the tag side-to-side slowly through
the zone and along the axis from the reader’s front face.
5. Installing Tags
WS tags: Follow instructions in “Vehicle Mounting Recommendations for Windshield Tag (WS)”.
• To identify a good location for a WS tag, it may be pressed by hand, with the peelable label still
on the tag, against the inside of the windshield close to the reader. The tag may be secured temporarily
by masking tape or electrical tape. Try the tag in both “portrait” and “landscape” orientation.
• WS tags must be firmly attached on the inside of vehicle windshield glass to assure rated read range.
Expose the tag’s adhesive by peeling off the unprinted label from one side of the tag.
Then press the edges of the tag (not the center) firmly by the fingers against the windshield glass.
• Do not put the tag in a pouch, or attach it by tape, or hold it by hand, or place it on the dashboard.
Do not attempt to move the tag from one vehicle to another. It is designed for a single installation.
• Caution: Any metal content in or on the windshield where the WS tag is attached can severely limit the
read range. Find the location on the windshield where the tag performs best. Then re-aim the reader.
MT tags: Follow instructions in “Vehicle Mounting Recommendations for Metal Mount (MT) Tags”.
• MT tags offer flexibility in use. They may be attached to a flat surface outside a vehicle, trailer,
container or pallet, or set on a dashboard, or held by the fingers. Try the tag in both “portrait” and
“landscape” orientation.
• MT tags may be attached by spreading a thin layer of silicone adhesive behind the adhesive on the back
of the tag, and pressing it on the surface, or by screwing the ends of the tag to the surface using
non-metallic screws.