
User`s guide


17
Once the dive is underway, you can navigate to any of the specific target locations that are
included in the destination file that was selected at the beginning of the dive. You can choose a
target to navigate to by following the steps below:
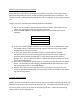
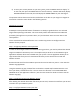
1. On the HOME SCREEN, press the DOWN switch two times to display the NAVIGATE TO
screen:
Navigate To:
Cancel
2. To cancel the NAVIGATE TO function, just press the ENTER switch. This will cancel this
function and will cause the software to return to the HOME SCREEN.
3. Otherwise, to select a specific target for navigation, press the LEFT/RIGHT switch to
scroll through the list of targets in the list.
4. Once the correct target is found and displayed on the LCD, press the ENTER switch. The
software will then return to the HOME SCREEN.
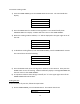
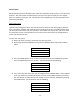
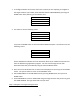
Step 5 : Navigating to the target
Now that you have selected a target and the navigation process has started, the HOME SCREEN
will look similar to the following:
N 44 32.7892
W093 22.9872 5
Heading:178.23
Target@ 190.45 178ft
The fourth line on the LCD displays the information necessary for navigating to the target.
There are two important pieces of information on this line:
The TARGET HEADING (indicated by the first set of numbers)
And the DISTANCE TO TARGET (indicated by the numbers to the far right on the LCD’s
4
th
line)
To navigate to the selected target, change your swimming direction and line up the current
heading (shown on line 3 of the LCD) with the target heading (shown on line 4) and maintain
that swimming course. As you move towards the target location, the DISTANCE TO TARGET
(measured in feet) will continue to show the distance remaining until the target is reached.