
User`s guide


10
9) Since this is the first dive of the day, you can simply press the ENTER switch. If this
happened to be your second or third dive of the day, you can use the RIGHT switch to
increment the dive number to reflect the correct number for your next dive, followed by
pressing the ENTER switch. You should then see the following:
Save Entry?
N
10) Since saving your entry position is considered an advanced function, we will skip it here
and cover it later. For now, just press the ENTER switch. You should then something
similar to the following:
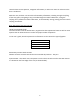
N 44 56.344
W092 16.987 5
Heading:125.3876
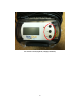
This is called the HOME SCREEN and is the primary view that you will have when using
NavDIve underwater. It displays the current latitude and longitude coordinates as well
as your current heading as you begin your dive. The single digit on the far right of the
second line on the display represents the battery condition (5-full to 1 – discharged).
This allows you to determine if your batteries have enough power to conduct a dive. It
is advisable to always have at least a “3” indicated before starting a dive to insure
enough power to conduct a dive.
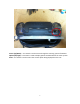
11) You are all set to start. Pay out some cable as needed and observe the console unit. You
will see the lat/long position and heading change as you swim, reflecting your current
position as you move underwater.
12) As you conduct your dive, pay attention to the NavDive cable. You will want to make
sure that you pay out cable as you move deeper and take up the cable on the reel as you
move from deeper depths to shallower depths. This will keep the cable for getting
tangled or hung up on the bottom. It will also improve your GPS position accuracy by
keeping the GPS receiver on your flag float as close to directly overhead as possible.