Diver Navigation System User’s Guide 1
Copyright 2014 Applied Logic Engineering, Inc. All rights reserved. Statement of Liability Our products and services are provided "as is" without warranty of any kind, either expressed or implied unless otherwise stated. In no event shall Applied Logic Engineering, Inc. be liable for any damages including, but not limited to, direct, indirect, special, incidental or consequential damages or other losses arising out of the use of or inability to use our products and services.
Table of Contents Introduction to NavDive……………………………………………………………………………………………………….. 3 Description of the System GPS Receiver…………………………………………………………………………………………………………….. 5 Diver Console Basic Overview……………………………………………………………………………………………… 5 Liquid Crystal Display (LCD)…………………………………………………………………………… 6 Operational controls……………………………………………………………………………………… 6 Starting Out – Using NavDive for the first time Using NavDive while conducting a dive……………………………………………………………………..
Introduction to NavDive Congratulations on your purchase of NavDive! You will find that NavDive is a useful tool that is fun to use, extending your ability to capture important data regarding your diving experience and use that data to map important dive locations. NavDive was designed and developed by divers for divers.
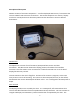
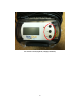
Description of the System NavDive consists of two main components -- a surface deployed GPS receiver / transmitter that receives a GPS fix and transmits it to the diver. The second component is a receiver / display unit that is used by the diver to determine position and to determine a course to desired destinations. GPS Receiver The topside unit consists of a self-contained, waterproof GPS receiver and data transmitter. The GPS receiver obtains the lat/long postion information from satellites overhead.
console shows current position, navigation information, or other unit status in real time as the dive is conducted. With this unit, the diver can control the functionality of NavDive, including saving the lat/long of the entry point, navigating to any pre-loaded target site while underwater, saving the lat/long of any notable site while underwater, or automatically storing (tracing) the entire dive's lat/long coordinates.
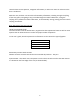
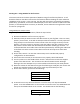
Location of Power switch Cursor (Up/Down) -- this switch is used to move through the menuing system of NavDive Option (left/right) – this switch is used to display options available within the menu system Enter – this switch is used to select the current option being displayed on the LCD 7
User interface controls (Up/Down, Left/Right, and ENTER) 8
Starting Out – Using NavDive for the first time This section will cover the basic operation of NavDive using a few of the key features. It will detail the features most divers will use the first few dives before detailing the more advanced capabilities of the system.
9) Since this is the first dive of the day, you can simply press the ENTER switch. If this happened to be your second or third dive of the day, you can use the RIGHT switch to increment the dive number to reflect the correct number for your next dive, followed by pressing the ENTER switch. You should then see the following: Save Entry? N 10) Since saving your entry position is considered an advanced function, we will skip it here and cover it later. For now, just press the ENTER switch.
Saving an underwater position to memory One of the most useful features of NavDive is the ability to save your current GPS position (latitude and longitude) whenever you find something underwater that is noteworthy. This could be a wreck, a training platform, geologic feature, or maybe just an interesting part of the reef. To save your current position with NavDive, follow the steps below: 1) Get as close as possible to the item/area you want to capture.
To activate tracking mode: 1) From the HOME SCREEN, press the DOWN switch three times. The LCD should then display: Track Position? Y 2) Press the ENTER switch to enable the tracing feature. The LCD will briefly show TRACKING ON on the display. NavDive will then return to the HOME SCREEN. 3) When the tracking mode is enabled, a “T” will be displayed in the upper right corner of the LCD: N 44 56.344 W092 16.987 Heading: 125.
Y 2) Press the ENTER switch to end the dive. NavDive when then display the Main Menu screen. 3) To cancel the END DIVE function, press the RIGHT switch to display N on the LCD. Then press the ENTER switch. NavDive will not terminate the dive and will then display the HOME SCREEN to resume the dive.
Advanced Use While the basic functions of NavDive are useful, the real power of the system is in its advanced features. The next section will detail how to save your entry point so that you can navigate back to it and the end of your dive. We also will cover navigating to any stored position while operating underwater. Saving Entry Point Typically when diving from shore, the diver will want to return to the same position after the dive is complete.
5) To save your current position as your entry point, press the RIGHT switch to display “Y” on the LCD, then press the ENTER switch to save to memory. NavDive will briefly display POSITION SAVED on the LCD, then will display the HOME SCREEN as your dive begins. The position that has been saved can be recalled later in the dive as your target to navigate to. This will be covered in more detail in the following section.
1. To configure NavDive at the start of the dive in which you are expecting to navigate to the target locations you loaded, select PRE DIVE from the MAIN MENU by pressing the ENTER switch after powering on the NavDive unit. Main Menu > 1 Pre Dive 2 Start Dive 3 Post Dive 2. You will then see the following menu: Pre Dive > 1 Select DestFile 2 3 Main Menu Just press the ENTER switch to select the SELECT DESTFILE option.
Once the dive is underway, you can navigate to any of the specific target locations that are included in the destination file that was selected at the beginning of the dive. You can choose a target to navigate to by following the steps below: 1. On the HOME SCREEN, press the DOWN switch two times to display the NAVIGATE TO screen: Navigate To: Cancel 2. To cancel the NAVIGATE TO function, just press the ENTER switch. This will cancel this function and will cause the software to return to the HOME SCREEN.
Maintain your heading by matching the current heading to the target heading to reach your target. Canceling the navigation function You can cancel an active navigation session by following these steps: 1) On the HOME SCREEN, press the DOWN switch twice to display the NAVIGATE TO: screen 2) On the NAVIGATE TO: screen, just press the ENTER switch when CANCEL is displayed: Navigate To: Cancel 3) The software will then cancel the navigation session and will return to the HOME SCREEN.
Working with NavDive data All data collected during your dive is stored on a removable SD memory card so that it can be easily transferred to a PC for storage and/or analysis. Location of SD memory card Using the NavDive Log PC Application The NavDive system includes a PC software application that allows the user to load the NavDive console with useful information before the dive and download valuable dive information from the console unit after the dive.
C:\NavDive \Destinations \SavedPaths \Saved Positions Descriptions.txt [You may also copy the files into these folders from the SD Card as the start to your library] With the setup above completed and the SD card inserted into the PC, start the NavDive Log application. The software application is organized into two sections – Pre Dive and Post Dive.
Once you have properly configured the SD Card for use, you can close the NavDive Log application, remove the SD Card from your PC, and insert it into the memory card slot in your NavDive unit. You are now ready to dive. Post Dive After the dive, remove the SD Card from the NavDive console and insert it into your PC to: View / Edit Positions by Location – Using this option, you can review all waypoints contained in a particular location fie.
View Saved Positions by Dive – select this option to review the saved positions you created for each dive made. You can view the information in a table form or it can be viewed graphically using Google Earth.
Any of the items from a particular dive can also be individually selected and saved to any location file for future dives. Click on the selector column in the data grid to select a particular record. Then click on the COPY TO LOCATION button. You will then be asked to select a location file in which to save the record in. Choose the correct filename and click OK to copy the selected record from the data grid to the location file. The record will be appended to the end of the location file’s content.
View Position Tracking by Dive – choose this option to review your saved dive tracking file for any dive. This information can be displayed in a table format or can be viewed in Google Earth to allow you to see the exact path you swam during your dive. If viewed in the table, NavDive Log will show each position saved during the dive. Each position is recorded every 10 seconds while the tracking feature was enabled in the NavDive console.
Appendix A : File Format NavDive stores its files in a particular format on the SD memory card. This next section describes the file structure and each particular file format. This information is not necessary to operate NavDIve – it is being provided for users that want to use the data created by NavDIve for other purposes.
Record format – DDMMYY, HHMMSS,Desc,N or S, Lat coords, E or W, Long coords Example : 040913,025111.000,Plane,N,4507.5022,W,09326.7368 File structure for Descriptions.txt file Filename : MUST be Descriptions.