
System information


20 Chapter 2
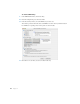
To format and mount an array on the host system:
1 Restart the host system.
In some instances, restarting the host system may not be necessary, but if you are creating or
adding arrays, you generally must restart before the arrays are visible in Disk Utility.
2 Open Disk Utility on the host system.
3 Select the array in the list at the left side of the window.
4 Click the Erase tab.
5 Choose a format for the array from the Volume Format pop-up menu.
Note: You can take advantage of disk journaling by using the journaled volume format.
Journaling is a technique that helps protect the integrity of HFS+ disks in RAID arrays. It
both prevents a disk from getting into an inconsistent state and expedites disk repair if the
system fails. Performance diminishes slightly when journaling is on.
When you enable journaling on an array, a continuous record of changes to files on the disks
in the array is maintained in the journal. If your system stops running because of a power
failure or some other problem, when you restart the system the journal is used to restore the
array to a known good state. Although you may experience loss of user data that was
buffered at the time of the failure, the file system is returned to a consistent state. In
addition, restarting the system is much faster.
If you are using Mac OS X Server, you can also turn journaling on or off for an array at any
time in the Information section of Disk Utility.
6 Type a name for the array.