Power Mac G5 User’s Guide Includes setup, expansion, and troubleshooting information for your Power Mac G5 computer
Apple Computer, Inc. © 2004 Apple Computer, Inc. All rights reserved. Finder, the FireWire logo, iDVD, iPhoto, iPod, Safari, and SuperDrive are trademarks of Apple Computer, Inc. Under the copyright laws, this manual may not be copied, in whole or in part, without the written consent of Apple. AppleCare is a service mark of Apple Computer, Inc., registered in the U.S. and other countries. The Apple logo is a trademark of Apple Computer, Inc., registered in the U.S. and other countries.
1 Contents Chapter 1 5 5 6 10 10 10 11 12 14 16 18 Setting Up Positioning the Computer and Display Plugging In the Computer Using a Wireless Keyboard and Mouse Need Help? Adjusting Your Display What’s Next? What to Do When You Have Finished Working Getting to Know Your Computer Ports and Connectors—Expanding Your Computer’s Capabilities Inside Your Power Mac G5—Your Computer’s Internal Expansion Options Chapter 2 21 22 23 23 24 25 27 29 30 32 34 34 36 38 38 Using Your Computer Using Your Apple Keyboa
66 67 Installing an AirPort Extreme Card Replacing the Battery Chapter 4 69 71 72 73 74 75 75 Troubleshooting Software Problems Problems With Your Display Using Apple Hardware Test Installing Software on Your Computer Maximizing Ethernet Performance Locating Your Product Serial Number Appendix A 77 Specifications Appendix B 83 83 85 86 Safety, Maintenance, and Ergonomics Important Safety Information General Maintenance Important Ergonomic and Health-Related Information Appendix C 89 91 92 92 94
1 Setting Up 1 Congratulations on purchasing your new high performance Power Mac G5 computer. This chapter contains instructions for setting up your computer and display. Your Power Mac G5 features the latest computer technology, including an advanced 64-bit processor, high-speed memory, an AGP 8X Pro graphics card for stunning visuals, and Serial ATA internal storage, all in an anodized aluminum chassis with easy access to internal components.
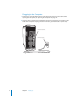
Plugging In the Computer 1 Remove any protective film from the inside of the side panel. For instructions about opening the side panel, see “Opening the Computer” on page 42. 2 Plug the power cord firmly and completely into the recessed power cord socket on the back of the computer and plug the other end into a grounded outlet or power strip.
3 Connect your display cables according to the following illustration: Important: Depending on your display, you may have one or more cables to connect. Check the instructions that came with the display for further setup information.
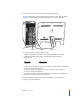
4 To access the Internet or a network, connect your computer to a DSL or cable modem, connect your modem to an analog phone line, or connect to an Ethernet network.
5 Connect the keyboard cable to one of the USB ports ( ) on the computer or on your display. Plug the mouse cable into a USB port on the keyboard. Plug the mouse into either USB port located on the back of the keyboard. Keyboard You may see several strips of clear plastic film on the inside of the side panel (used to protect the side panel during shipment). Open the side panel and remove the film.
Using a Wireless Keyboard and Mouse If you purchased an Apple Wireless Keyboard and Apple Wireless Mouse with your Power Mac G5, see the instructions that came with the keyboard and mouse to set them up with your computer.
What’s Next? You’ve done everything you need to get your Power Mac G5 up and running. The first time you turn on your computer, the Setup Assistant starts. The Setup Assistant helps you enter your Internet and email information and set up an account on your computer. If you already have another Mac, the Setup Assistant can also help you transfer files, applications, and other information from your old Mac to your new Power Mac G5.
What to Do When You Have Finished Working When you have finished working with your Power Mac G5, you can put your computer to sleep or shut it down. Putting Your Power Mac G5 to Sleep If you will be away from your Power Mac G5 for only a short time, put the computer to sleep. When the computer is in sleep, the display’s screen is dark. You can quickly wake the computer from sleep and bypass the startup process. To put the computer to sleep quickly, do one of the following: • Choose Apple (K) > Sleep.
Shutting Down Your Power Mac G5 If you will not use your Power Mac G5 for a day or two, you should turn it off. m To turn off your computer: Choose Apple (K) > Shut Down. Warning: Do not turn off the computer by turning off the switch on a power strip or by pulling the computer’s power plug (unless you can’t turn off the computer any other way). Your files or system software could be damaged if your computer is not shut down properly. Warning: Shut down your Power Mac G5 before moving it.
Getting to Know Your Computer Optical drive Status light f Headphone jack ® Power button FireWire 400 port 14 Chapter 1 Setting Up USB 2.
Optical drive Your computer has a Combo drive (DVD-ROM/CD-RW) or a SuperDrive (DVD-R/CD-RW). Both drives can read DVD discs, DVD movies, CD-ROM discs, photo CDs, music CDs, standard audio discs, and other kinds of media. Both drives can write music, documents, and other digital files to blank CD-R and CD-RW discs. The SuperDrive can also write on blank DVD-R discs. To open the optical drive, press the Media Eject ( ) key on your Apple Keyboard.
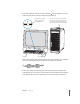
Ports and Connectors—Expanding Your Computer’s Capabilities Latch Access covers for PCI expansion slots DVI display port ADC display port AirPort antenna port Optical digital audio out port Bluetooth antenna port Optical digital audio in port USB 2.
s Ç Latch Lift the latch to open the side panel and access the internal components in your Power Mac G5. You can also attach a security lock to the latch to secure the internal components. DVI display port Connect displays that use a Digital Visual Interface (DVI) connector. You can also connect displays that use a video graphics connector (VGA) with the DVI to VGA adapter that came with your computer.
Inside Your Power Mac G5—Your Computer’s Internal Expansion Options Optical drive Top hard disk drive bay Battery Bottom hard disk drive bay AirPort Extreme Card connector Slots 2–4: PCI or PCI-X slots (depending on model) DDR SDRAM slots (either 4 or 8 slots, depending on model) 18 Slot 1: AGP 8X Pro slot (graphics card installed) Chapter 1 Setting Up
Optical drive Your computer comes with either a Combo drive (DVD-ROM/CD-RW) or a SuperDrive (DVD-R/ CD-RW). For information about the optical drive, see “Using Your Optical Drive” on page 32. Battery Your computer uses a battery that you rarely need to replace. If your computer has trouble starting up, or the system date and time are frequently incorrect, you may need to replace the battery. For more information, see “Replacing the Battery” on page 67.
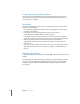
Additional Information If you would like additional information, see the following: To learn about... See... Shutting down your computer or putting it to sleep “What to Do When You Have Finished Working” on page 12. Using a specific hardware feature of your Power Mac G5 Chapter 2, “Using Your Computer,” on page 21. Installing additional drives, memory, and cards, or changing the battery Chapter 3, “Working Inside Your Computer,” on page 41.
2 Using Your Computer 2 This chapter provides instructions for using the important features of your Power Mac G5 computer, including your keyboard, mouse, FireWire, USB, audio, Bluetooth wireless technology, and networking.
Using Your Apple Keyboard Your Apple Keyboard comes with function keys preset for common tasks. Press the Media Eject ( ) key to eject discs from the optical drive. Press the Volume Up or Volume Down keys to adjust the sound level or press the Mute key to turn sound on or off. Use the Brightness Up and Brightness Down keys to adjust the level of brightness on an Apple display.
Using Your Apple Mouse Your Apple Mouse uses optical tracking. To position the pointer using your mouse, move the mouse over any suitable surface such as your desktop, mouse pad, or other textured surface. (Some smooth, glassy surfaces provide less pointer control than others.) To click an object, press down once on the mouse body until you feel a click. To double-click an item, press down twice in quick succession.
For More Information on Displays For information about connecting your display, see the setup instructions in Chapter 1, “Setting Up.” Additional information on using and configuring an external display is available in Mac OS Help. Choose Help > Mac Help and search for “display.” Connecting a Television, VCR, or Other Video Device You can connect your Power Mac G5 to a television, VCR, projector, or other external video device using the DVI to Video adapter, designed for use with the Power Mac G5.
Using Universal Serial Bus (USB) Your Power Mac G5 comes with three USB 2.0 ports; one on the front and two on the back. Your Apple Keyboard also has two USB 1.1 ports. You can use your USB ports to connect many types of external devices, including printers, scanners, digital cameras, microphones, game pads, joysticks, keyboards, mice, and storage devices. USB makes it easy to connect external equipment. In most cases, you can connect and disconnect a USB device while the computer is running.
Connecting Multiple USB Devices If you want to connect more than three USB devices, you can purchase a USB hub. The USB hub connects to an open port on your computer and provides additional USB ports (usually four or seven). Note: To use certain USB devices, you may need a powered USB hub. USB hub For More Information on USB Additional information on USB is available in Mac OS Help. Choose Help > Mac Help and search for “USB.” You can also find information on the Apple USB website at www.apple.com/usb.
Using FireWire FireWire is a high-speed data transfer system that lets you easily connect and disconnect external devices—such as iPod devices, digital video (DV) cameras, printers, scanners, and hard disk drives. You can connect and disconnect FireWire devices without restarting your computer. Your computer includes three external FireWire ports. • Two FireWire 400 ports, one on the front and one on the back, support a maximum data rate of up to 400 megabits per second (Mbps).
Using FireWire Devices With FireWire you can: • Connect a FireWire digital videocamera and capture or transfer high-quality video directly to or from your computer. Then use video-editing software such as iMovie to edit the video. • Connect an external FireWire hard disk drive to back up data or transfer files. A disk drive with the FireWire icon appears on your desktop after you connect the hard disk drive to your Power Mac G5.
3 Start up your Power Mac G5 and immediately hold down the T key. Your Power Mac G5 display shows the FireWire disk mode indicator, and the Power Mac G5 internal hard disk icon appears on the other computer’s desktop. 4 When you have finished transferring files, drag the Power Mac G5 hard disk icon to the Trash on the other computer to unmount the drive. 5 Press the power button on the Power Mac G5 to shut it down, and then disconnect the FireWire cable.
Headphone Jack You can plug headphones into the computer’s headphone jack. When a plug is inserted into this jack, your internal, built-in speaker is muted. Important: Do not plug line-out devices into the headphone jack. Use the analog lineout port on the back instead. Analog Audio Ports You can connect external microphones or other audio equipment to the analog mini jacks on the back of the computer for line in and line out.
Here are just a few of the things you can do with Bluetooth wireless technology: • Use an Apple Wireless Keyboard or Apple Wireless Mouse with your Power Mac G5. • Communicate with your handheld PDA. Perform a HotSync operation without cables or send your business card or calendar events directly to a colleague’s PDA. • Use your Power Mac G5 to communicate with a Bluetooth technology mobile phone. Use iSync to keep your phone updated with the contact information from Address Book on your Macintosh.
Using Your Optical Drive You can install or use software from CDs or DVDs using your optical drive. You can play multimedia on CD discs and music from audio CDs, and write music, documents, and other digital files to CD-R and CD-RW discs. You can also play DVD movies and use most DVD discs. If your computer came with a SuperDrive, you can record information to blank DVD-R (recordable DVD) discs.
To record music on a CD-R disc from your iTunes library: 1 Open iTunes (click its icon in the Dock). 2 Select the playlist you want to record. 3 Insert a blank CD-R disc. 4 Click Burn CD at the top of the iTunes window. To record data on a CD-R disc from the Finder: 1 Insert a blank CD-R disc. 2 In the dialog that appears, enter a name for the disc and select the format you want. An icon for the CD appears on the desktop. 3 Double-click the CD icon, then drag files and folders to it.
Using Your Modem Your Macintosh may come with an Apple 56K internal modem installed. To connect the Apple 56K internal modem, plug one end of the modem cord or RJ-11 cable into the modem port on the back of the computer and the other end into a standard RJ-11 telephone wall jack. Modem port icon Modem port Important: Make sure you connect the internal modem to an analog phone line—the kind used typically in homes. The modem will not work with a digital phone line, which may damage the modem.
Connecting to a Twisted-Pair Ethernet Network You can connect directly to a 10/100/1000 twisted-pair Ethernet network. Note: You can also connect your computer to an Ethernet network that uses thin coaxial cables. To do this, you need an RJ-45–to–Thin Coax adapter (available from other manufacturers). See your Apple Authorized Reseller for more information on Ethernet media adapters.
For More Information on Using Ethernet Additional information, including information about setting up an Ethernet network or transferring files using Ethernet, is available in Mac OS Help. Choose Help > Mac Help and search for “Ethernet” or “network.” For more information on networking your Power Mac G5, go to AppleCare Support at www.apple.com/support. For information on networking products you can use with your Power Mac G5, go to the Macintosh Products Guide at www.apple.com/guide.
How AirPort Provides Wireless Internet Access With AirPort, you set up a wireless connection to a device known as a base station, which has a physical connection to the Internet. AirPort technology works like a cordless telephone. The handset of the cordless phone makes a wireless connection to the base, which is connected to the telephone line. Similarly, your computer makes a wireless connection to the base station, which is connected to the telephone line or your Ethernet network.
Putting the Computer to Sleep to Save Energy Power Mac G5 computers are set to go to sleep after a period of inactivity. Sleep is a state in which your computer uses very little power. You can also put the computer to sleep whenever you want to. Note: Power Mac G5 computers are set to sleep automatically within15 minutes of inactivity; however, you can change the automatic sleep settings in System Preferences.
Next, follow these steps on one computer: 1 Choose Go > Connect to Server. 2 Click Local Network. 3 Select the computer you want to access. For more information about configuring Ethernet, search for “Ethernet” in Mac OS Help. If you have an AirPort or Bluetooth wireless network, you can also transfer information between two Macintosh computers. For more information about AirPort or Bluetooth wireless networks, search for “AirPort” or “Bluetooth” in Mac OS Help.
3 Working Inside Your Computer 3 You can customize and expand your Power Mac G5 to fit your needs.
Opening the Computer 1 Before you open your computer, shut it down by choosing Apple (K) > Shut Down. Warning: Always shut down your Power Mac G5 before opening it to avoid damaging its internal components or the components you want to install. Do not open the computer or attempt to install items inside it while it is on. 2 Wait 5 to 10 minutes to allow the computer’s internal components to cool. Warning: After shutting down your computer, the internal components can be very hot.
4 Unplug all the cables and the power cord from the computer. Warning: To avoid damaging its internal components or the components you want to install, always unplug your Power Mac G5. Do not attempt to install items inside the computer while it is plugged in. 5 Hold the side panel and lift the latch on the back of the computer. While holding the side panel, lift the latch.
6 Remove the side panel. Pull the top of the side panel away from the computer, and then lift it up and remove it from the computer. Important: When you remove the side panel, hold it securely.
7 Remove the air deflector and place it on a soft, clean cloth. Important: Always remember to replace the air deflector after you have finished working inside your computer. Your computer will not function properly without the air deflector. Using this finger hold, pull the air deflector away from the computer, and then lift the air deflector up and away from the computer.
8 Pull the front fan assembly by the handle to remove it from the computer. Set it aside. Note: You do not need to remove the front fan assembly to install drives, install PCI and AGP cards, or replace the battery. Pull the fan assembly completely out of the computer.
Installing Memory Depending upon the model, your Power Mac G5 has four or eight dual inline memory module (DIMM) slots for Double-Data-Rate (DDR) synchronous dynamic random-access memory (SDRAM) devices. Your computer comes with a minimum of 256 MB of random access memory (RAM), installed as a pair of 128 MB DIMMs in two of the DIMM slots. You can install additional pairs of DIMMs in the open DIMM slots on your computer’s main logic board.
To install memory: 1 Open your computer and remove the side panel, air deflector, and fan assembly following the directions that begin on page 42. No matter how many SDRAM slots your computer has, the SDRAM DIMMs must be installed in pairs with one DIMM per bank. Install additional DIMMs in these two slots first. DIMMs are already installed in these two slots.
3 Open the ejectors on the DIMM slots by pushing them out to the sides. 4 Placing one hand on the back of the computer for support, align the first DIMM in the slot and push both ends of the DIMM down until the tabs are vertical and the ejectors snap into place. Important: Do not touch the DIMM connectors. Handle the DIMM only by the edges. 5 Align the second DIMM in the opposite slot and push until the ejectors snap into place. DDR SDRAM DIMM (Your DIMM’s shape and components may vary.
6 Replace the front fan assembly by firmly pushing it back into the computer by the handle until it connects. Important: Make sure the fan assembly engages the connector or your computer will not operate properly. Gently pull the fan assembly to see if it is properly connected. If it resists and stays in place, it is connected. Slide the plastic rail on the fan assembly into the cutout in the sheet metal divider inside the computer. The fan assembly needs to engage this connector.
7 Replace the air deflector. Slide the three tabs on the air deflector into the slots in the computer and then push the air deflector closed. Important: Always remember to replace the air deflector. Your computer will not function properly if the air deflector is not in place.
8 Replace the side panel. Important: Always replace the side panel before you start up your computer. Your computer does not function properly if the side panel is not in place. Place the side panel into the slot in the computer and then push the side panel closed.
9 Push the latch down to close and secure the side panel. While pushing the side panel against the computer, push the latch down until it is firmly secured against the back of the computer. To lock the side panel or secure the computer, flip down the lock tab before you close the latch. This provides a metal loop through which you can attach a lock or cable. Important: When you replace the side panel, hold it securely so that it stays in place as you push the latch down.
Installing Internal Storage Devices Your Macintosh has three internal drive bays: one optical drive bay and two hard drive bays. In most configurations, a single hard disk drive occupies the top hard drive bay and an optical drive is located in the front optical drive bay. You can add a Serial ATA disk drive to the empty slot in the hard disk drive bay. The drives must meet these specifications: • Type: Serial ATA • Width: 3.9 inches (102 mm) • Depth: 5.7 inches (147 mm) • Height: 1.
Installing Serial ATA Drives Your Macintosh can accommodate one additional internal 1-inch-high Serial ATA drive in the hard drive bay, for a total of two drives. Your computer comes with one Serial ATA drive installed, and it usually sits in the top hard drive bay. You can install a second Serial ATA drive in the lower hard drive bay. 1 Open your computer and remove the side panel following the directions that begin on page 42.
3 To install an additional drive, slide the drive into the lower drive bay, aligning the drive guides into the bottom track, and gently push the drive until it snaps into place. Engage the drive guides in the bottom track in the lower drive bay and slide the drive in until it snaps into position. Drive guides 4 To replace the drive in the top drive bay, pull the original drive out of the drive bay and drop it down slightly until it clears the drive bay.
5 Pull the appropriate drive bay tab down to secure the drive. 6 Connect the power cable and the Serial ATA data cable to the drive. Secure the drive in position by rotating the drive bay tab to its closed (horizontal) position. Connect the power cable and the data cable to the hard disk drive. 7 Replace the side panel, following the directions that begin on page 52.
Replacing the Optical Drive Your computer comes with an optical drive installed, either a SuperDrive or Combo drive. Follow these instructions to replace the optical drive in the optical drive bay. Important: Contact your drive manufacturer or consult the manufacturer’s website to determine if your drive is set for cable select mode. Before installation, set the drive to cable select if the manufacturer hasn’t already done so.
4 Carefully pull the drive a short distance out of the bay. 5 Disconnect the ribbon cable from the back of the original drive and gently pull the cable through the opening in the sheet metal divider at the back of the optical drive bay. Remove the ribbon cable from the back of the optical drive. Slide the other end of the ribbon cable up through the opening in the sheet metal divider inside the computer. Remove the metal shield from the optical drive.
10 Carefully remove the ribbon cable from the top of the original drive and transfer it to the replacement drive. Important: Reusable adhesive tape on the underside of the ribbon cable attaches the cable to the drive. When removing the cable from the original drive, be careful to keep the tape with the cable. 11 Attach the ribbon cable connector and the power cable to the back of the replacement drive.
13 Slide the drive the rest of the way into the drive bay, aligning the optical drive guide pins in the slots, and gently push the drive into place. 14 The optical drive release levers should close when the drive is installed correctly. If they don’t close, gently push them. Push the optical drive into the computer so that the guide pins on the bottom of the drive engage the four slots inside the computer. Close the optical drive release levers completely when the drive is properly seated.
Installing a PCI Expansion Card or Replacing the AGP Card You can expand the capabilities of your Power Mac G5 by installing cards in its expansion slots. Your Power Mac G5 has four expansion card slots, three of which accommodate Peripheral Component Interconnect (PCI) cards and one that accepts an advanced graphics port (AGP) card. AGP cards and PCI cards have different connectors, so you cannot insert a PCI card into the AGP slot.
To determine whether your computer has PCI or PCI-X slots, read the ID label, which is located on the side of the computer at the bottom under the air deflector. You can also identify your model by the number of DIMM slots. Computers with 4 DIMM slots have 33 MHz PCI slots; computers with 8 DIMM slots have 100 and 133 MHz PCI-X slots. Your computer’s ID label tells you what hardware configuration you have. It is coded and resembles the label shown here.
Installing Your Card You can install an AGP card in slot 1 only. The AGP slot accepts standard AGP cards or AGP Pro cards. Install either PCI or PCI-X cards in the slots labeled PCI 2, 3, and 4. See the table on page 62. 1 Open your computer and remove the side panel and air deflector following the directions on page 42. Warning: To avoid damaging its internal components or the components you want to install, always turn off and then unplug your Power Mac G5. Wait 5 or 10 minutes for it to cool down.
4 Align the card’s connector with the expansion slot and press until the connector is inserted all the way into the slot. If you’re installing a 12-inch card, make sure the card engages the appropriate guide. Reinstall the screw to secure the card in place. Port access opening PCI slot If the PCI card you are installing is full-length (12 inches), make sure it fits in one of these card guides. Press the card gently but firmly until the connector is fully inserted.
Installing an AirPort Extreme Card AirPort offers an affordable and easy way to provide wireless Internet access anywhere in the home, at work, or in the classroom. You can install an AirPort Extreme Card in your Power Mac G5. Important: You must install an AirPort Extreme Card. Older AirPort Cards will not work in the Power Mac G5. 1 Open your computer following the directions on page 42.
4 Replace the front fan assembly, air deflector, and side panel, following the directions that begin on page 50. 5 Attach the AirPort Extreme antenna to the AirPort antenna port ( To adjust reception, you can rotate the antenna. ) on the back panel. Install the AirPort antenna into the AirPort antenna port. You can rotate the antenna through a full 360°. Warning: The FCC Rules require that the operator or a nearby person be more than 1 centimeter (0.
To replace the battery: 1 Open your computer following the directions on page 42. Remove the battery by pulling it out of its holder. You may need to spread the two tabs to release the battery. 2 If a PCI card is installed next to the battery, remove the card. 3 Remove the battery from its holder, noting the orientation of the battery’s positive end. (A plus sign is marked on or near the battery holder.) If necessary, spread the tabs holding the battery so you can remove it.
4 Troubleshooting 4 If you have a problem while working with your computer, here are some things you can try right away. The computer won’t respond or the pointer won’t move. First, make sure the mouse and keyboard are connected. • Unplug and then plug in the connectors and make sure they are firmly seated. Then try to cancel what the computer is doing. • Press the Command (x) and Q keys at the same time to try to quit the current application. • Press the Command (x) and period keys at the same time.
The computer won’t turn on or start up. First, make sure the power cord is connected to a working power source. The plug on the power cord must be completely inserted into the computer’s power socket and firmly seated for your computer to operate correctly. Next reset the computer’s parameter random-access memory (PRAM). Turn on the computer and immediately hold down the Command (x), Option, P, and R keys until you hear the startup sound a second time. Then set your hard disk as the computer’s startup disk.
Software Problems Important: To use Mac OS 9 applications with your computer, you must install Classic support (see “Installing Classic Support and Other Applications” on page 75). To start the Classic environment, open a Mac OS 9 application or double-click a document that requires a Mac OS 9 application. Classic works in the background to access Mac OS 9 features and software applications. You have a problem with a software program.
Problems With Your Display Warning: If you have a problem with your Apple display and nothing presented in this manual solves it, contact an Apple Authorized Service Provider or Apple for assistance. If you attempt to repair the display yourself, any damage you may cause to the display will not be covered by the limited warranty on your display. Contact an Apple Authorized Reseller or Service Provider for additional information about this or any other warranty question. No image appears on the screen.
The screen freezes. • Force the application that has frozen to quit. Choose Apple (K) > Force Quit and select the application. • If that doesn’t work, force the computer to restart by pressing the power button on the front of your computer for approximately 5 seconds. The light on the front of the display is flashing. On some Apple flat-panel displays, the power light displays a series of short flashes when an error has been detected.
Installing Software on Your Computer Use the software install discs that came with your computer to install Mac OS X, the applications that came with your computer, and Classic Support. Important: Apple recommends that you back up the data on your hard disk before restoring software. Apple is not responsible for any lost data. Installing Mac OS X and Applications To install Mac OS X and the applications that came with your computer, follow these steps: 1 Back up your essential files, if possible.
Installing Classic Support and Other Applications Use the “Additional Software & Apple Hardware Test” to install Classic support and additional applications that were not included on Mac OS X install disc 1. Install Classic support if you want to use Mac OS 9 applications with your computer. Follow these steps to install Classic support or the additional bundled applications: 1 Back up your essential files, if possible.
Specifications A Appendix A Processor and Memory Specifications Processor • PowerPC processor with 512 kilobytes (KB) of on-chip L2 cache per processor Random-access memory (RAM) • Double-Data-Rate (DDR) synchronous dynamic random-access memory (SDRAM) • All DDR SDRAM supplied in removable dual inline memory modules (DIMMs) • DIMMs installed in pairs of equal size • Four or eight DIMM slots available for 400 MHz, PC 3200 DDR SDRAM, depending on your computer model 256 MB DIMMs must have 128 or 256 megab
Combo Drive (DVD-ROM/CD-RW) Specifications • Disc diameters supported: 12 cm and 8 cm Data formats • CD-ROM • CD-Audio • CD-R • CD-RW • CD-I • CD-I Bridge • CD Extended • CD Mixed Mode • Photo CD • Video CD • Enhanced CD • DVD-Video • DVD-ROM • DVD-R (read only) SuperDrive (DVD-R/CD-RW) Specifications • Disc diameters supported: 12 cm and 8 cm Data formats • CD-ROM • CD-Audio • CD-R • CD-RW • CD-I • CD-I Bridge • CD Extended • CD Mixed Mode • Photo CD • Video CD • Enhanced CD • DVD-Video • DVD-ROM • DVD-
USB Specifications • Support for Universal Serial Bus (USB) 2.0 and 1.1 • Five external USB Type A ports • One USB 2.0 port on the front • Two USB 2.0 ports on the back • Two USB 1.1 ports on the Apple Keyboard • Each rear port is on a separate 480 megabit-per-second (Mbps) USB channel • 500 milliamperes (mA) at 5 V are available for each USB 2.0 port, for a total of 1.
AirPort Extreme Card (Optional) Specifications • • • • Wireless data rate: Up to 54 Mbps Range: Up to 150 feet (data rates may vary depending on environmental conditions) Frequency band: 2.4 gigahertz (GHz) Radio output power: 15 dBm (nominal) Compatibility • 802.11 Direct Sequence Spread Spectrum (DSSS) 1 and 2 Mbps standard • 802.11b 11Mbps standard • 802.
Analog Audio Specifications • • • • Sample rate: 32 kHz, 44.1 kHz or 48 kHz Jack type: 1/8” mini Bits per sample: 16-bit or 24-bit Frequency response: 20 Hz to -20 kHz, +0.5 dB/-3 dB Sound out using the headphone jack • Output voltage: 1.4 volts (root mean square) (Vrms) (+4 dbu) • Output impedance: 24 ohms • Output power: 20 milliwatts (mW) • Signal-to-noise ratio: Greater than 90 dB • Total harmonic distortion: Less than -80 dB (0.
Power Requirements for Devices You Can Connect Expansion cards • Combined maximum power consumption by the AGP and PCI cards is 90 W. USB devices • Each of the computer’s built-in USB ports is allotted 500 mA. FireWire devices • The computer can provide up to 15 W total to the FireWire ports. System Clock and Battery • CMOS custom circuitry with long-life lithium battery.
Safety, Maintenance, and Ergonomics B Appendix B This appendix provides important information about safety procedures, routine maintenance, and ergonomic considerations for using your computer and display. Important Safety Information The only way to disconnect power completely from your computer is to unplug the power cord from the main power supply. To disconnect your display completely, you must also unplug its power cable from the computer or power outlet.
To prevent accidents and damage to your computer or display, be sure that you always follow these instructions: • Keep your computer and display away from sources of liquids and moisture. • Don’t set anything on top of the computer or display. • Keep the computer and display vents free from obstruction. • Never remove the case from the display or open your computer when it’s running. You could come in contact with hazardous voltage.
Warning: Always operate your computer in an upright position. In the unlikely event that coolant leaks in or from your computer, disconnect all electrical power to the computer and do not restart it. Contact an Apple Authorized Service Provider or Apple for information about servicing your computer. After disconnecting electrical power, you can clean up coolant using an absorbent cloth. Avoid inhaling or direct contact with skin: coolant may cause minor skin irritation.
Protecting Your Optical Drive To keep your optical drive working properly: • Position your computer so that the drive tray doesn’t bump into anything when it opens. • Close the drive when you’re not using it. • Do not put anything on the drive tray when it is open. • Do not touch the optical drive lens with your fingers. Do not wipe the lens with a paper towel or other abrasive surface. If you need to clean the lens, see an Apple Authorized Service Provider for a lens cleaner.
• Arrange the display so the top of the screen is slightly below your eye level when you’re sitting at the keyboard. The best distance from your eyes to the screen is up to you, although most people seem to prefer 18 to 28 inches (45 to 70 cm). • Position the display to minimize glare and reflections on the screen from overhead lights and nearby windows. If possible, use a tiltable display stand.
Connecting to the Internet C Appendix C You can use your computer to browse the World Wide Web, send email to friends and family, and chat in real time over the Internet. Use this detailed guide to connect to the Internet. When you first start up Mac OS X, the Setup Assistant helps you enter your Internet configuration information and sign up for an Internet service provider (ISP) if you don’t already have one.
2 Gather the connection information you need from your ISP or network administrator. See the next section, “Gathering the Information You Need,” to find out what information to get for each type of connection. If another computer in the same location is already connected to the Internet, you may be able to use its settings. To find the settings on a Mac OS X computer: • Open the Network pane of System Preferences. • Choose your connection method from the Show pop-up menu.
Gathering the Information You Need You can write the information you get from your Internet service provider (ISP), your network administrator, or your other computer on these pages, then enter it in Network Setup Assistant.
If you selected “PPP” (for PPPoE connections), gather the following: • Service provider • Account name • Password • PPPoE service name The information below is optional. Ask your ISP or system administrator if you need it.
3 Choose Network Port Configurations from the Show pop-up menu and select the On checkbox next to Internal Modem. 4 Drag Internal Modem to the top of the Port Configurations list to make it the preferred, or primary, network interface. 5 Choose Internal Modem from the Show pop-up menu and click PPP. 6 Enter the information from your ISP and click Apply Now.
To test your Internet configuration: 1 Open the Internet Connect application (in the Applications folder). 2 Click the Internal Modem icon, if necessary. 3 Enter your dial-up telephone number, account name, and password, if necessary. 4 Click Connect. Internet Connect dials your ISP and establishes a connection. To connect automatically when you start a TCP/IP application, such as a web browser or email: 1 Click PPP Options (in the PPP pane of Network preferences).
To set up Network preferences for the built-in Ethernet port: 1 Choose Apple (K) > System Preferences from the menu bar. 2 Click Network. 3 Choose Network Port Configurations from the Show pop-up menu. 4 Select Built-in Ethernet. 5 Drag Built-in Ethernet to the top of the Port Configurations list to make it the preferred, or primary, network interface. Next, follow the instructions to configure your network manually, using DHCP, or using PPPoE, as instructed by your ISP or network administrator.
Manual Configuration Have your static IP address, router address, and subnet mask from your ISP ready (see page 91). To set up a manual configuration: 1 In Network preferences, choose Built-in Ethernet from the Show pop-up menu. 2 Click TCP/IP, if necessary. 3 In the Configure IPv4 pop-up menu, choose Manually. 4 Type the information into the corresponding fields. 5 Click Apply Now. Once you configure your network, your connection is ready.
DHCP Configuration After you set up a DHCP configuration, the DHCP server automatically provides your network information. To set up a DHCP configuration: 1 In Network preferences, choose Built-in Ethernet from the Show pop-up menu. 2 Click TCP/IP, if necessary. 3 Choose Using DHCP from the Configure IPv4 pop-up menu. 4 Click Apply Now. Open your web browser (or another TCP/IP application) to test your Internet connection.
PPPoE Configuration Some DSL-based ISPs use Point-to-Point Protocol over Ethernet (PPPoE). If you use a DSL modem and need a user name and password to connect to the Internet, check with your ISP to determine if you should connect using PPPoE. To set up a PPPoE connection: Have your user name, password, and if required, the domain name server (DNS) address from your ISP available (see page 91). 1 In Network preferences, choose Built-in Ethernet from the Show pop-up menu.
4 Click TCP/IP and choose either Using PPP or Manually from the Configure IPv4 pop-up menu, as instructed by your ISP. If you have a static IP address from your ISP, choose Manually and type the address in the IP Address field. 5 Type the domain name server (DNS) addresses in the DNS Servers field. 6 Click Apply Now. Once you configure your network, your Internet connection is ready. You can open your web browser or other TCP/IP application to test your connection.
AirPort Extreme Wireless Connection You can configure your AirPort Extreme network and Internet connection using AirPort Setup Assistant, located in the Utilities folder within your Applications folder. The assistant helps you configure the AirPort Extreme Base Station and set up your computer to use AirPort Extreme. For more information about your AirPort Extreme Base Station, see the AirPort Extreme Base Station Setup Guide that came with your base station.
Next, make sure your AirPort connection options are active in Network preferences. To set up Network preferences for an AirPort Extreme connection: 1 Choose Apple (K) > System Preferences from the menu bar. 2 Click Network. 3 Choose Network Port Configurations from the Show pop-up menu. 4 Select the On checkbox next to AirPort. Next, follow the instructions to configure your network either manually or using DHCP, as instructed by your ISP or network administrator.
5 Choose AirPort from the Show pop-up menu. 6 Click TCP/IP, if necessary. 7 In the Configure IPv4 pop-up menu, choose either Manually or Using DHCP. • If you chose Manually, type the other information into the corresponding fields. • If you chose Using DHCP, you don’t need to enter any further information unless your system administrator has instructed you to do so. 8 Click AirPort and select options for joining an AirPort Extreme network after restarting or when your computer wakes from sleep.
Troubleshooting Your Connection Cable Modem, DSL, and LAN Internet Connections If you can’t connect to the Internet using your cable modem, DSL, or local area network (LAN), see the following steps. Important: Instructions that refer to modems do not apply to LAN users. LAN users may have hubs, switches, routers, or connection pods that cable and DSL modem users do not. LAN users should contact their network administrator rather than an ISP.
Network Connections If you have two or more computers attempting to share an Internet connection, be sure that your network is set up properly. You need to know if your ISP provides only one IP address or if it provides multiple IP addresses, one for each computer. If only one IP address is used, then you must have a router capable of sharing the connection, also known as network address translation (NAT) or “IP masquerading.
Communications Regulation Information FCC Compliance Statement Industry Canada Statement This equipment has been tested and found to comply with the limits for a Class B digital device, pursuant to part 15 of the FCC Rules. These limits are designed to provide reasonable protection against harmful interference in a residential installation. Complies with the Canadian ICES-003 Class B specifications. Cet appareil numérique de la classe B est conforme à la norme NMB-003 du Canada.
Laser Specifications Laser on pickup unit (when reading a CD): • Type: Semiconductor GaAlAs laser • Wavelength: 790 nm • Power out of objective lens: 3.3 mW • Beam divergence: horizontal 12º vertical 35º Exposure to Radio Frequency Energy The radiated output power of the optional AirPort Extreme Card is far below the FCC radio frequency exposure limits. Nevertheless, it is advised to use the wireless equipment in such a manner that the potential for human contact during normal operation is minimized.
If you do not disconnect your modem when it is adversely affecting the telephone line, the telephone company has the right to disconnect your service temporarily until you correct the problem. The telephone company will notify you as soon as possible. Also, you will be informed of your right to file a complaint with the FCC. The telephone company may make changes in its facilities, equipment, operations, or procedures that could affect the operation of your equipment.
Les réparations de matériel homologué doivent être effectuées par un centre d’entretien canadien autorisé désigné par la fournisseur. La compagnie de télécommunications peut demander à l’utilisateur de débrancher un appareil suite à des réparations ou à des modifications effectuées par l’utilisateur ou en raison d’un mauvais fonctionnement. Informationen fur Deutschland Diese Modem-Karte ist als Endeinrichtung vorgesehen und muss an ein TAE mit F-Kodierung angeschlossen werden.
accordingly with the approved Telepermit number to comply with the New Zealand telecommunications standards, ensuring the health and safety of the operator and the integrity of the New Zealand telecommunications network. To ensure compliance, all calls that are automatically generated should not make more than 10 call attempts to the same number within any 30 minute period with a minimum period between calls of 30 seconds.
Index Index A D adapter DVI to ADC 7 DVI to Composite 7 DVI to VGA 7 ADC 7 port 17 AGP 8X Pro graphics 19 AGP card 62 air deflector 45 AirPort Extreme 80 antenna 17, 67 base station 37 card 19, 36 card installation 66 connection 92 connector 19 setting up 100 setting up a connection 91 analog audio 30, 81 line-in 17, 81 line-out 17, 81 DDR SDRAM 19, 47 DHCP 92 configuration 97 dial-up connection 92 modem 92 dialup connection 89 dimensions 82 DIMMs 47 discharge static 42 display 10, 77 extended desktop
installing AGP card 62 AirPort Extreme Card 66 applications 74, 75 battery 67 Classic support 74, 75 Mac OS 9 74, 75 Mac OS X 74, 75 memory 47 PCI/PCI-X cards 64 Serial ATA drives 55 SuperDrive 58 Internet configuration 94 connecting to 11 connection using Setup Assistant 100 Internet service provider 89 ISP 89 iTunes 33 K keyboard 22 keyboard extender cable 9 L LAN 94 connection 91, 92 latch 17, 53 liquid cooling system 84 M maintenance 85 manual Internet configuration 96 manually using DHCP router opti