Mac Pro Solid-State Drive Replacement Instructions First Steps 1 Shut down computer. 2 Wait 10 minutes. Note: Follow these instructions carefully. Failure to do so could damage your equipment and void its warranty. Warning: Parts inside computer can be very hot. Allow computer to cool down before continuing. 3 Unplug all external cables except power cord. 4 Touch metal PCI cover on back of computer. 5 Unplug power cord.
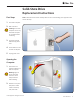
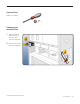
Required Tool Phillips #1 screwdriver Removing the Installed Drive 1 Make sure latch on back panel is up, so that drives and carriers are unlocked. 2 Pull drive carrier (with drive) out of drive bay. © 2010 Apple Inc. All rights reserved. 073-1349 Rev.
Remove 2 screws on side of carrier adapter. 4 Slide solid-state drive out of adapter. Installing the Replacement Drive 1 Slide replacement drive into adapter as shown, label side down and connector facing out. 2 Replace mounting screws. 3 Slide carrier over guides and into drive bay until drive snaps into place. © 2010 Apple Inc. All rights reserved. 073-1349 Rev.
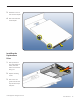
Closing the Computer 1 Replace access panel. Note: Make sure latch is up before you replace panel. If latch is down, panel will not seat correctly. 2 Push latch down to close and secure access panel. Warning: Never turn on computer unless all its internal/external parts are in and it is closed. Operating unit when open or missing parts can cause damage or injury. Formatting a New Drive After installing a new (replacement) drive, format it using these steps: 1.
Reinstalling Software that Came with the Computer Use the software install discs that came with the computer to reinstall Mac OS X and any applications that came with the computer. Important: Apple recommends backing up data on the hard disk before restoring software. Back up essential files before installing Mac OS X and other applications. Apple is not responsible for any lost data. For more details, refer to http://support.apple.com/kb/HT3910.
3. Select the disk you erased. It should now be highlighted with a green arrow. 4. Click Install. A status bar appears on the bottom of the screen while Mac OS X installs. 5. An Additional Information screen appears, advising you that you operating system has been installed. Click Continue. 6. An Install Succeeded screen appears. Click Restart. Part Three: Completing the Mac OS X Setup Assistant 1. When the restart has completed, a welcome video plays, then country/region selection screen appears.
Part Four: Restoring the bundled applications 1. To install the bundled applications, locate the Applications Install Disc that came with your computer. Note: You may see a Software Update icon bouncing up and down in your dock. You can quit this for now. 2. Insert the Applications Install Disc into the optical drive. 3. The disc will mount and an Applications Install Disk dialog appears. Double-click on Install Bundled Software to install your iLife applications. 4.