
Setup guide


• Remote Apple Events: This service enables the machine to respond to
Apple events from other computers, which may present security risks.
Configuring this capability is out of scope for this guide and it should remain
disabled.
3.5.9 Accounts
The Accounts option in System Preferences allows administrators to create and
configure local user accounts. On a Mac OS X Server system, the only accounts
configured here should be for the system administrators. To edit Accounts settings:
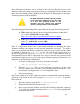
1. Open System Preferences and click on the Accounts icon.
2. Click on the Login Options item.
3. Select Name and password as the setting for Display Login Window
as:. This causes the login window to require both a user name and a
password to be entered. If the List of users option is set, the system will
provide a list of all valid user accounts. Such information should never be
automatically displayed.
4. Uncheck the box for Automatically log in as: if it is checked. If this box
is checked, no login is required for the machine; the user selected in this
option is always automatically logged in. A user should always be required
to authenticate to gain access to the system.
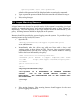
5. Place a check in the Hide the Sleep, Restart, and Shut Down
buttons checkbox to prevent a user from attempting to reboot the
machine into single user mode without first logging into a valid account.
This will not prevent a user from pulling the power cable to abruptly shut
down the computer, unless the power cable is inaccessible to the user.
Further protection for this problem will be discussed later in this chapter.
6. Uncheck the box for Enable fast user switching to disable it.
3.5.10 Date and Time
Some system services, such as the Kerberos authentication system and some e-mail
servers, require that the system keep correct time. To configure date and time:
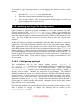
1. Open System Preferences and click on the Date & Time icon.
2. Click on the Date & Time button at the top of the panel.
3. Set the date and time for the machine.
4. If a local, trusted NTP server is available, enter it into the text field and
check the box for Set Date & Time automatically. Otherwise, uncheck
the box.
5. Click the Time Zone button at the top of the panel and select the
appropriate time zone.
16
UNCLASSIFIED