
User`s guide


126 Chapter 5 Server Administration
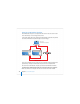
 To authenticate as an administrator for a particular server, local or remote, enter the
server’s IP address or DNS name in the login dialog box, or click Browse to choose
from a list of servers. Specify the user name and password for an administrator of the
server, then click Connect. Use this approach when you’ll be working most of the
time with a particular server.
After opening Workgroup Manager, you can open a Workgroup Manager window for a
different computer by clicking Connect in the toolbar or choosing Server > Connect.
Important: When you connect to a server in Workgroup Manager, make sure the long
or short user name you specify matches the capitalization in the user account.
Administering Accounts
After you log in to Workgroup Manager, the account window appears, showing a list of
user accounts. Initially, accounts listed are those stored in the last directory node of the
server’s search path. When you use other Workgroup Manager windows, such as
Preferences or Sharing, click Accounts in the toolbar to return to the account window.
To specify the directory or directories that store accounts you want to work with, click
the small globe icon. To work with different accounts in different Workgroup Manager
windows, click New Window in the toolbar.
To administer the accounts listed, click the Users, Groups, or Computer Lists button on
the left side of the window. You can filter the accounts listed by using the pop-up
search list above the accounts list. To refresh the accounts list, click the Refresh button
in the toolbar.