Mac OS X Server Version 10.
Getting Started with Leopard Server in Small Workgroups When most people think about the word server, they think about monolithic machines in labyrinthine, air-conditioned rooms keeping e-commerce websites online, or high-performance machines sequencing the human genome. And don’t be surprised to find Mac OS X Server in those environments performing those large-scale tasks.
• iChat Server. Leopard Server makes it simple to set up your own personal Instant Messaging server so just your workgroup can communicate with one another in real time. It also can communicate securely with other servers running the Jabber standard protocol. • VPN Remote Access. Setting up a VPN so that remote users could access your network’s services securely used to be a tedious, involved process. Leopard Server makes it easy with just a few simple steps.
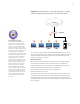
Scenario 1: Leopard Server on an Existing Mac Pro in a Small Office Using Apple AirPort Extreme as the Network Router The Internet Airport Extreme or Time Capsule You Know Where to Find Me Most consumer broadband Internet services provide you with a dynamic IP address—one that changes anytime you turn your modem off and back on. However, you can generally get a static IP address—one which remains the same permanently—either by paying an extra fee or by opting for a small business service package.
Installing Mac OS X Server • Connect the Mac Pro to the Airport Extreme. The Ethernet cable will connect one of the ports on the back of the Mac Pro to one on the back of the Airport Extreme. Both ports should be marked with this symbol: . • Insert the Mac OS X Server Install Disc. Double-click Install Mac OS X Server. Click Restart and authenticate after your system restarts. Mac OS X Server will boot from the installation DVD. • Choose your language. Click to continue. • Welcome.
Setting Up Mac OS X Server At restart, your system will boot from the destination hard drive, eject the Install Disc, and launch Server Assistant—which steps you through all the information needed to configure your server. Getting Help Along the Way If you need help—or simply want more information—you can always click the icon on any screen. This brings up a Help window, which you can keep at the side of the Server Assistant window or Server Preferences pane.
• Time Zone. Choose your time zone. This is very important for accurately capturing times for wiki and blog entries, sent and received emails, and logins and logouts. Click Continue. • Server Backup. If your server has more than one hard drive, Mac OS X Server gives you the option to back up your system, as well as all service data, such as wikis, calendars, mail, and shared files—making it easy to restore your server in case of system failure. Click Continue. • Mail Service.
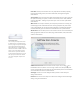
• Simple Client Machine Configuration. On each Client machine, run the Directory Utility program in /Applications/Utilities. Click the lock icon and enter the administrator name and password for that machine. It should automatically find the available Directory Server and offer to configure your machine (see above). If not, click the icon and select your server’s name from the Server Name or IP Address menu. Click OK. Once you see the screen above, click Begin Setup.
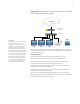
Scenario 2: Leopard Server on an Xserve or a Mac Pro in a Small Office with Routing/Firewall Services The Internet Xserve or Dual Ethernet Mac Pro Hub/Switch Go Headless. If you don’t have a monitor (also known as a “head”) for the Xserve in this configuration, you can control everything remotely from a Mac on the same LAN as the Xserve, connected to the same network switch/hub. Install the Admin Tools from the provided Install Disk and use the Server Assistant application.
• Get Connected. Connect the Xserve and each desktop Mac (and the Airport Extreme if you have it) to the network switch/hub. Connect the Xserve’s other Ethernet port to your Internet connection. Then start up! (If you’re using a Mac Pro as your server, check the instructions in Scenario 1 for installing Leopard Server before proceeding.) Make sure you either have a monitor, keyboard, and mouse connected to the Xserve or have the included Admin Tools installed on one of the connected Macs.
• TCP/IP Connection. This screen allows you to enter the IP address and TCP/IP information provided to you by your ISP or network administrator. This configuration pre-supposes a server with two Ethernet ports, one connected to your Internet service, and the other to your local network switch/hub. The one connected to your Internet service should be configured either manually with information provided by your ISP or using DHCP.
• Server Backup. If your server has more than one hard drive, Mac OS X Server gives you the option to back up your system, as well as all service data, such as wikis, calendars, mail, and shared files—making it easy to restore your server in case of system failure. Click Continue. • Mail Service. You can opt to either be your own primary email server or to relay your mail through your ISP’s outbound mail server. To relay, specify the relay server name, such as relay.ISPname.com.
• Set Up Your VPN. Run the Server Preferences application on your server. Click VPN. Before you can start the service, you’ll need to enter a Shared Secret (a passphrase) and the starting and ending IP address of a range on your local network (as configured in “TCP/IP Connection” above). You also can save a copy of your configuration file for easy reference using the Save As button. • Protect Yourself.
Getting Help Along the Way If you need help—or simply want more information—you can always click the icon on any screen. This brings up a Help window, which you can keep at the side of the Server Assistant window or Server Preferences pane. As you move through installation and setup, you’ll see the Help information change to support you— wherever you are in the process. • Simple Client Machine Configuration. On each Client machine, run the Directory Utility program in /Applications/Utilities.
Scenario 3: Leopard Server on an Xserve in a Co-location Facility The Internet Airport Extreme Co-Located XServe or Mac mini Airport Extreme or Time Capsule Co-lo-what-now? Co-location is an IT industry term used to describe a hosting service where you provide the server, and the facility provides the power, rack space, Internet connection, and 24/7/365 monitoring. You’re small and you’re agile.
• Connect. Run the Server Assistant application from the /Applications/Server folder. Select “Set up a remote server” and click Continue. In the Destination window, click the icon, then enter the IP address provided by your hosting service and the first eight characters (case-sensitive!) of your Xserve’s serial number in the spaces provided. Click Continue. • Welcome. Click Continue. Getting Help Along the Way If you need help—or simply want more information—you can always click the icon on any screen.
• TCP/IP Connection. This screen allows you to enter the IP address and TCP/IP information provided to you by your ISP or network administrator. Select “No, configure network settings manually.” Then click Continue. Enter all information provided by the co-location hosting service in the appropriate spaces. When finished, click Continue. • Network Names.
• Mail Service. You can opt to either be your own primary email server or to relay your mail through your ISP’s outbound mail server. If using this server as a primary email server, you’ll need to have that address listed as a Mail Exchanger in your domain provider’s DNS records. To relay, specify the relay server name, such as relay.ISPname. com. You also have the opportunity to customize the welcome email that will notify your users that their account has been set up. Click Continue. • Remote Access.
• Protect Yourself. Because your Xserve connects directly to the Internet, we strongly suggest you go to Server Preferences and turn on the Firewall. But you shouldn’t check the boxes for any of your services because you’re connecting to this server only through the Internet, and never from its local network. • Simple Client Machine Configuration. On each Client machine, run the Directory Utility program in /Applications/Utilities.
Scenario 4: Leopard Server on an Xserve for a Workgroup at a Medium-to-Large Business with an Existing Server Infrastructure Organization-wide servers Hub/Switch The Internet Mac OS X server Getting Help Along the Way If you need help—or simply want more information—you can always click the icon on any screen. This brings up a Help window, which you can keep at the side of the Server Assistant window or Server Preferences pane.
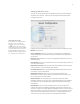
• Welcome. Click Continue. Following are all the dialog boxes you will encounter during the configuration process: • Server Configuration. Mac OS X Server gives you a choice of three configurations: Standard, Workgroup, and Advanced. For this type of installation, select Workgroup and click Continue. • Keyboard. Confirm that Mac OS X Server has recognized the keyboard you are using and click Continue. • Serial Number. Enter the serial number that’s on the card included with your Mac OS X Server discs.
• TCP/IP Connection. This screen allows you to enter the IP address and TCP/IP information provided to you by your ISP or network administrator. In most companies, this will mean selecting “Yes, use the information supplied.” If that’s not the case for you, your network administrator will provide you with the correct information. Click Continue. • Network Names. For your Primary DNS Name, Mac OS X Server can detect your computer’s IP address from information provided by your Ethernet connection.
• Server Backup. If your server has more than one hard drive, Mac OS X Server gives you the option to back up your system, as well as all service data, such as wikis, calendars, mail, and shared files—making it easy to restore your server in case of system failure. Click Continue. • Users & Authentication. Leave the check-box checked and enter the DNS name (such as yourdomainserver.example.
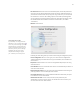
• Simple Client Machine Configuration. On each Client machine, run the Directory Utility program in /Applications/Utilities. Click the lock icon and enter the administrator name and password for that machine. It should automatically find the available Directory Server and offer to configure your machine (see above). If not, click the icon and select your server’s name from the Server Name or IP Address menu. Click OK. Once you see the screen above, click Begin Setup.
The Client Experience Once your server is up and running, it’s easy to get Mac clients connected and more productive. If you recall, we walked through simple steps for using Directory Utility to configure each of your client Macs for each scenario. Once set up, the client Macs are ready to go.
For More Information For more information about Mac OS X Server and other Apple server solutions, visit www.apple.com/server. © 2008 Apple Inc. All rights reserved. Apple, the Apple logo, FireWire, iCal, iChat, Mac, Mac OS, QuickTime, Xgrid, Xsan, and Xserve are trademarks of Apple Inc., registered in the U.S. and other countries. Leopard is a trademark of Apple Inc. PowerPC is a trademark of International Business Machines Corporation, used under license therefrom.