LL2845Q88.
LL2845Q88.book Page 2 Thursday, November 18, 2004 4:23 PM K Apple Computer, Inc. © 2005 Apple Computer, Inc. All rights reserved. Under the copyright laws, this manual may not be copied, in whole or in part, without the written consent of Apple. The Apple logo is a trademark of Apple Computer, Inc., registered in the U.S. and other countries.
LL2845Q88.
LL2845Q88.
LL2845Q88.
LL2845Q88.
LL2845Q88.book Page 7 Thursday, November 18, 2004 4:23 PM 1 Getting Started 1 Your Mac mini has been designed so that you can easily set it up and start using it right away. If you have never used Mac mini or are new to Macintosh computers, read this section for instructions on getting started. If you are an experienced user, you may already know enough to get started. Be sure to look over the information in Chapter 2, “Getting to Know Your Mac mini,” to find out about the features of your Mac mini.
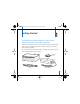
LL2845Q88.book Page 8 Thursday, November 18, 2004 4:23 PM Setting Up Your Mac mini Follow these steps to set up your Mac mini. If there is any protective film around the computer or power adapter, remove it before setting up your Mac mini. 1 Plug the AC cord firmly into the power adapter. Plug the cord from the power adapter into the computer. Plug the power adapter into a grounded power outlet.
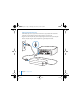
LL2845Q88.book Page 9 Thursday, November 18, 2004 4:23 PM 2 To access the Internet, connect an Ethernet cable or phone cord.
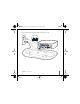
LL2845Q88.book Page 10 Thursday, November 18, 2004 4:23 PM 3 Connect the USB cable from your keyboard and mouse. Your Mac mini does not come with a keyboard and mouse, but you can use any USB keyboard or mouse with your computer. If your keyboard has a USB port, you can plug your mouse into the USB port on the keyboard. If it doesn't, you can plug the mouse into a USB port on the back of the computer. Note: Using a USB mouse or keyboard from another manufacturer may require software drivers.
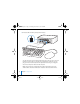
LL2845Q88.book Page 11 Thursday, November 18, 2004 4:23 PM To set up an Apple Wireless Keyboard and Apple Wireless Mouse with your computer, follow the instructions that came with the keyboard and mouse. 4 Connect the DVI cable from your display to the video out port. To connect a VGA display, use the Apple DVI to VGA Adapter that came with your computer. For more information about connecting a display, see the guidelines in Chapter 2, “Getting to Know Your Mac mini.
LL2845Q88.book Page 12 Thursday, November 18, 2004 4:23 PM 5 Press the power button (®) on the back of your Mac mini to turn it on.
LL2845Q88.book Page 13 Thursday, November 18, 2004 4:23 PM What’s Next? You’ve done everything you need to get your Mac mini up and running. The first time you turn on your computer, the Setup Assistant starts and helps you enter your Internet and email information and set up a user on your computer. If you already have a Mac, the Setup Assistant can help you automatically transfer files, applications, and other information from your previous Mac to your new Mac mini.
LL2845Q88.book Page 14 Thursday, November 18, 2004 4:23 PM You may want to deauthorize your old Mac to prevent your iTunes Music Store or spoken word purchases from being played or to change which computers are authorized to play your purchases. For more information, choose Help > Mac Help, then choose Library > iTunes and Music Store Help, and search for “deauthorize.” If you don’t use the Setup Assistant to transfer information when you first start up your Mac mini, you can do it later.
LL2845Q88.book Page 15 Thursday, November 18, 2004 4:23 PM What to Do When You Have Finished Using Your Mac mini When you have finished working with your Mac mini, you have two options. Put Your Mac mini to Sleep to Save Energy If you will be away from your Mac mini for less than a few days, put the computer to sleep. When the computer is in sleep, its screen is dark. You can quickly wake the computer and bypass the startup process.
LL2845Q88.
LL2845Q88.book Page 17 Thursday, November 18, 2004 4:23 PM 2 Getting to Know Your Mac mini 2 This chapter gives you some basic information you’ll need to know about your Mac mini. Read on for an overview of the different parts of your computer and Mac OS X, and summary information on common tasks such as customizing the way your desktop looks, connecting to a printer, playing a CD, connecting a digital camera, using the Internet, getting answers when you need help, and more.
LL2845Q88.
LL2845Q88.book Page 19 Thursday, November 18, 2004 4:23 PM Slot-loading optical drive Your computer has a Combo drive that can read DVD discs, DVD movies, CD-ROM discs, photo CDs, music CDs, standard audio discs, and other kinds of media. It can also write music, documents, and other digital files to blank CD-R and CD-RW discs Power indicator light A white light indicates your Mac mini is on; a pulsing light indicates it’s in sleep ® Power button Turn on your Mac mini or put it to sleep.
LL2845Q88.book Page 20 Thursday, November 18, 2004 4:23 PM Learning About Mac OS X Your computer comes with Mac OS X, which includes an elegant user interface, advanced graphics capabilities, and added system stability and performance.
LL2845Q88.book Page 21 Thursday, November 18, 2004 4:23 PM When you’re ready to learn more about Mac OS X and the award-winning iLife applications that came with your computer, see the Welcome to Panther booklet located in the User Guides and Information folder on your hard disk. You can also open Mac OS Help and browse the information there. You’ll find plenty of information for new users, experienced users, and people switching to the Mac.
LL2845Q88.book Page 22 Thursday, November 18, 2004 4:23 PM Customizing Your Desktop and Setting Your Preferences You can quickly make your desktop look the way you want using System Preferences. Choose Apple () > System Preferences from the menu bar. Feel free to make changes and experiment with the following: Â Desktop & Screen Saver: Select this preference pane to change the background color or pattern of your desktop, or change it to a photo or image you like.
LL2845Q88.book Page 23 Thursday, November 18, 2004 4:23 PM Â Dock: Select this preference pane to change the look, location, and behavior of your Dock. Â Appearance: Select this preference pane to change the colors of buttons, menus, windows, and highlight colors, among other options. As you get to know your computer, explore the other System Preferences. It is your command center for most settings on your Mac mini.
LL2845Q88.book Page 24 Thursday, November 18, 2004 4:23 PM 3 Click the Add button. 4 Choose the type of connection for your printer (USB or Rendezvous in most cases). To add a USB printer connected to an AirPort Extreme Base Station or AirPort Express, choose Rendezvous from the pop-up menu. 5 Select or enter your printer information and click Add. Note: If you’re connecting to a printer via a network, you may need to know the network name or address of the printer to select it.
LL2845Q88.book Page 25 Thursday, November 18, 2004 4:23 PM To monitor printing: m Click the printer icon in the Dock to open the printer window. You can now see the print jobs in the print queue and work with them. For more information, open Mac OS Help (see page 30) and search for “printing.” Playing a CD and Connecting Headphones If you’d like to listen to music with your Mac mini, insert a music CD in your optical drive. iTunes, an easy-to-use music player, opens automatically.
LL2845Q88.book Page 26 Thursday, November 18, 2004 4:23 PM To check for updated software: 1 Choose Apple () > Software Update. The Software Update window opens. If there are any updates available, they appear in a list. 2 Click the checkbox to select the items you want to install, then click Install. Type an administrator name and password (the name and password you used when you first set up your computer). When the updates complete, Software Update checks for updates again.
LL2845Q88.book Page 27 Thursday, November 18, 2004 4:23 PM Using the Internet When you first set up your Mac mini, you were instructed on how to connect to the Internet. If you need to change to a different type of connection, such as a DSL or cable modem, Ethernet local area network (LAN), or AirPort Extreme network, you can find more information in Appendix C, “Connecting to the Internet,” on page 69.
LL2845Q88.book Page 28 Thursday, November 18, 2004 4:23 PM Â If your computer has an AirPort Extreme Card, you can connect to an AirPort wireless network to transfer files. For more information, see “AirPort Extreme Wireless Internet and Networking” on page 37. For more information about transferring files and documents, open Mac OS Help (see page 29) and search for “transferring files.” When an Application Freezes On rare occasions, an application may freeze on the screen.
LL2845Q88.book Page 29 Thursday, November 18, 2004 4:23 PM 2 Click Force Quit. The application quits, leaving all other applications open. If needed, you can force the Classic environment to quit, which closes all Classic applications. You can also restart the Finder from this dialog. If you are experiencing other problems, see Chapter 4, “Troubleshooting,” on page 49.
LL2845Q88.book Page 30 Thursday, November 18, 2004 4:23 PM To use Mac OS Help: 1 Click the Finder icon in the Dock. 2 Choose Help > Mac Help (click the Help menu and choose Mac Help). 3 Type a question and press the Return key on your keyboard. 4 Double-click an item in the list of Help topics.
LL2845Q88.book Page 31 Thursday, November 18, 2004 4:23 PM 3 Using Your Computer 3 Your Mac mini has many built-in features you can use to customize your computer to fit your needs. Here are some of your computer’s features and capabilities: Â High-speed Universal Serial Bus (USB) 2.0 ports for connecting additional equipment, such as printers, scanners, joysticks, keyboards, digital cameras, and disk drives.
LL2845Q88.book Page 32 Thursday, November 18, 2004 4:23 PM Connecting a Display or Video Device You can connect displays with a DVI connector to your Mac mini. Using one of the adapters described below, you can also connect displays with a VGA connector or you can connect a video device. DVI to VGA Adapter Use the Apple DVI to VGA Adapter that came with your computer to connect a display with a VGA connector.
LL2845Q88.book Page 33 Thursday, November 18, 2004 4:23 PM Universal Serial Bus (USB) Your Mac mini comes with two USB ports on the back, which you can use to connect many types of external devices, including a keyboard, a mouse, printers, scanners, digital cameras, game pads, joysticks, keyboards, and floppy disk drives. USB makes it easy to connect peripherals. In most cases you can connect and disconnect a USB device while the computer is running. Once you connect the device, it is ready to use.
LL2845Q88.book Page 34 Thursday, November 18, 2004 4:23 PM Using Multiple USB Devices at the Same Time If all of your USB ports are being used and you want to connect more USB devices, you can purchase a USB hub. The USB hub connects to an open USB port on your computer and provides additional USB ports (usually four or seven). Most USB hubs also have a power adapter and should be plugged into an outlet. For More Information on USB Additional information on USB is available in Mac OS Help (see page 29).
LL2845Q88.book Page 35 Thursday, November 18, 2004 4:23 PM FireWire Your computer has a FireWire 400 port, which lets you easily connect and disconnect external high-speed devices—such as an iPod, an iSight camera, digital video cameras, printers, scanners, and hard disks—without restarting your computer. FireWire port These are some of the things you can do with FireWire: Â Connect an iPod and transfer songs from iTunes or synchronize contact and calendar information using iSync.
LL2845Q88.book Page 36 Thursday, November 18, 2004 4:23 PM Using FireWire Devices To use a FireWire device with your computer, simply connect the device to the computer. Apple has already included software to work with many FireWire devices. When you connect a FireWire device, if your Mac mini cannot find the correct software, you can install the software that came with the device or check the device manufacturer’s website for the latest software.
LL2845Q88.book Page 37 Thursday, November 18, 2004 4:23 PM AirPort Extreme Wireless Internet and Networking If you ordered an AirPort Extreme Card when you purchased your Mac mini, the card is already installed. AirPort offers an easy and affordable way to provide wireless Internet access anywhere in the home, at work, or in the classroom. Instead of using traditional cables, AirPort uses wireless local area network (LAN) technology to provide wireless communication between multiple computers.
LL2845Q88.book Page 38 Thursday, November 18, 2004 4:23 PM How AirPort Provides Wireless Internet Access With AirPort, you set up a wireless connection to a device known as a base station, which has a physical connection to the Internet. AirPort technology works like a cordless telephone. The AirPort Extreme Card in the computer makes a wireless connection to the base station, which is connected to the Internet via a telephone line or a DSL or cable modem.
LL2845Q88.book Page 39 Thursday, November 18, 2004 4:23 PM AirPort Express and AirPort Extreme Base Station Use an AirPort Express to play iTunes music over your wireless network to your home stereo or powered speakers. With an AirPort Extreme Base Station or Airport Express, you can also share a broadband Internet connection for up to 10 users and a USB printer. (Wireless printing over USB requires a compatible printer.
LL2845Q88.book Page 40 Thursday, November 18, 2004 4:23 PM With Bluetooth wireless technology, you can do the following: Â Use your Mac mini to communicate with a mobile phone equipped with Bluetooth wireless technology. Your phone can act as a modem to connect you to a wireless service provider, at speeds of up to 56 kilobits per second (kbit/s), so you can use your mobile phone to access the Internet. Â Communicate with your PDA.
LL2845Q88.book Page 41 Thursday, November 18, 2004 4:23 PM Setting Up Bluetooth File Exchange You can control how your computer handles files that are exchanged between it and other Bluetooth devices. You can choose a folder for the files you accept from other devices, a folder for other devices to browse, and which applications to use to open the files you accept. To set up a Bluetooth file exchange: m Open System Preferences and click Bluetooth, then click File Exchange.
LL2845Q88.book Page 42 Thursday, November 18, 2004 4:23 PM To send a file to a Bluetooth enabled device: 1 Open the Bluetooth File Exchange application, located in Applications/Utilities. 2 Choose File > Send File, select the file you want to send, then click Send. 3 Choose a device from the Device list and click Send. 4 If the device is not in the Device list, click Search. When Bluetooth File Exchange finds the device, you can add it to your Favorites list.
LL2845Q88.book Page 43 Thursday, November 18, 2004 4:23 PM Ethernet (10/100Base-T) Your computer comes with built-in 10/100 megabit per second (Mbps) Base-T (twistedpair) Ethernet networking capability, which you can use to connect to a network or to a cable or DSL modem. Ethernet port (10/100Base-T) Connecting to a network gives you access to other computers. You may be able to store and retrieve information; use network printers, modems, and electronic mail; or connect to the Internet.
LL2845Q88.book Page 44 Thursday, November 18, 2004 4:23 PM For More Information on Using Ethernet Additional information, including how to set up an Ethernet network and transfer files using Ethernet, is available in Mac OS Help (see page 29). Choose Help > Mac Help and search for “Ethernet” or “network.” For information on networking products you can use with your Mac mini, check the Macintosh Products Guide at www.apple.com/guide.
LL2845Q88.book Page 45 Thursday, November 18, 2004 4:23 PM For More Information on Using Audio Additional information about using audio is available in Mac OS Help (see page 29). Choose Help > Mac Help and search for “audio” or “music.” For information on audio and music products you can use with your Mac mini, check the Macintosh Products Guide at www.apple.com/guide. Using Your Optical Drive You can install or use software from CDs and DVDs using your optical drive.
LL2845Q88.book Page 46 Thursday, November 18, 2004 4:23 PM Inserting a CD or DVD Disc To install or use programs from a CD or DVD disc, follow these steps: 1 Place the disc into the optical drive with the label side up. 2 When the icon for the disc appears on the desktop, the disc is ready to use. Note: Some DVD discs are two-sided and don’t have a label on either side. Ejecting a Disc To eject a disc, drag the disc icon to the Trash.
LL2845Q88.book Page 47 Thursday, November 18, 2004 4:23 PM Playing DVD Discs To play a DVD, insert the DVD disc. DVD Player opens automatically and starts playing the disc. Recording CD-R and CD-RW Discs You can record music on CD-R or CD-RW discs right from your iTunes library. To burn music to a CD-R or CD-RW disc using iTunes: 1 Click the iTunes icon in the Dock. 2 Select the playlist you want to record. 3 Insert a blank CD-R or CD-RW disc. (For highest compatibility with CD players, use a CD-R disc.
LL2845Q88.book Page 48 Thursday, November 18, 2004 4:23 PM Securing Your Computer Use a locking cable (available at www.apple.com/store) and the built-in security slot to attach your Mac mini to a stationary object. Security slot Additional information on the software security features of your Mac mini, including multiple user passwords and file encryption, is available in Mac OS Help (see page 29). Choose Help > Mac Help and search for “security” or “multiple users.
LL2845Q88.book Page 49 Thursday, November 18, 2004 4:23 PM 4 Troubleshooting 4 Occasionally you may have problems while working with your Mac mini. This chapter gives you some solutions to try when you have a problem. This chapter contains solutions to problems that prevent you from working with your computer, such as a system freeze or a computer that will not start up. You can find more troubleshooting information in Mac OS Help (see page 29) or on the Apple Support website at www.apple.com/support.
LL2845Q88.book Page 50 Thursday, November 18, 2004 4:23 PM Problems That Prevent You From Using Your Computer If the computer won’t respond or the pointer won’t move  First, make sure the mouse and keyboard are connected. Unplug and then plug in the connectors and make sure they are secure.  If that doesn’t work, try to force problem applications to quit. Hold down the Option and Command (x) keys and then press the Esc key. If a dialog appears, select the application and click Force Quit.
LL2845Q88.book Page 51 Thursday, November 18, 2004 4:23 PM If the computer freezes during startup or you see a flashing question mark  Wait a few seconds. If the computer doesn’t start up after a delay, shut down your computer by pressing and holding the power button (®) for about 5 seconds, until the computer shuts down. Then hold down the Option key and press the power button (®) again to start up your computer. When your computer starts up, click the hard disk icon, then click the right arrow.
LL2845Q88.book Page 52 Thursday, November 18, 2004 4:23 PM Important: Apple recommends that you back up the data on your hard disk before restoring software. Apple is not responsible for any lost data. Installing Mac OS X To install Mac OS X, follow these steps: 1 Back up your essential files, if possible. 2 Insert the Mac OS X Install Disc 1 that came with your computer. 3 Double-click “Install Mac OS X and Bundled Software.” 4 Follow the onscreen instructions.
LL2845Q88.book Page 53 Thursday, November 18, 2004 4:23 PM Installing Mac OS 9 Your Mac mini does not come with Mac OS 9 installed. To use Mac OS 9 applications with your computer, you have to install Mac OS 9 using the Mac OS 9 Install Disc. Follow these steps to install Mac OS 9: 1 Back up your essential files, if possible. 2 Insert the Mac OS 9 Install Disc that came with your computer. 3 Double-click “Install Mac OS 9 System Support.” 4 Follow the onscreen instructions.
LL2845Q88.book Page 54 Thursday, November 18, 2004 4:23 PM Â Make sure you are within antenna range of the other computer or the network’s access point. Nearby electronic devices or metal structures can interfere with wireless communication and reduce this range. Repositioning or rotating the computer may improve reception. Â Check the AirPort signal level. There are up to four bars in the AirPort status icon in the menu bar. Â Make sure nothing is placed on top of your computer.
LL2845Q88.book Page 55 Thursday, November 18, 2004 4:23 PM If you have problems with your Internet connection  Make sure your telephone line or network cable is connected and functioning properly.  If you are using a dial-up Internet connection, make sure that your telephone cord is plugged into the modem port (marked with the icon W) and not the Ethernet port (marked with the icon G).  See “Connecting to the Internet” on page 69 for information on setting up your computer to connect to the Internet.
LL2845Q88.book Page 56 Thursday, November 18, 2004 4:23 PM Using Apple Hardware Test You can use Apple Hardware Test to help determine if there is a problem with your computer’s hardware. To use Apple Hardware Test: 1 Disconnect all external devices from your computer except the display, keyboard, and mouse. If you have an Ethernet cable connected, disconnect it. 2 Insert the Mac OS X Install Disc 1 that came with your computer. 3 Restart your computer and hold down the Option key as it starts up.
LL2845Q88.book Page 57 Thursday, November 18, 2004 4:23 PM If you didn’t order a Bluetooth module or AirPort Extreme Card with your Mac mini or if you want additional memory installed, contact an Apple Authorized Service Provider or an Apple Store. Online Resources For online service and support information, go to www.apple.com/support/. Choose your country from the pop-up menu. You can search the AppleCare Knowledge Base, check for software updates, or get help on Apple’s discussion boards.
LL2845Q88.book Page 58 Thursday, November 18, 2004 4:23 PM If you need further assistance, AppleCare telephone support representatives can help you with installing and opening applications, and basic troubleshooting. Call the support center number nearest you (the first 90 days are complimentary). Have the date of purchase and your Mac mini serial number ready when you call. Note: Your 90 days of complimentary telephone support begins on the date of purchase and telephone fees may apply.
A Specifications A Appendix LL2845Q88.book Page 59 Thursday, November 18, 2004 4:23 PM You can use System Profiler to find out detailed information about your Mac mini, such as the amount of built-in memory, hard disk size, devices connected, and the product serial number. To access the information in System Profiler, choose Apple () > About This Mac from the menu bar and then click More Info.
LL2845Q88.book Page 60 Thursday, November 18, 2004 4:23 PM Click the triangles in the window to show and hide information in the different categories. Additional information is available on the Internet at www.apple.com and www.apple.com/support.
B Care, Use, and Safety Information B Appendix LL2845Q88.book Page 61 Thursday, November 18, 2004 4:23 PM For your safety and that of your equipment, follow the rules in this appendix for cleaning and handling your computer, as well as the guidelines for working more comfortably. Cleaning Your Mac mini Follow these general rules when cleaning the outside of your computer and its components: Â Shut down your Mac mini and disconnect all cables.
LL2845Q88.book Page 62 Thursday, November 18, 2004 4:23 PM Safety Instructions for Setting Up and Using Your Computer For your own safety and that of your equipment, always take the following precautions.
LL2845Q88.book Page 63 Thursday, November 18, 2004 4:23 PM Â Read all the installation instructions carefully before you plug your computer into a wall socket. Â Keep these instructions handy for reference by you and others. Â Follow all instructions and warnings dealing with your system. Important: Electrical equipment may be hazardous if misused. Operation of this product, or similar products, must always be supervised by an adult.
LL2845Q88.book Page 64 Thursday, November 18, 2004 4:23 PM Â The only way to disconnect power completely is to unplug the power cord by pulling the plug, not the cord. Important: The power adapter for your computer is a high-voltage component and should not be opened for any reason, even when it’s unplugged. Do not allow children access to the interior of any electrical product and do not permit them to handle any cables.
LL2845Q88.book Page 65 Thursday, November 18, 2004 4:23 PM Ergonomics Chair An adjustable chair that provides firm, comfortable support is best. Adjust the height of the chair so your thighs are horizontal and your feet flat on the floor. The back of the chair should support your lower back (lumbar region). Follow the manufacturer’s instructions for adjusting the backrest to fit your body properly. You may have to raise your chair so your forearms and hands are at the proper angle to the keyboard.
LL2845Q88.book Page 66 Thursday, November 18, 2004 4:23 PM Mouse Position the mouse at the same height as your keyboard and within a comfortable reach. Shoulders relaxed 45–70 cm (18–28 in.) Forearms and hands in a straight line Top of the screen at or slightly below eye level (You may need to adjust the height of your display by raising or lowering your work surface.
LL2845Q88.book Page 67 Thursday, November 18, 2004 4:23 PM Change hand positions often to avoid fatigue. Some computer users may develop discomfort in their hands, wrists, or arms after intensive work without breaks. If you begin to develop chronic pain or discomfort in your hands, wrists, or arms, consult a qualified health specialist. For More Information Go to www.apple.com/about/ergonomics. Apple and the Environment Apple Computer, Inc.
LL2845Q88.
C Connecting to the Internet C Appendix LL2845Q88.book Page 69 Thursday, November 18, 2004 4:23 PM You can use your computer to browse the World Wide Web, send email to friends and family, and chat in real time over the Internet. Use this detailed guide to connect to the Internet. When you first start up Mac OS X, the Setup Assistant helps you enter your Internet configuration information and sign up for an Internet service provider (ISP) if you don’t already have one.
LL2845Q88.book Page 70 Thursday, November 18, 2004 4:23 PM Â AirPort Extreme or AirPort Express wireless connection: Your computer is connected wirelessly to the Internet using an AirPort Extreme Base Station or AirPort Express. Â Local area network (LAN): Your computer is plugged into a LAN using an Ethernet cable. This type of connection is usually used in the workplace. Before you connect to the Internet: 1 Set up an account with an ISP.
LL2845Q88.book Page 71 Thursday, November 18, 2004 4:23 PM To find the settings on a Mac OS 9 computer: Â Open the TCP/IP control panel. Â Find the connection method in the “Connect via” pop-up menu. Â Find the configuration in the Configure pop-up menu. Â Copy the IP address, subnet mask, and router address from the corresponding fields. To find the settings on a Windows PC: The connection information on a Windows computer resides in two places.
LL2845Q88.book Page 72 Thursday, November 18, 2004 4:23 PM Setup Assistant Worksheet You can write the information you get from your Internet service provider (ISP), your network administrator, or your other computer on these pages, then enter it in Network Setup Assistant. Select how your computer connects to the Internet.
LL2845Q88.book Page 73 Thursday, November 18, 2004 4:23 PM To set up a DSL or cable modem or a LAN connection: 1 Choose your connection type. Ask your ISP for this information. Manually Manually using DHCP Router Using DHCP Using BootP PPP 2 Enter information from your ISP: If you selected “Manually” or “Manually using DHCP Router,”1 enter the following: IP Address Subnet Mask Router Address If you selected “Using DHCP,” enter the following: DHCP Client ID 1.
LL2845Q88.book Page 74 Thursday, November 18, 2004 4:23 PM Note: DHCP Client ID is optional and may not be required. Ask your ISP. If you selected “PPP (for PPPoE connections),” enter the following: Service Provider (optional) PPPoE Service Name (optional) Account Name Password The information below is optional. Ask your ISP if you need to enter it.
LL2845Q88.book Page 75 Thursday, November 18, 2004 4:23 PM Setting Up Your Internet Connection Manually Once you have completed the steps on the previous pages using the Setup Assistant, you are done setting up your Internet connection. If you don’t wish to use the Setup Assistant, or if you only want to make changes to specific parts of your Internet setup configuration, you can use the instructions below to set up your connection manually.
LL2845Q88.book Page 76 Thursday, November 18, 2004 4:23 PM 3 Choose Network Port Configurations from the Show pop-up menu and select the On checkbox next to Internal Modem. 4 Drag Internal Modem to the top of the Port Configurations list to make it the preferred, or primary, network interface. 5 Choose Internal Modem from the Show pop-up menu and click PPP.
LL2845Q88.book Page 77 Thursday, November 18, 2004 4:23 PM 6 Enter the information from your ISP and click Apply Now. To test your Internet configuration: 1 Open the Internet Connect application (in the Applications folder). 2 Click the Internal Modem icon, if necessary. 3 Enter your dial-up telephone number, account name, and password, if necessary. 4 Click Connect. Internet Connect dials your ISP and establishes a connection.
LL2845Q88.book Page 78 Thursday, November 18, 2004 4:23 PM To connect automatically when you start an Internet application, such as a web browser or email: 1 Click PPP Options (in the PPP pane of Network preferences). 2 Select the “Connect automatically when needed” checkbox. 3 Click OK and Apply Now.
LL2845Q88.book Page 79 Thursday, November 18, 2004 4:23 PM DSL, Cable Modem, or LAN Internet Connections If you connect to the Internet using a DSL or cable modem or Ethernet LAN, ask your ISP or network administrator how you should configure your Internet connection: Â Manually: With a manual configuration, your ISP or network administrator provides a static IP address and other information that you enter in Network preferences.
LL2845Q88.book Page 80 Thursday, November 18, 2004 4:23 PM 4 Select the On checkbox next to Built-in Ethernet. 5 Drag Built-in Ethernet to the top of the Port Configurations list to make it the preferred, or primary, network interface. Next, follow the instructions to configure your network manually, using DHCP, or using PPPoE, as instructed by your ISP or network administrator.
LL2845Q88.book Page 81 Thursday, November 18, 2004 4:23 PM Manual Configuration Have your static IP address, router address, and subnet mask from your ISP ready (see page 72). To set up a manual configuration: 1 In Network preferences, choose Built-in Ethernet from the Show pop-up menu. 2 Click TCP/IP, if necessary. 3 Choose Manually from the Configure IPv4 pop-up menu.
LL2845Q88.book Page 82 Thursday, November 18, 2004 4:23 PM 4 Type the other information into the corresponding fields. 5 Click Apply Now. Once you configure your network, your connection is ready. Open your web browser (or another TCP/IP application) to test your Internet connection. DHCP Configuration After you set up a DHCP configuration, the DHCP server automatically provides your network information.
LL2845Q88.book Page 83 Thursday, November 18, 2004 4:23 PM 3 Choose Using DHCP from the Configure IPv4 pop-up menu.
LL2845Q88.book Page 84 Thursday, November 18, 2004 4:23 PM 4 Click Apply Now. Open your web browser (or another TCP/IP application) to test your Internet connection. Note: Unless your ISP instructs you to do otherwise, ignore the DHCP Client ID field and the Search Domains field. PPPoE Configuration Some DSL-based ISPs use Point-to-Point Protocol over Ethernet (PPPoE).
LL2845Q88.book Page 85 Thursday, November 18, 2004 4:23 PM 2 Click PPPoE and select “Connect using PPPoE.” 3 Type the information into the corresponding fields. If you want all users of your computer to use the same connection method, select “Save password.” Note: To connect automatically when you start a TCP/IP application, such as a web browser or email, click PPPoE Options, then select “Connect automatically when needed.
LL2845Q88.book Page 86 Thursday, November 18, 2004 4:23 PM 4 Click TCP/IP and choose either Using PPP or Manually from the Configure IPv4 pop-up menu, as instructed by your ISP. If you have a static IP address from your ISP, choose Manually and type the address in the IP Address field. 5 Type the domain name server (DNS) addresses in the DNS Servers field. 6 Click Apply Now. Once you configure your network, your Internet connection is ready.
LL2845Q88.book Page 87 Thursday, November 18, 2004 4:23 PM Important: If you did not select the option to connect automatically, you will need to open the Internet Connect application, choose the correct configuration, and then click Connect. For more information, choose Help > Internet Connect Help from the menu bar at the top of the display.
LL2845Q88.book Page 88 Thursday, November 18, 2004 4:23 PM If you don’t see an AirPort network listed, you can use the AirPort Setup Assistant to check or change your settings, or you can change them using the Network pane of System Preferences. Setting Up an AirPort Extreme Connection Manually Gather the following information from your system administrator if you’ll be setting up a manual connection.
LL2845Q88.book Page 89 Thursday, November 18, 2004 4:23 PM 4 Select the On checkbox next to AirPort. Next, follow the instructions to configure your network either manually or using DHCP, as instructed by your ISP or network administrator. If you’re setting up your network yourself, it may be easier to configure the network using DHCP, because the server assigns IP addresses automatically. 1 Choose AirPort from the Show pop-up menu. 2 Click TCP/IP, if necessary.
LL2845Q88.book Page 90 Thursday, November 18, 2004 4:23 PM 3 In the Configure IPv4 pop-up menu, choose either Manually or Using DHCP. Â If you chose Manually, type the other information into the corresponding fields. Â If you chose Using DHCP, you don’t need to enter any further information unless your system administrator has instructed you to do so.
LL2845Q88.book Page 91 Thursday, November 18, 2004 4:23 PM 4 Click AirPort and select options for joining an AirPort Extreme network after restarting or when your computer wakes from sleep. 5 Click Apply Now. Once you configure your AirPort settings, you are ready to connect. To test your AirPort Extreme connection: m Click the AirPort status icon in the menu bar and choose Turn AirPort On. Any AirPort Extreme network in range should appear in the menu.
LL2845Q88.book Page 92 Thursday, November 18, 2004 4:23 PM PPPoE Connections If you are unable to connect to your Internet service provider using PPPoE, first check the cables and power supplies, then turn the power off and on and reset the modem hardware. Check System Preferences settings: 1 Choose Apple () > System Preferences. 2 Click Network. 3 Choose Network Port Configurations from the Show pop-up menu. 4 Drag Built-in Ethernet to the top of the Port Configurations list.
LL2845Q88.book Page 93 Thursday, November 18, 2004 4:23 PM Network Connections If you have two or more computers attempting to share an Internet connection, be sure that your network is set up properly. You need to know if your ISP provides only one IP address or if it provides multiple IP addresses, one for each computer. If only one IP address is used, then you must have a router capable of sharing the connection, also known as network address translation (NAT) or “IP masquerading.
LL2845Q88.
LL2845Q88.book Page 95 Thursday, November 18, 2004 4:23 PM Communications Regulation Information FCC Compliance Statement This device complies with part 15 of the FCC rules. Operation is subject to the following two conditions: (1) This device may not cause harmful interference, and (2) this device must accept any interference received, including interference that may cause undesired operation. See instructions if interference to radio or television reception is suspected.
LL2845Q88.book Page 96 Thursday, November 18, 2004 4:23 PM Bluetooth Information Laser Information FCC Bluetooth Wireless Compliance The antenna used with this transmitter must not be colocated or operated in conjunction with any other antenna or transmitter subject to the conditions of the FCC Grant. Warning: Making adjustments or performing procedures other than those specified in your equipment’s manual may result in hazardous radiation exposure.
LL2845Q88.book Page 97 Thursday, November 18, 2004 4:23 PM High-Risk Activities Warning This computer system is not intended for use in the operation of nuclear facilities, aircraft navigation or communications systems, or air traffic control machines, or for any other uses where the failure of the computer system could lead to death, personal injury or severe environmental damage.
LL2845Q88.book Page 98 Thursday, November 18, 2004 4:23 PM Â Telephone jack type: USOC, RJ-11 An FCC-compliant telephone cord and modular plug are provided with this equipment. This equipment is designed to be connected to the telephone network or premises wiring using a compatible modular jack that complies with Part 68 rules. See the installation instructions for details. Telephone Line Problems If your telephone doesn’t work, there may be a problem with your telephone line.
LL2845Q88.book Page 99 Thursday, November 18, 2004 4:23 PM In Canada, contact Apple at: 7495 Birchmount Road, Markham, Ontario, L3R 5G2, 800-263-3394 Warning: Users should ensure for their own protection that the electrical ground connections of the power utility, telephone lines, and internal metallic water pipe system, if present, are connected together. This precaution may be particularly important in rural areas.
LL2845Q88.book Page 100 Thursday, November 18, 2004 4:23 PM Service à la clientèle d’Apple Canada: 800-263-3394 Avertissement : Pour sa propre protection, l’utilisateur doit s’assurer que tout les fils de mise à la terre du secteur, des lignes téléphoniques et les canalisations d’eau métalliques, s’il y en a, soient raccordés ensemble. Cette précaution est particulièrement importante dans les régions rurales.
LL2845Q88.book Page 101 Thursday, November 18, 2004 4:23 PM For calls that are automatically generated, a total of three call attempts are allowed to a telephone number, with a minimum period between calls of 2 seconds. If the call does not connect after three attempts, 30 minutes must expire before automatic redialing may be initiated.
LL2845Q88.
LL2845Q88.
LL2845Q88.
LL2845Q88.
LL2845Q88.book Page 106 Thursday, November 18, 2004 4:23 PM www.apple.