
X


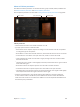


Table Of Contents
- Logic Pro X Instruments
- Contents
- Chapter 1: Drum Kit Designer
- Chapter 2: ES1
- Chapter 3: ES2
- ES2 overview
- ES2 interface
- ES2 sound sources
- ES2 oscillator parameters overview
- ES2 basic oscillator waveforms
- Use pulse width modulation in ES2
- Use frequency modulation in ES2
- Use ring modulation in ES2
- Use ES2 Digiwaves
- Use the ES2 noise generator
- ES2 emulation of detuned analog oscillators
- Stretch tuning in ES2
- Balance ES2 oscillator levels
- ES2 oscillator start points
- Synchronize ES2 oscillators
- ES2 global parameters
- ES2 filter parameters
- ES2 amplifier parameters
- ES2 modulation
- ES2 integrated effects processor
- ES2 macro controls and controller assignments
- ES2 Surround mode
- ES2 extended parameters
- Create random ES2 sound variations
- ES2 tutorials
- Chapter 4: EFM1
- Chapter 5: ES E
- Chapter 6: ES M
- Chapter 7: ES P
- Chapter 8: EVOC 20 PolySynth
- EVOC 20 PolySynth and vocoding
- EVOC 20 PolySynth interface
- EVOC 20 PolySynth analysis parameters
- EVOC 20 PolySynth (U/V) detection parameters
- EVOC 20 PolySynth synthesis parameters
- EVOC 20 PolySynth formant filter
- EVOC 20 PolySynth modulation parameters
- EVOC 20 PolySynth output parameters
- EVOC 20 PolySynth performance tips
- Vocoder history
- EVOC 20 block diagram
- Chapter 9: EXS24 mkII
- EXS24 mkII overview
- Sampler instruments
- EXS24 mkII Parameter window
- EXS24 mkII Parameter window overview
- Sampler Instruments pop-up menu
- EXS24 mkII global parameters
- EXS24 mkII pitch parameters
- EXS24 mkII filter parameters
- EXS24 mkII output parameters
- EXS24 mkII extended parameters
- EXS24 mkII modulation overview
- EXS24 mkII modulation router
- EXS24 mkII LFOs
- EXS24 mkII envelope overview
- EXS24 mkII modulation reference
- EXS24 mkII Instrument Editor window
- EXS24 mkII preferences
- EXS24 mkII memory management
- Chapter 10: External Instrument
- Chapter 11: Klopfgeist
- Chapter 12: Retro Synth
- Retro Synth overview
- Retro Synth Analog oscillator controls
- Retro Synth Sync oscillator controls
- Retro Synth Table oscillator controls
- Retro Synth FM oscillator controls
- Retro Synth filter controls
- Retro Synth amp and effect controls
- Retro Synth modulation controls
- Retro Synth global and controller settings
- Retro Synth extended parameters
- Chapter 13: Sculpture
- Sculpture overview
- Sculpture interface
- Sculpture string parameters
- Sculpture objects parameters
- Sculpture pickups parameters
- Sculpture global parameters
- Sculpture amplitude envelope parameters
- Use Sculpture’s Waveshaper
- Sculpture filter parameters
- Sculpture delay effect parameters
- Sculpture Body EQ parameters
- Sculpture output parameters
- Sculpture surround range and diversity
- Sculpture modulation controls
- Sculpture morph parameters
- Define Sculpture MIDI controllers
- Sculpture tutorials
- Chapter 14: Ultrabeat
- Ultrabeat overview
- Ultrabeat interface
- Ultrabeat Assignment section
- Ultrabeat Synthesizer section overview
- Ultrabeat sound sources
- Ultrabeat oscillator overview
- Ultrabeat oscillator 1 phase oscillator mode
- Use Ultrabeat oscillator 1 FM mode
- Use Ultrabeat oscillator 1 side chain mode
- Use Ultrabeat oscillator 2 phase oscillator mode
- Basic waveform characteristics
- Use Ultrabeat oscillator 2 sample mode
- Use Ultrabeat oscillator 2 model mode
- Ultrabeat ring modulator
- Ultrabeat noise generator
- Use Ultrabeat’s filter section
- Ultrabeat distortion circuit
- Ultrabeat Output section
- Ultrabeat modulation
- Ultrabeat step sequencer
- Ultrabeat step sequencer overview
- Step sequencer basics
- Ultrabeat step sequencer interface
- Ultrabeat global sequencer controls
- Ultrabeat pattern controls
- Use Ultrabeat’s swing function
- Ultrabeat Step grid
- Automate parameters in Ultrabeat’s step sequencer
- Export Ultrabeat patterns as MIDI regions
- MIDI control of Ultrabeat’s step sequencer
- Ultrabeat tutorials
- Chapter 15: Vintage B3
- Chapter 16: Vintage Clav
- Chapter 17: Vintage Electric Piano
- Appendix A: Legacy instruments
- Appendix B: Synthesizer Basics
Chapter 15 Vintage B3 401
Change the default MIDI channels
Changing MIDI channels can be useful when you perform live and require quick access to
another sound module.
1 Click Main in the control bar, then click the Split button at the lower right.
2 Set the switch to the left of the keyboard in the central display to Multi.
3 Change the channel numbers for the upper, lower, and pedal manuals.
Set keyboard zones
1 Click Main in the control bar, then click the Split button at the lower right.
2 Set the switch to the left of the keyboard in the central display to Split.
3 Horizontally drag the split icons to create the pedal/lower zone and the lower/upper zone.
If you select the same value for both split points, the lower manual is turned o. If the lower/
pedal split is moved above the upper/lower split, the other split point is moved (and vice versa).
Transpose keyboard zones by octaves
You can make transpositions that are independent of the global Tune parameter or transposition
features of the host application. These have no impact on the preset keys which is particularly
important when you want to use preset switching (see Use Vintage B3 preset keys) when split
keyboard mode is active.
1 Click Main in the control bar, then click the Split button at the lower right.
2 Set the switch to the left of the keyboard in the central display to Split.
3 Choose an octave value (+/– 2 octaves) from the Pedal Transpose, Lower Transpose, or Upper
Transpose pop-up menu.
Use a single-channel controller
If you don’t have a master keyboard that allows multichannel transmission, you can use a MIDI
keyboard that is capable of transmitting on only one MIDI channel. You can use Vintage B3 Split
parameters to split the keyboard in order to play upper, lower, and pedal sounds in dierent
keyboard zones. Each keyboard zone can be transposed independently.
There are three keyboard modes: single, split, and multi.
•
Single: Uses the entire keyboard. You can only play the upper sound.
•
Split: Divides the keyboard into two. You can play the upper and lower sounds in dierent
keyboard zones.
•
Multi: Divides the keyboard into three. You can play the upper, lower, and pedalboard sounds
in dierent keyboard zones.
Technically, Vintage B3 remaps the incoming single-channel MIDI data into two or three MIDI
channels when either split or multi keyboard mode is active.
Set the keyboard mode
1 Click Main in the control bar, then click the Split button at the lower right.
2 Set the switch to the left of the keyboard in the central display to Single, Split, or Multi.