
Installation guide


MC Installation Guide2
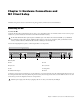
Configuring the Network
MC Standalone
Using the RJ-45 Ethernet cables (included), connect your
workstations to the LAN ports on the Netgear RP614 router (or
other router included with your MC system). Then connect
the MC to one of the other LAN ports on the router. Because
the router has four LAN ports, you must use an additional
Ethernet switch if you have more than three workstations.
The MC ships with DHCP enabled, allowing it to automati-
cally obtain an IP address. The router has a DHCP server and
hands out IP addresses to the devices connected to its LAN
ports (the MC and your workstations). This allows for easy
plug-and-play network configuration. For this reason, the
router must be turned on before the MC and your worksta-
tions.
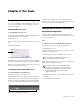
System 5-MC
1 Connect the MC and CM408T modules to LAN ports on the
SonicWALL 1260 router (or other router included with your
System 5-MC system).
2 Connect your workstations to LAN ports on the router.
The MC ships with DHCP enabled, allowing it to automat-
ically obtain an IP address. The router has a DHCP server
and hands out IP addresses to the MC, CM408T modules,
and your workstations. For this reason the router must be
turned on before the MC, CM408T modules, and your
workstations.
EUCON Software Installation
Follow these instructions to install the EUCON Software on
each workstation:
1 Insert the MC Software Installation disc in your worksta-
tion’s CD/DVD drive.
2 Do one of the following:
• On Mac OS X, locate and double-click the EUCONWS
package.
– or –
• In Windows, if AutoRun is enabled, the setup program
starts from the CD automatically. If AutoRun is not en-
abled, locate and double-click the EuConWS.exe file.
3 Click Next and choose a directory to install the software.
• The default Mac OS X directory is the Applications folder.
• The default Windows directory is C:\Program Files\Eu-
phonix\EuCon.
4 For Windows installations, click Next to customize the soft-
ware components to install. EUCON Workstation Core is
automatically selected (this is the basic software used to
communicate with the MC). Select further options accord-
ing to your DAW:
• For Nuendo workstations, select only the EUCON adapter
for Nuendo and VST plug-in layouts for Nuendo options.
• For Pyramix, select only the EUCON adapter for Pyramix
option.
• For all other DAWs, select the Studio Monitor Express or
Studio Monitor Pro 2 option.
5 Click Next to continue.
6 Select locations for application shortcuts in the Start menu.
The default is a EUCON folder in the Start menu with short-
cuts to the MC applications.
7 Click Next to continue.
The Wizard displays a summary of all options selected dur-
ing the setup process. To change them, click Back until the
desired setup option appears.
8 Click Install.
9 The Windows installer may ask you about two Euphonix
drivers: Euphonix Virtual MIDI Driver and Euphonix Vir-
tual Keyboard. Click Continue Anyway.
Windows detects the new hardware. Do not click anything.
10 Click Finish to exit the Wizard.
11 Repeat the above installation steps for each workstation.
You have created a small local area network (LAN)
comprised of just the MC and your workstations. If you
want to have access to an outside network, such as a
studio facility LAN or the Internet, connect the WAN
port on the router to your studio’s network switch, or to
your cable/DSL modem.
Running Studio Monitor Express and Studio Monitor
Pro 2 on the same machine may cause conflicts and is
not recommended.
When first running the MC Client, the Windows Fire-
wall may ask whether to block or unblock MC Client and
EUCON Discovery from accessing the Internet or local
area network. Because all communication between the
MC Client and the MC occurs through the workstation’s
network connection, you must select Unblock or it will
not communicate with the MC.