MC Installation Guide
Legal Notices This guide is copyrighted ©2011 by Avid Technology, Inc., with all rights reserved. Under copyright laws, this guide may not be duplicated in whole or in part without the written consent of Avid.
Contents Chapter 1. Hardware Connections and MC Client Setup . . . . . . . . . . . . . . . . . . . . . . . . . . . . . . . . . . . . . . . . . . . . . . 1 Connecting the MC . . . . . . . . . . . . . . . . . . . . . . . . . . . . . . . . . . . . . . . . . . . . . . . . . . . . . . . . . . . . . . . . . . . . . . . . . . . . 1 Configuring the Network . . . . . . . . . . . . . . . . . . . . . . . . . . . . . . . . . . . . . . . . . . . . . . . . . . . . . . . . . . . . . . . . . . . . . . . .
iv MC Installation Guide
Chapter 1: Hardware Connections and MC Client Setup Schematics and parts are listed for each DAW setup in Appendix B, “DAW Parts Lists and Schematics.” Connecting the MC To connect the MC: Unpack the MC from its packaging and select a place to put it. The MC should go on a hard flat surface in order to allow proper ventilation. (System 5-MC has its own frame for the MC and CM408T modules). The MC and CM408T modules require sufficient ventilation space on the bottom.
Configuring the Network MC Standalone Using the RJ-45 Ethernet cables (included), connect your workstations to the LAN ports on the Netgear RP614 router (or other router included with your MC system). Then connect the MC to one of the other LAN ports on the router. Because the router has four LAN ports, you must use an additional Ethernet switch if you have more than three workstations. You have created a small local area network (LAN) comprised of just the MC and your workstations.
Workstation Connection and Control To connect the MC to your workstations: 1 Make sure the MC Client is running on all workstations, and 6 To control a workstation, press the Workstation key to which you assigned that workstation. The MC right-hand trackball (which acts as the mouse) and keyboard should now function just as if they were connected directly to your workstation. then press the Strip Control Setup key on the right side of the MC.
When a Workstation key is pressed, the MC sends a switch command to the KVM and changes your display to reflect that KVM input. Since the MC does not know the order your workstations were connected to the KVM, we recommend assigning the workstation attached to KVM input 1 to Workstation key 1, the workstation attached to KVM input 2 to Workstation key 2, etc. Otherwise the MC will not control the desired workstation when the display is switched.
Chapter 2: Pro Tools Configuring Pro Tools 9 and Higher Pro Tools 9.0 and higher is fully EUCON-aware. For versions of Pro Tools lower than 9.0, see “Configuring Pro Tools 8.x and Lower” on page 5. 3 Verify that the displays on your controllers show track names, location, or other session data, depending on the configuration of your MC Pro or System 5 MC. Configuring Pro Tools 8.
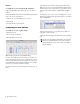
Windows To configure Pro Tools to work with the MC on Windows: 1 Open the EUCON Control Panel (Start > Control Panel > EUCON). 2 In the EUCON Control Panel, click the ADD button and nav- igate to the Pro Tools application. 3 Select the Protocol and MIDI ports to be used. 5 Configure each controller to have the input and output MIDI ports set for Pro Tools in the EUCON Preferences Pane.
Chapter 3: Steinberg Nuendo To enable Nuendo to work with the MC, you must obtain a Nuendo EUCON Adapter license fromAvid and download it to your Nuendo USB protection device (dongle): For Nuendo to communicate with the MC, Nuendo’s EUCON device must be added in the Nuendo Device Setup dialog: To add the device in the Device Setup dialog: To enable Nuendo to work with the MC: 1 Close all open applications. Make sure your Syncrosoft USB dongle is plugged into your Nuendo workstation.
8 MC Installation Guide
Chapter 4: Apple Logic Pro Logic Pro (version 7.2.1 and higher) has EUCON support and connectivity built into the application. With the MC Client running on your Macintosh, load Logic Pro, and the MC automatically connects to the application and displays the Logic Pro application set. Versions of Logic prior to 7.2.1 do not have EUCON support.
10 MC Installation Guide
Chapter 5: Pyramix To enable the use of the MC with Pyramix, the EUCON adapter for Pyramix checkbox must be selected during the MC Client software installation. Then add the MC as an installed controller in Pyramix. 4 Click Controller. To enable the MC with Pyramix: 5 Click the Add button. The right pane shows any installed controllers. However, at this point the pane is empty unless other interface controllers have been installed previously. 1 Launch the Pyramix Virtual Studio software.
10 Select EUCON from the Transport pop-up menu. If EUCON is not in the menu, it is probably because the MC Client is not running. Check that the MC Client menu tray icon is present. If not, launch the MC Client using the shortcuts in the Start menu or the Euphonix folder. Leave the Station ID at its default setting of 1 unless you have multiple controllers, in which case simply increment the setting (i.e., if two controllers are installed, set the Station ID = 3 for the MC).
Appendix A: Troubleshooting The MC is a professional control surface engineered with industrial-grade components, and it should operate reliably in your studio setup. It is, however, a complex device and issues can arise due to environmental or other factors. If you are having trouble with your MC, these sections can either resolve the problem or provide useful troubleshooting information for our technical support personnel. Both the workstation and MC must have the same version of the EUCON software.
14 MC Installation Guide
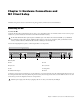
Appendix B: DAW Parts Lists and Schematics 1 32-Fader System 5 MC 1 Sonic Wall Pro 1260 DHCP Router/Ethernet Switch 1 Apple 20" Cinema Display 1 Euphonix USB Relay Box (included with Euphonix packout) 1 Euphonix RJ45 Control Cable (included with Euphonix packout) 1 DVI Cable Male-to-Male (included with Cinema Display packout) 6 Ethernet Cable 1 USB Memory Stick (for app sets and configuration data) 1 Pro Tools: Apple Workstation with: 1 Avid Pro Tools 1 002 Rack 1 Gefen DVI Detective
Legend: 1 USB IN USB IN USB IN GEFEN 4 x 2 DVI SW USB USB OUT DVI OUT APPLE CINEMA DISPLAY DVI IN 2 USB IN DVI IN DVI IN DVI IN DVI IN 3 1 2 3 4 4 REMOTE DVI IN RJ45 EUPHONIX SYSTEM 5MC FADERS 1-8 USB RELAY BOX (supplied) DVI OUT USB EUPHONIX SYSTEM 5MC FADERS 9-16 EUPHONIX MC CONTROLLER DVI IN EUPHONIX SYSTEM 5MC FADERS 17-24 EUPHONIX SYSTEM 5MC FADERS 25-32 DVI IN NET GEFEN DVI DETECTIVE DVI OUT PC AUDIO LABS NUENDO 3.
Avid Technical Support (USA) Product Information 2001 Junipero Serra Boulevard Daly City, CA 94014-3886 USA Visit the Online Support Center at www.avid.com/support For company and product information, visit us on the web at www.avid.