
User`s guide


Take Apart Fuser Assembly - 42
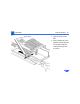
3 Remove the two screws.
4
Note:
There is a receptacle left of center on the rear face
of the fuser assembly. The receptacle mates with the
high-voltage power supply and may cause slight
resistance when you pull out the fuser in the following
step.
Raise the fuser slightly to clear the two positioning nibs,
press down on the green jam-release arm, and pull out
the fuser.