
User`s guide


2
2
2
222
2
Flowcharts and Tables
Troubleshooting
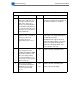
Table 11. All-Blank Page
Step Check Result Action
1 Is the sealing tape removed
from the toner cartridge?
No Remove the sealing tape.
2 Have you recently installed
a laser/scanner unit and
has this symptom existed
since?
Yes The laser shutter may have been
installed incorrectly. The shutter
should spring back and forth as you
insert the toner cartridge.
3 Does this symptom occur
only with envelopes?
Yes Instruct the customer to adjust
margins in the software application.
4 Run the Extended Power-
On Self Test. Does the test
indicate a specific error?
Yes Go to the appropriate troubleshooting
table that describes the error
indicated.
5 Remove the rear panel and
I/O shield. Place probes
between J210-6 (HVRST)
and J210-10 (GND). Does
the voltage change from 0
to 5 V about one second
after the printer starts up?
No Replace the DC controller board.
6 Place probes between
J210-9 (SLO2) and J2
10-10 (GND). Does the
voltage measure
approximately 0.7 V about
one second after the main
motor starts?
No
Ye s
Replace the DC controller board.
Perform the first module exchange
listed below. If the problem persists,
reinstall the original module and
perform the next exchange:
• Replace the high-voltage power
supply.
• Replace the power-supply-to-HVPS
interface board.
• Replace the transfer block assembly.