
Specifications


Take Apart Transfer Corona Assembly - 93
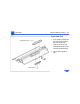
colored screw (1) goes
into the grounding hole
closest to the fuser.
Note: The discharging
pins and contacts are
accessible at this point
for inspection and
cleaning, if need be.
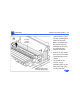
2 Remove the two screws
that secure the transfer
corona assembly to the
chassis.
3 Lift the side of the
transfer corona
assembly closest to the
drive gears and pull it
out of the printer.
Discharging Pins and
Contacts (Underneath)
Transfer
Corona
Assembly