
User Guide
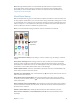


Table Of Contents
- iPod touch User Guide
- Contents
- Chapter 1: iPod touch at a Glance
- Chapter 2: Getting Started
- Set up iPod touch
- Connect iPod touch to your computer
- Connect to Wi‑Fi
- Connect to the Internet
- Apple ID
- iCloud
- Set up other mail, contacts, and calendar accounts
- Manage content on your iOS devices
- Sync with iTunes
- Date and time
- International settings
- Your iPod touch name
- View this user guide on iPod touch
- Tips for using iOS 8
- Chapter 3: Basics
- Chapter 4: Siri
- Chapter 5: Messages
- Chapter 6: Mail
- Chapter 7: Safari
- Chapter 8: Music
- Chapter 9: FaceTime
- Chapter 10: Calendar
- Chapter 11: Photos
- Chapter 12: Camera
- Chapter 13: Weather
- Chapter 14: Clock
- Chapter 15: Maps
- Chapter 16: Videos
- Chapter 17: Notes
- Chapter 18: Reminders
- Chapter 19: Stocks
- Chapter 20: Game Center
- Chapter 21: Newsstand
- Chapter 22: iTunes Store
- Chapter 23: App Store
- Chapter 24: iBooks
- Chapter 25: Health
- Chapter 26: Passbook
- Chapter 27: Calculator
- Chapter 28: Podcasts
- Chapter 29: Voice Memos
- Chapter 30: Contacts
- Appendix A: Accessibility
- Accessibility features
- Accessibility Shortcut
- VoiceOver
- Zoom
- Invert Colors and Grayscale
- Speak Selection
- Speak Screen
- Speak Auto-text
- Large, bold, and high-contrast text
- Button Shapes
- Reduce screen motion
- On/off switch labels
- Assignable tones
- Video Descriptions
- Hearing aids
- Mono audio and balance
- Subtitles and closed captions
- Siri
- Widescreen keyboards
- Guided Access
- Switch Control
- AssistiveTouch
- Voice Control
- Accessibility in OS X
- Appendix B: International Keyboards
- Appendix C: Safety, Handling, & Support
- Important safety information
- Important handling information
- iPod touch Support site
- Restart or reset iPod touch
- Reset iPod touch settings
- Get information about your iPod touch
- Usage information
- Disabled iPod touch
- VPN settings
- Profiles settings
- Back up iPod touch
- Update and restore iPod touch software
- Sell or give away iPod touch
- Learn more, service, and support
- FCC compliance statement
- Canadian regulatory statement
- Disposal and recycling information
- Apple and the environment

Chapter 11 Photos 75
•
Tap , and Photos suggests an optimal crop, but you can drag the corners of the grid tool to
set your own crop. Move the wheel to tilt or straighten the photo. Tap Auto to align the photo
with the horizon, and tap Reset to undo alignment changes. Tap to rotate the photo 90
degrees. Tap to choose a standard crop ratio, such as 2:3 or Square.
Rotate photo.
Rotate photo.
Move the wheel to
tilt or straighten.
Move the wheel to
tilt or straighten.
Choose a standard
photo format.
Choose a standard
photo format.
•
Photo lters let you apply dierent color eects, such as Mono or Chrome.
•
Tap Adjustments to use Light, Color, and B&W (black & white) sliders. Tap next to Light
to choose the element you want to adjust: Light, Brightness, Contrast, Exposure, Highlights, or
Shadows. Tap next to Color to choose among Color, Contrast, and Vibrancy adjustments.
Tap next to B&W to choose among Intensity, Neutrals, Tone, and Grain adjustments. Move
the slider to the desired eect.
Compare with the original photo. Touch and hold the photo to view the original. Release to see
your edits.
Don’t like the results? Tap Cancel, then tap Discard Changes. Tap Done to save changes.
Revert to original. After you edit a photo and save your edits, you can revert to the original
image. Tap the image, tap Edit, then tap Revert.
Trim a video. Tap the screen to display the controls, drag either end of the frame viewer, then
tap Trim.
Important: If you choose Trim Original, the trimmed frames are permanently deleted from the
original video. If you choose Save as New Clip, a new trimmed video clip is saved in your Camera
Roll album and the original video is unaected.