
User Guide
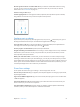


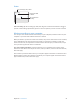
Table Of Contents
- iPod touch User Guide
- Contents
- Chapter 1: iPod touch at a Glance
- Chapter 2: Getting Started
- Chapter 3: Basics
- Use apps
- Customize iPod touch
- Type text
- Dictate
- Voice Control
- Search
- Control Center
- Alerts and Notification Center
- Sounds and silence
- Do Not Disturb
- AirDrop, iCloud, and other ways to share
- Transfer files
- AirPlay
- AirPrint
- Bluetooth devices
- Restrictions
- Privacy
- Security
- Charge and monitor the battery
- Travel with iPod touch
- Chapter 4: Siri
- Chapter 5: Messages
- Chapter 6: Mail
- Chapter 7: Safari
- Chapter 8: Music
- Chapter 9: FaceTime
- Chapter 10: Calendar
- Chapter 11: Photos
- Chapter 12: Camera
- Chapter 13: Weather
- Chapter 14: Clock
- Chapter 15: Maps
- Chapter 16: Videos
- Chapter 17: Notes
- Chapter 18: Reminders
- Chapter 19: Stocks
- Chapter 20: Game Center
- Chapter 21: Newsstand
- Chapter 22: iTunes Store
- Chapter 23: App Store
- Chapter 24: Passbook
- Chapter 25: Contacts
- Chapter 26: Voice Memos
- Chapter 27: Calculator
- Chapter 28: Nike + iPod
- Appendix A: Accessibility
- Accessibility features
- Accessibility Shortcut
- VoiceOver
- Siri
- Zoom
- Invert Colors
- Speak Selection
- Speak Auto-text
- Large and bold text
- Reduce screen motion
- Display on/off switch labels
- Hearing aids
- Subtitles and closed captions
- Mono Audio
- Assignable tones
- Guided Access
- Switch Control
- AssistiveTouch
- Widescreen keyboards
- Voice Control
- Accessibility in OS X
- Appendix B: International Keyboards
- Appendix C: Safety, Handling, & Support
- Important safety information
- Important handling information
- iPod touch Support site
- Restart or reset iPod touch
- Reset iPod touch settings
- Get information about your iPod touch
- Usage information
- Disabled iPod touch
- VPN settings
- Profiles settings
- Back up iPod touch
- Update and restore iPod touch software
- Sell or give away iPod touch?
- Learn more, service, and support
- FCC compliance statement
- Canadian regulatory statement
- Disposal and recycling information
- Apple and the environment

Chapter 24 Passbook 95
Reorder a pass. Drag a pass in the list to move it to a new location. The pass order is updated on
all your iOS 7 devices.
Refresh a pass. Passes are usually updated automatically. To refresh a pass manually, tap the pass,
tap , then pull the pass downward.
Done with a pass? Tap the pass, tap , then tap Delete.
Passbook settings
Keep passes from appearing on the Lock screen. Go to Settings > General > Passcode Lock and
tap Turn Passcode On. Then under Allow Access When Locked, turn o Passbook. For passes with
notications, to keep a specic pass from appearing on the Lock screen, tap the pass, tap ,
then turn o Show On Lock Screen.
Set notication options. Go to Settings > Notication Center > Passbook.
Include passes on your other iOS devices. Go to Settings > iCloud and turn on Passbook.