
User Guide
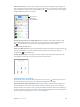
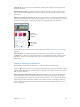
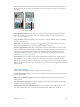
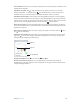

Table Of Contents
- iPhone User Guide
- Contents
- Chapter 1: iPhone at a Glance
- Chapter 2: Getting Started
- Set up and activate iPhone
- Connect iPhone to your computer
- Connect to Wi-Fi
- Connect to the Internet
- Apple ID
- Set up other mail, contacts, and calendar accounts
- iCloud
- Manage content on your iOS devices
- Sync with iTunes
- Date and time
- International settings
- Your iPhone name
- View this user guide on iPhone
- Tips for using iOS 8
- Chapter 3: Basics
- Use apps
- Continuity
- Customize iPhone
- Type text
- Dictate
- Voice Control
- Search
- Control Center
- Alerts and Notification Center
- Sounds and silence
- Do Not Disturb
- Sharing
- iCloud Drive
- Transfer files
- Personal Hotspot
- AirPlay
- AirPrint
- Use an Apple headset
- Bluetooth devices
- Restrictions
- Privacy
- Security
- Charge and monitor the battery
- Travel with iPhone
- Chapter 4: Siri
- Chapter 5: Phone
- Chapter 6: Mail
- Chapter 7: Safari
- Chapter 8: Music
- Chapter 9: Messages
- Chapter 10: Calendar
- Chapter 11: Photos
- Chapter 12: Camera
- Chapter 13: Weather
- Chapter 14: Clock
- Chapter 15: Maps
- Chapter 16: Videos
- Chapter 17: Notes
- Chapter 18: Reminders
- Chapter 19: Stocks
- Chapter 20: Game Center
- Chapter 21: Newsstand
- Chapter 22: iTunes Store
- Chapter 23: App Store
- Chapter 24: iBooks
- Chapter 25: Health
- Chapter 26: Passbook
- Chapter 27: FaceTime
- Chapter 28: Calculator
- Chapter 29: Podcasts
- Chapter 30: Compass
- Chapter 31: Voice Memos
- Chapter 32: Contacts
- Appendix A: Accessibility
- Accessibility features
- Accessibility Shortcut
- VoiceOver
- Zoom
- Invert Colors and Grayscale
- Speak Selection
- Speak Screen
- Speak Auto-text
- Large, bold, and high-contrast text
- Button Shapes
- Reduce screen motion
- On/off switch labels
- Assignable ringtones and vibrations
- Video Descriptions
- Hearing aids
- Mono audio and balance
- Subtitles and closed captions
- Siri
- Widescreen keyboards
- Large phone keypad
- LED Flash for Alerts
- Call audio routing
- Phone noise cancelation
- Guided Access
- Switch Control
- AssistiveTouch
- TTY support
- Visual voicemail
- Voice Control
- Accessibility in OS X
- Appendix B: International Keyboards
- Appendix C: iPhone in Business
- Appendix D: Safety, Handling, & Support
- Important safety information
- Important handling information
- iPhone Support site
- Restart or reset iPhone
- Reset iPhone settings
- Get information about your iPhone
- Usage information
- Disabled iPhone
- Back up iPhone
- Update and restore iPhone software
- Cellular settings
- Sell or give away iPhone
- Learn more, service, and support
- FCC compliance statement
- Canadian regulatory statement
- Disposal and recycling information
- Apple and the environment

Chapter 24 iBooks 118
Get a denition. Double-tap a word, then tap Dene in the menu that appears. Denitions aren’t
available for all languages.
Remember your place. Tap to add a bookmark, or tap again to remove it. You can have
multiple bookmarks—to see them all, tap , then tap Bookmarks. You don’t need to add a
bookmark when you close the book because iBooks remembers where you left o.
Remember the good parts. Some books let you add highlights and notes. To add a highlight,
touch and hold a word then move your nger to draw the highlight. To add a note, double-tap
a word to select it, move the grab points to adjust the selection, then tap Note in the menu that
appears. To see all the highlights and notes you’ve made, tap , then tap Notes.
Share the good parts. Tap some highlighted text, then, in the menu that appears, tap . If the
book is from the iBooks Store, a link to the book is included automatically. (Sharing may not be
available in all regions.)
Share a link to a book. Tap near the center of a page to display the controls, then tap . Next,
tap , then tap Share Book.
Change the way a book looks. Some books let you change the font, font size, and color of the
page. (Tap .) You can also change justication and hyphenation in Settings > iBooks. These
settings apply to all books that support them.
Page color
Page color
Brightness
Brightness
Turn off pagination.
Turn off pagination.
Change the brightness. Tap . If you don’t see , tap rst.
Dim the screen when it’s dark. Turn on Auto-Night Theme to automatically change the
bookshelf, page color, and brightness when using iBooks in low-light conditions. (Not all books
support Auto-Night Theme.)