
User Guide
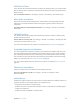
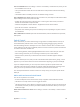
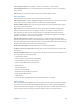
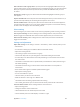
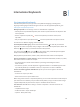
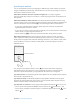

Table Of Contents
- iPhone User Guide
- Contents
- Chapter 1: iPhone at a Glance
- Chapter 2: Getting Started
- Chapter 3: Basics
- Use apps
- Customize iPhone
- Type text
- Dictate
- Voice Control
- Search
- Control Center
- Alerts and Notification Center
- Sounds and silence
- Do Not Disturb
- AirDrop, iCloud, and other ways to share
- Transfer files
- Personal Hotspot
- AirPlay
- AirPrint
- Use an Apple headset
- Bluetooth devices
- Restrictions
- Privacy
- Security
- Charge and monitor the battery
- Travel with iPhone
- Chapter 4: Siri
- Chapter 5: Phone
- Chapter 6: Mail
- Chapter 7: Safari
- Chapter 8: Music
- Chapter 9: Messages
- Chapter 10: Calendar
- Chapter 11: Photos
- Chapter 12: Camera
- Chapter 13: Weather
- Chapter 14: Clock
- Chapter 15: Maps
- Chapter 16: Videos
- Chapter 17: Notes
- Chapter 18: Reminders
- Chapter 19: Stocks
- Chapter 20: Game Center
- Chapter 21: Newsstand
- Chapter 22: iTunes Store
- Chapter 23: App Store
- Chapter 24: Passbook
- Chapter 25: Compass
- Chapter 26: Voice Memos
- Chapter 27: FaceTime
- Chapter 28: Contacts
- Chapter 29: Calculator
- Chapter 30: iBooks
- Chapter 31: Nike + iPod
- Chapter 32: Podcasts
- Appendix A: Accessibility
- Accessibility features
- Accessibility Shortcut
- VoiceOver
- Siri
- Zoom
- Invert Colors
- Speak Selection
- Speak Auto-text
- Large, bold, and high-contrast text
- Reduce onscreen motion
- On/off switch labels
- Hearing aids
- Subtitles and closed captions
- LED Flash for Alerts
- Mono audio and balance
- Call audio routing
- Assignable ringtones and vibrations
- Phone noise cancellation
- Guided Access
- Switch Control
- AssistiveTouch
- TTY support
- Visual voicemail
- Widescreen keyboards
- Large phone keypad
- Voice Control
- Accessibility in OS X
- Appendix B: International Keyboards
- Appendix C: iPhone in Business
- Appendix D: Safety, Handling, & Support
- Important safety information
- Important handling information
- iPhone Support site
- Restart or reset iPhone
- Reset iPhone settings
- Get information about your iPhone
- Usage information
- Disabled iPhone
- Back up iPhone
- Update and restore iPhone software
- Cellular settings
- Sell or give away iPhone?
- Learn more, service, and support
- FCC compliance statement
- Canadian regulatory statement
- Disposal and recycling information
- Apple and the environment

Appendix B International Keyboards 148
Special input methods
You can use keyboards to enter some languages in dierent ways. A few examples are Chinese
Cangjie and Wubihua, Japanese Kana, and Facemarks. You can also use your nger or a stylus to
write Chinese characters on the screen.
Build Chinese characters from the component Cangjie keys. As you type, suggested
characters appear. Tap a character to choose it, or continue typing up to ve components to see
more options.
Build Chinese Wubihua (stroke) characters. Use the keypad to build Chinese characters using
up to ve strokes, in the correct writing sequence: horizontal, vertical, left falling, right falling, and
hook. For example, the Chinese character 圈 (circle) should begin with the vertical stroke 丨.
•
As you type, suggested Chinese characters appear (the most commonly used characters
appear rst). Tap a character to choose it.
•
If you’re not sure of the correct stroke, enter an asterisk (*). To see more character options, type
another stroke, or scroll through the character list.
•
Tap the match key (匹配) to show only characters that match exactly what you typed.
Write Chinese characters. Write Chinese characters directly on the screen with your nger
when Simplied or Traditional Chinese handwriting input is turned on. As you write character
strokes, iPhone recognizes them and shows matching characters in a list, with the closest match
at the top. When you choose a character, its likely follow-on characters appear in the list as
additional choices.
Matching characters
Matching characters
You can type some complex characters, such as 鱲 (part of the name for the Hong Kong
International Airport), by writing two or more component characters in sequence. Tap the
character to replace the characters you typed. Roman characters are also recognized.
Type Japanese kana. Use the Kana keypad to select syllables. For more syllable options, drag the
list to the left or tap the arrow key.
Type Japanese romaji. Use the Romaji keyboard to type syllables. Alternative choices appear
along the top of the keyboard; tap one to type it. For more syllable options, tap the arrow key
and select another syllable or word from the window.
Type facemarks or emoticons. Use the Japanese Kana keyboard and tap the key. Or you can:
•
Use the Japanese Romaji keyboard (QWERTY-Japanese layout): Tap , then tap the key.
•
Use the Chinese (Simplied or Traditional) Pinyin or (Traditional) Zhuyin keyboard: Tap , then
tap the key.