
User Guide

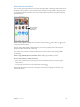

Table Of Contents
- iPhone User Guide
- Contents
- Chapter 1: iPhone at a Glance
- Chapter 2: Getting Started
- Chapter 3: Basics
- Use apps
- Customize iPhone
- Type text
- Dictate
- Voice Control
- Search
- Control Center
- Alerts and Notification Center
- Sounds and silence
- Do Not Disturb
- AirDrop, iCloud, and other ways to share
- Transfer files
- Personal Hotspot
- AirPlay
- AirPrint
- Use an Apple headset
- Bluetooth devices
- Restrictions
- Privacy
- Security
- Charge and monitor the battery
- Travel with iPhone
- Chapter 4: Siri
- Chapter 5: Phone
- Chapter 6: Mail
- Chapter 7: Safari
- Chapter 8: Music
- Chapter 9: Messages
- Chapter 10: Calendar
- Chapter 11: Photos
- Chapter 12: Camera
- Chapter 13: Weather
- Chapter 14: Clock
- Chapter 15: Maps
- Chapter 16: Videos
- Chapter 17: Notes
- Chapter 18: Reminders
- Chapter 19: Stocks
- Chapter 20: Game Center
- Chapter 21: Newsstand
- Chapter 22: iTunes Store
- Chapter 23: App Store
- Chapter 24: Passbook
- Chapter 25: Compass
- Chapter 26: Voice Memos
- Chapter 27: FaceTime
- Chapter 28: Contacts
- Chapter 29: Calculator
- Chapter 30: Nike + iPod
- Appendix A: Accessibility
- Accessibility features
- Accessibility Shortcut
- VoiceOver
- Siri
- Zoom
- Invert Colors
- Speak Selection
- Speak Auto-text
- Large and bold text
- Reduce screen motion
- Display on/off switch labels
- Hearing aids
- Subtitles and closed captions
- LED Flash for Alerts
- Mono Audio
- Route the audio of incoming calls
- Assignable ringtones and vibrations
- Ambient Noise Cancellation
- Guided Access
- Switch Control
- AssistiveTouch
- TTY support
- Visual voicemail
- Widescreen keyboards
- Large phone keypad
- Voice Control
- Accessibility in OS X
- Appendix B: iPhone in Business
- Appendix C: International Keyboards
- Appendix D: Safety, Handling, & Support
- Important safety information
- Important handling information
- iPhone Support site
- Restart or reset iPhone
- Reset iPhone settings
- Get information about your iPhone
- Usage information
- Disabled iPhone
- Back up iPhone
- Update and restore iPhone software
- Cellular settings
- Sell or give away iPhone?
- Learn more, service, and support
- FCC compliance statement
- Canadian regulatory statement
- Disposal and recycling information
- Apple and the environment

Chapter 11 Photos 72
While viewing a photo or video, tap to show and hide the controls. Swipe left or right to go
forward or backward.
Zoom in or out. Double-tap, or pinch and stretch a photo. When you zoom in, you can drag to
see other parts of the photo.
Play a video. Tap . To toggle between full-screen and t-to-screen, double-tap the display.
Play a slideshow. While viewing a photo, tap , then tap Slideshow. Select options, then tap
Start Slideshow. To stop the slideshow, tap the screen. To set other slideshow options, go to
Settings > Photos & Camera.
To stream a slideshow or video to a TV, see AirPlay on page 33.
Organize your photos and videos
Create a new album. Tap Albums, tap , enter a name, then tap Save. Select photos and videos
to add to the album, then tap Done.
Note: Albums created on iPhone aren’t synced back to your computer.
Add items to an existing album. While viewing thumbnails, tap Select, select items, tap Add To,
then select the album.
Manage albums. While viewing your album list, tap Edit.
•
Rename an album: Select the album, then enter a new name.
•
Rearrange albums: Drag .
•
Delete an album: Tap .
Only albums created on iPhone can be renamed or deleted.
iCloud Photo Sharing
Share streams of photos and videos with people you choose. Friends you’ve chosen who have an
iCloud account—and iOS 6 or later or OS X Mountain Lion or later—can join your stream, view
the photos you add, and leave comments. If they have iOS 7, they can add their own photos and
videos to the stream. You can also publish your stream to a public website for anyone to view.
Note: iCloud Photo Sharing works over both Wi-Fi and cellular networks. Cellular data charges
may apply. See Usage information on page 147.
Turn on iCloud Photo Sharing. Go to Settings > iCloud > Photos.
Create a shared stream. While viewing a photo or video, or when you’ve selected multiple
photos or videos, tap , tap iCloud, tap Stream, then tap New Shared Stream. You can send an
invitation by text or email.
Enable a public website. Select the shared stream, tap People, then turn on Public Website. Tap
Share Link to announce the site, if desired.
Add items to a shared stream. View a shared stream, tap , select items, then tap Done. You can
add a comment, then tap Post. You can also add items to a shared stream when you’re viewing
photos or albums. Tap , tap iCloud, tap Stream, then select the shared stream or create a new one.
Delete photos from a shared stream. Select the photo stream, tap Select, select the photos or
videos you want to delete, then tap . You must be the owner of the stream, or the owner of
the photo.