
User Guide
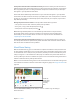
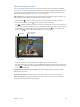
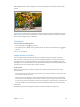
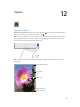

Table Of Contents
- iPad User Guide
- Contents
- Chapter 1: iPad at a glance
- Chapter 2: Get started
- Set up iPad
- Sign up for cellular service
- Connect to Wi-Fi
- Connect to the Internet
- Apple ID
- iCloud
- Set up other mail, contacts, and calendar accounts
- Manage content on your iOS devices
- Connect iPad to your computer
- Sync with iTunes
- Date and time
- International settings
- Your iPad name
- View this user guide on iPad
- Tips for using iOS 8
- Chapter 3: Basics
- Chapter 4: Siri
- Chapter 5: Messages
- Chapter 6: Mail
- Chapter 7: Safari
- Chapter 8: Music
- Chapter 9: FaceTime
- Chapter 10: Calendar
- Chapter 11: Photos
- Chapter 12: Camera
- Chapter 13: Contacts
- Chapter 14: Clock
- Chapter 15: Maps
- Chapter 16: Videos
- Chapter 17: Notes
- Chapter 18: Reminders
- Chapter 19: Photo Booth
- Chapter 20: Game Center
- Chapter 21: Newsstand
- Chapter 22: iTunes Store
- Chapter 23: App Store
- Chapter 24: iBooks
- Chapter 25: Podcasts
- Appendix A: Accessibility
- Accessibility features
- Accessibility Shortcut
- VoiceOver
- Zoom
- Invert Colors and Grayscale
- Speak Selection
- Speak Screen
- Speak Auto-Text
- Large, bold, and high-contrast text
- Button Shapes
- Reduce screen motion
- On/off switch labels
- Assignable tones
- Video Descriptions
- Hearing aids
- Mono audio and balance
- Subtitles and closed captions
- Siri
- Widescreen keyboards
- Guided Access
- Switch Control
- AssistiveTouch
- Accessibility in OS X
- Appendix B: iPad in Business
- Appendix C: International Keyboards
- Appendix D: Safety, Handling, and Support
- Important safety information
- Important handling information
- iPad Support site
- Restart or reset iPad
- Reset iPad settings
- An app doesn’t fill the screen
- Onscreen keyboard doesn’t appear
- Get information about your iPad
- Usage information
- Disabled iPad
- VPN settings
- Profiles settings
- Back up iPad
- Update and restore iPad software
- Cellular settings
- Sell or give away iPad
- Learn more, service, and support
- FCC compliance statement
- Canadian regulatory statement
- Disposal and recycling information
- ENERGY STAR® compliance statement
- Apple and the environment

Chapter 12 Camera 87
Take photos and videos
Camera oers several modes, which let you shoot stills, square-format photos, time-lapse, videos,
and panoramas.
Choose a mode. Drag up or down, or tap the camera mode labels to choose Time-Lapse, Video,
Photo, Square, or Pano.
Take a photo. Choose Photo, then tap the white Take Picture button or press either
volume button.
•
Take Burst shots: (iPad Air 2) Touch and hold the Take Picture button to take rapid-re photos
in bursts (available while in Square or Photo mode). The shutter sound is dierent, and the
counter shows how many shots you’ve taken, until you lift your nger. To see the suggested
shots and select the photos you want to keep, tap the thumbnail, then tap Select. The gray
dot(s) mark the suggested photos. To copy a photo from the burst as a separate photo in your
Bursts album in Photos, tap the circle in the lower-right corner of the photo. To delete the
burst of photos, tap it, then tap .
•
Apply a lter: Tap to apply dierent color eects, such as Mono or Chrome. To turn o a
lter, tap , then tap None. You can also apply a lter later, when you edit the photo. See Edit
photos and trim videos on page 83.
A rectangle briey appears where the exposure is set. When you photograph people, face
detection (iPad 3rd generation or later) balances the exposure across up to 10 faces. A rectangle
appears for each face detected.
Exposure is automatic, but you can set the exposure manually for the next shot by tapping an
object or area on the screen. With an iSight camera, tapping the screen sets the focus and the
exposure, and face detection is temporarily turned o. To lock the exposure and focus, touch
and hold until the rectangle pulses. Take as many photos as you want. When you tap the screen
again, the automatic settings and face detection turn back on.
Adjust the exposure. Tap to see next to the exposure rectangle, then slide up or down to
adjust the exposure.
Take a panorama photo. (iSight camera) Choose Pano, tap the Take Picture button, then pan slowly
in the direction of the arrow. To pan in the other direction, rst tap the arrow. To pan vertically, rst
rotate iPad to landscape orientation. You can reverse the direction of a vertical pan, too.