
User Guide
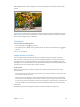
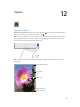

Table Of Contents
- iPad User Guide
- Contents
- Chapter 1: iPad at a glance
- Chapter 2: Get started
- Set up iPad
- Sign up for cellular service
- Connect to Wi-Fi
- Connect to the Internet
- Apple ID
- iCloud
- Set up other mail, contacts, and calendar accounts
- Manage content on your iOS devices
- Connect iPad to your computer
- Sync with iTunes
- Date and time
- International settings
- Your iPad name
- View this user guide on iPad
- Tips for using iOS 8
- Chapter 3: Basics
- Chapter 4: Siri
- Chapter 5: Messages
- Chapter 6: Mail
- Chapter 7: Safari
- Chapter 8: Music
- Chapter 9: FaceTime
- Chapter 10: Calendar
- Chapter 11: Photos
- Chapter 12: Camera
- Chapter 13: Contacts
- Chapter 14: Clock
- Chapter 15: Maps
- Chapter 16: Videos
- Chapter 17: Notes
- Chapter 18: Reminders
- Chapter 19: Photo Booth
- Chapter 20: Game Center
- Chapter 21: Newsstand
- Chapter 22: iTunes Store
- Chapter 23: App Store
- Chapter 24: iBooks
- Chapter 25: Podcasts
- Appendix A: Accessibility
- Accessibility features
- Accessibility Shortcut
- VoiceOver
- Zoom
- Invert Colors and Grayscale
- Speak Selection
- Speak Screen
- Speak Auto-Text
- Large, bold, and high-contrast text
- Button Shapes
- Reduce screen motion
- On/off switch labels
- Assignable tones
- Video Descriptions
- Hearing aids
- Mono audio and balance
- Subtitles and closed captions
- Siri
- Widescreen keyboards
- Guided Access
- Switch Control
- AssistiveTouch
- Accessibility in OS X
- Appendix B: iPad in Business
- Appendix C: International Keyboards
- Appendix D: Safety, Handling, and Support
- Important safety information
- Important handling information
- iPad Support site
- Restart or reset iPad
- Reset iPad settings
- An app doesn’t fill the screen
- Onscreen keyboard doesn’t appear
- Get information about your iPad
- Usage information
- Disabled iPad
- VPN settings
- Profiles settings
- Back up iPad
- Update and restore iPad software
- Cellular settings
- Sell or give away iPad
- Learn more, service, and support
- FCC compliance statement
- Canadian regulatory statement
- Disposal and recycling information
- ENERGY STAR® compliance statement
- Apple and the environment
Chapter 11 Photos 81
Use My Photo Stream without iCloud Photo Library. Photos and videos you take with iPad are
added to the My Photo Stream album when you leave the Camera app and iPad is connected to
Wi-Fi. Any photos you add—including screenshots and photos saved from email, for example—
also appear in your My Photo Stream album.
Photos and videos added to My Photo Stream on your other devices appear in your My Photo
Stream album on iPad. iOS devices can keep up to 1000 of your most recent photos in iCloud for
30 days; you can choose to automatically import these photos to your computer, if you want to
keep them permanently.
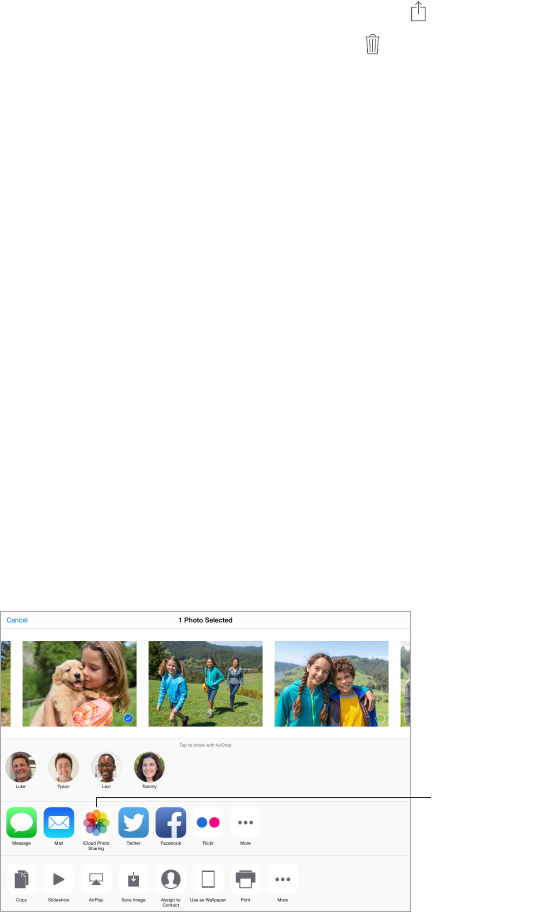
Manage My Photo Stream contents. In the My Photo Stream album, tap Select.
•
Save your best shots on iPad: Select the photos, then tap Add To.
•
Share, print, or copy: Select the photos, then tap .
•
Delete photos: Select the photos, then tap .
Note: Although deleted photos are removed from My Photo Stream on all your devices,
the original photos remain in Photos on the device on which they were originally taken.
Photos that you save to another album on a device or computer are also not deleted. See
support.apple.com/kb/HT4486.
Use My Photo Stream with iCloud Photo Library. If you use iCloud Photo Library on iPad, you
can use My Photo Stream to upload recent photos and videos and view them on other devices
that do not have iCloud Photo Library enabled.
iCloud Photo Sharing
With iCloud Photo Sharing, you can create albums of photos and videos to share, and subscribe
to other people’s shared albums. You can invite others using iCloud Photo Sharing (iOS 6 or later
or OS X Mountain Lion or later) to view your albums, and they can leave comments if they wish.
If they’re using iOS 7 or OS X Mavericks or later, they can add their own photos and videos. You
can also publish your album to a website for anyone to view. iCloud Photo Sharing works with or
without iCloud Photo Library and My Photo Stream.
Note: To use iCloud Photo Sharing, iPad must be connected to Wi-Fi. iCloud Photo Sharing works
over both Wi-Fi and cellular networks. Cellular data charges may apply. See Usage information on
page 159.
Create new
shared albums
or add photos
to existing
ones.
Create new
shared albums
or add photos
to existing
ones.
Turn on iCloud Photo Sharing. Go to Settings > iCloud > Photos. Or go to Settings >
Photos & Camera.