iPad User Guide For iOS 8 Software
Contents 8 8 10 10 10 11 11 12 13 Chapter 1: iPad at a Glance 14 14 14 15 15 16 17 17 18 18 19 19 19 19 Chapter 2: Getting Started 20 20 23 24 26 30 30 31 32 33 33 33 36 36 37 37 37 Chapter 3: Basics iPad Overview Accessories Multi-Touch screen Sleep/Wake button Home button Volume buttons and the Side Switch SIM card tray Status icons Set up iPad Connect to Wi-Fi Apple ID iCloud Set up other mail, contacts, and calendar accounts Manage content o
38 38 39 39 41 42 Bluetooth devices Restrictions Privacy Security Charge and monitor the battery Travel with iPad 43 43 44 44 44 Chapter 4: Siri 45 45 46 47 47 48 Chapter 5: Messages 49 49 50 50 51 51 52 52 52 53 Chapter 6: Mail 54 54 55 55 56 57 57 58 59 59 60 Chapter 7: Safari 61 61 61 62 64 64 65 65 Chapter 8: Music Use Siri Tell Siri about yourself Make corrections Siri settings iMessage service Send and receive messages Mana
66 66 Home Sharing Music settings 67 67 68 68 Chapter 9: FaceTime 69 69 70 70 71 71 Chapter 10: Calendar 72 72 73 73 74 75 75 77 77 78 Chapter 11: Photos 79 79 80 81 81 82 Chapter 12: Camera 83 83 83 84 84 Chapter 13: Contacts 85 85 86 Chapter 14: Clock 87 87 88 88 89 89 Chapter 15: Maps 90 90 Chapter 16: Videos FaceTime at a glance Make and answer calls Manage calls Calendar at a glance Invitations Use multiple calendars
90 91 92 Add videos to your library Control playback Videos settings 93 93 94 Chapter 17: Notes 95 95 96 96 97 Chapter 18: Reminders 98 98 99 Chapter 19: Photo Booth Notes at a glance Share notes in multiple accounts Reminders at a glance Scheduled reminders Location reminders Reminders settings Take photos Manage photos 100 Chapter 20: Game Center 100 Game Center at a glance 101 Play games with friends 101 Game Center settings 102 Chapter 21: Newsstand 103
118 118 119 119 130 131 131 131 131 132 132 132 132 132 132 132 133 134 134 134 134 135 138 140 Appendix A: Accessibility 141 141 141 141 141 Appendix B: iPad in Business Accessibility features Accessibility Shortcut VoiceOver Zoom Invert Colors and Grayscale Speak Selection Speak Screen Speak Auto-Text Large, bold, and high-contrast text Button Shapes Reduce screen motion On/off switch labels Assignable tones Video Descriptions Hearing aids Mono audio and bala
154 155 156 156 157 157 158 158 Sound, music, and video Sell or give away iPad Learning more, service, and support FCC compliance statement Canadian regulatory statement Disposal and recycling information ENERGY STAR® compliance statement Apple and the environment Contents 7
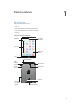
1 iPad at a Glance iPad Overview This guide describes iOS 8 for: •• iPad 2 •• iPad (3rd generation and 4th generation) •• iPad mini and iPad mini with Retina display •• iPad Air iPad mini with Retina display FaceTime HD camera Status bar App icons Multi-Touch display Home Sleep/Wake button iSight camera Side Switch Headset jack Volume buttons Microphones Speakers Nano-SIM tray (cellular models) Lightning connector 8
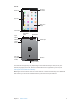
iPad Air FaceTime HD camera Status bar App icons Multi-Touch display Home button iSight camera Sleep/Wake button Microphones Side Switch Headset jack Volume buttons Nano-SIM tray (cellular models) Speakers Lightning connector Your features and apps may vary depending on the model of iPad you have, and on your location, language, and carrier. To find out which features are supported in your area, see www.apple.com/ios/feature-availability.
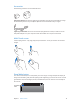
Accessories The following accessories are included with iPad: USB power adapter. Use with the Lightning to USB Cable or the 30-pin to USB Cable to charge the iPad battery. The size of your adapter depends on the iPad model and your region. Lightning to USB Cable. Use this to connect iPad (4th generation or later) or iPad mini to the USB power adapter or to your computer. Earlier iPad models use a 30-pin to USB Cable.
Lock iPad. Press the Sleep/Wake button. Unlock iPad. Press the Home button or the Sleep/Wake button, then drag the slider that appears onscreen. Turn iPad on. Hold down the Sleep/Wake button until the Apple logo appears. Turn iPad off. Hold down the Sleep/Wake button for a few seconds until the slider appears onscreen, then drag the slider. If you don’t touch the screen for two minutes, iPad locks itself. You can change how long iPad waits to lock itself, or set a passcode to unlock iPad.
Adjust the volume. Press the Volume buttons. •• Mute the sound: Press and hold the Volume Down button. •• Set a volume limit: Go to Settings > Music > Volume Limit. WARNING: For important information about avoiding hearing loss, see Important safety information on page 146. Mute notifications, alerts, and sound effects. Slide the Side Switch toward the Volume buttons. The Side Switch doesn’t mute the audio from music, podcasts, movies, and TV shows.
Status icons The icons in the status bar at the top of the screen give information about iPad: Status icon What it means Wi-Fi iPad has a Wi-Fi Internet connection. The more bars, the stronger the connection. See Connect to Wi-Fi on page 14. Cell signal iPad (Wi-Fi + Cellular models) is in range of the cellular network. If there’s no signal, “No service” appears. Airplane Mode Airplane Mode is on—you can’t access the Internet, or use Bluetooth® devices.
Getting Started 2 Set up iPad · WARNING: To avoid injury, read Important safety information on page 146 before using iPad. Set up iPad. Turn on iPad, then follow the Setup Assistant.
Set up your own Wi-Fi network. If you have a new or unconfigured AirPort base station turned on and within range, you can use iPad to set it up. Go to Settings > Wi-Fi, then look for “Set up an AirPort base station.” Tap your base station and the Setup Assistant does the rest. Manage your AirPort network. If iPad is connected to an AirPort base station, go to Settings > Wi-Fi, tap next to the network name, then tap “Manage this Network.
•• iCloud Drive: Safely store your presentations, spreadsheets, PDFs, images, and other documents in iCloud, and access them from your iPad, iPhone, iPod touch, Mac, or PC. See About iCloud Drive on page 36. •• Documents in the Cloud: For iCloud-enabled apps, keep documents and app data up to date across all your devices set up with iCloud. •• Mail, Contacts, Calendars: Keep your mail, contacts, calendars, notes, and reminders up to date across all your devices.
Manage content on your iOS devices You can transfer information and files between iPad and your other iOS devices and computers, using either iCloud or iTunes. •• iCloud stores your photos and videos, documents, music, calendars, contacts, and more. It all gets pushed wirelessly to your other iOS devices and computers, keeping everything up to date. See iCloud on page 15. •• iTunes syncs music, videos, photos, and more between your computer and iPad.
•• In the Info pane, click Advanced to select options that let you replace the information on iPad with the information from your computer during the next sync. •• In the Music pane, you can sync music using your playlists. •• In the Photos pane, you can sync photos and videos from a supported app or folder on your computer. •• If you use iCloud to store your contacts, calendars, and bookmarks, don’t also sync them to iPad using iTunes.
International settings Go to Settings > General > Language & Region to set: •• The language for iPad •• The preferred language order for apps and websites •• The region format •• The calendar format •• Advanced settings for dates, times, and numbers To add a keyboard for another language, go to Settings > General > Keyboard > Keyboards. For more information, see Use international keyboards on page 143. Your iPad name The name of your iPad is used by iTunes and iCloud.
3 Basics Use apps All the apps that come with iPad—as well as the apps you download from the App Store—are on the Home screen. Start at home Tap an app to open it. Press the Home button anytime to return to the Home screen. Swipe left or right to see other screens. Multitasking iPad helps you manage several tasks at the same time. View contacts and open apps. Double-click the Home button to reveal the multitasking screen. Swipe left or right to see more. To switch to another app, tap it.
Close an app. If an app isn’t working properly, you can force it to quit. Drag the app up from the multitasking screen. Then try opening the app again. If you have lots of apps, you can use Spotlight to find and open them. Pull down the center of the Home screen to see the search field. See Spotlight Search on page 30. Look around Drag a list up or down to see more. Swipe to scroll quickly; touch the screen to stop it. Some lists have an index—tap a letter to jump ahead.
Multitasking gestures You can use multitasking gestures on iPad to return to the Home screen, reveal the multitasking display, or switch to another app. Return to the Home screen. Pinch four or five fingers together. Reveal the multitasking display. Swipe up with four or five fingers. Switch apps. Swipe left or right with four or five fingers. Turn multitasking gestures on or off. Go to Settings > General > Multitasking Gestures.
App extensions can also help you edit a photo or video in your Photos app. For example, you can download a photo-related app that lets you apply filters to photos from your Photos app. Install app extensions. Download the app from the App Store, then open the app, then follow the onscreen instructions. Turn sharing or action options on or off. Tap , then tap More (drag options to the left if necessary). Turn off third-party sharing or action options (they are on by default).
Messages If your iPhone (with iOS 8) is signed into iMessage using the same Apple ID as your iPad, you can also send and receive SMS and MMS messages on your iPad. Charges may apply to the text messaging service for your iPhone. Instant Hotspot You can use Instant Hotspot on your iPhone (with iOS 8) or iPad (cellular models with iOS 8) to provide Internet access to your other iOS devices and Mac computers (with iOS 8 or OS X Yosemite) that are signed into iCloud using the same Apple ID.
Organize with folders Create a folder. While arranging apps, drag one app onto another. Tap the name of the folder to rename it. Drag apps to add or remove them. Press the Home button when you finish. You can have multiple pages of apps in a folder. Delete a folder. Drag out all the apps—the folder is deleted automatically. Change the wallpaper Wallpaper settings let you set an image or photo as wallpaper for the Lock screen or Home screen. You can choose from dynamic and still images.
Adjust the screen brightness Dim the screen to extend battery life, or use Auto-Brightness. Adjust the screen brightness. Go to Settings > Display & Brightness, then drag the slider. If Auto-Brightness is on, iPad adjusts the screen brightness for current light conditions using the built-in ambient light sensor. You can also adjust the brightness in Control Center. Type text The onscreen keyboard lets you enter text when needed.
Tap Shift to type uppercase, or touch the Shift key and slide to a letter. Double-tap Shift for caps lock. To enter numbers, punctuation, or symbols, tap the Number key or the Symbol key . If you haven’t added any keyboards, tap to switch to the emoji keyboard. If you have several keyboards, tap to switch to the last one you used. Continue tapping to access other enabled keyboards, or touch and hold , then slide to choose a different keyboard.
Edit text Revise text. Touch and hold the text to show the magnifying glass, then drag to position the insertion point. Select text. Tap the insertion point to display the selection options. Or double-tap a word to select it. Drag the grab points to select more or less text. In read-only documents, such as webpages, touch and hold to select a word. Grab points You can cut, copy, or paste over selected text.
Once it’s paired, the keyboard reconnects to iPad whenever it’s in range—up to about 30 feet (10 meters). When it’s connected, the onscreen keyboard doesn’t appear. Save your batteries. Turn off Bluetooth and the wireless keyboard when not in use. You can turn off Bluetooth in Control Center. To turn off the keyboard, hold down the On/off switch until the green light goes off. Unpair a wireless keyboard. Go to Settings > Bluetooth, tap tap “Forget this Device.
Dictation On iPad models that support it, you can dictate instead of typing. Make sure Siri is turned on (in Settings > General > Siri) and iPad is connected to the Internet. Note: Dictation may not be available in all languages or in all areas, and features may vary. Cellular data charges may apply. Dictate text. Tap on the iPad keyboard, then speak. When you finish, tap Done. Tap to begin dictation. Add text. Tap again and continue dictating.
You can use Spotlight Search to find and open apps too. Choose which apps and content are searched. Go to Settings > General > Spotlight Search, then tap to deselect apps or content. To change the search order, touch and drag to a new position. Limit Spotlight Search to your iPad. Go to Settings > General > Spotlight Search, then tap Spotlight Suggestions to deselect it. Turn off Location Services for Spotlight Suggestions. Go to Settings > Privacy > Location Services.
Alerts and Notification Center Alerts Alerts let you know about important events. They can appear briefly at the top of the screen, or remain in the center of the screen until you acknowledge them. Some apps may include a badge on their Home screen icon, to let you know how many new items await—for example, the number of new email messages. If there’s a problem—such as a message that couldn’t be sent—an exclamation mark appears on the badge.
Set notification options. Go to Settings > Notifications. Tap an app to set its notification options. For example, choose to view a notification from the Lock screen. You can also tap Edit to arrange the order of app notifications. Touch , then drag it to a new position. Choose whether to show Today and Notifications View on a locked screen. Go to Settings > Passcode, then choose whether to allow access when locked. Close Notification Center. Swipe up, or press the Home button.
AirDrop Use AirDrop AirDrop lets you share your photos, videos, websites, locations, and other items wirelessly with other nearby devices (iOS 7 or later). With iOS 8, you can share with Mac computers that have OS X Yosemite installed. AirDrop transfers information using Wi-Fi and Bluetooth. To use AirDrop, you need to be signed into iCloud using your Apple ID, and must be on the same Wi-Fi network, or within approximately 30 feet (10 meters) of the other device.
Create an Apple ID for a child. Tap Settings > iCloud > Family, scroll to the bottom of the screen, then tap Create an Apple ID for a child. Accept an invitation to Family Sharing. Make sure you are signed into iCloud, and that you can accept a Family Sharing invitation from your iOS device (iOS 8 required), Mac (OS X Yosemite required), or PC (iCloud for Windows 4.0 required).
Set up a family reminder. When you set up Family Sharing, a shared list is automatically created in the Reminders app on all family members’ devices. To add a reminder to the family list, open the Reminders app, tap the family list, then add a reminder to the list. See Reminders at a glance on page 95. Share your location with family members. Family members can share their location by tapping Settings > iCloud > Share My Location.
Personal Hotspot Use Personal Hotspot to share your iPad (Wi-Fi + Cellular models) Internet connection. Computers can share your Internet connection using Wi-Fi, Bluetooth, or a USB cable. Other iOS devices can share the connection using Wi-Fi. Personal Hotspot works only if iPad is connected to the Internet over the cellular data network. Note: This feature may not be available with all carriers. Additional fees may apply. Contact your carrier for more information.
See the status of a print job. Double-click the Home button, then tap Print Center. The badge on the icon shows how many documents are in the queue. Cancel a job. Select it in the Print Center, then tap Cancel Printing. Bluetooth devices You can use Bluetooth devices with iPad, such as stereo headphones or an Apple Wireless Keyboard. For supported Bluetooth profiles, go to support.apple.com/kb/HT3647.
Privacy Privacy settings let you see and control which apps and system services have access to Location Services, and to contacts, calendars, reminders, and photos. Location Services lets location-based apps such as Maps, Weather, and Camera gather and use data indicating your location. Your approximate location is determined using available information from local Wi-Fi networks, if you have Wi-Fi turned on.
Increase security. Turn off Simple Passcode and use a longer passcode. To enter a passcode that’s a combination of numbers and letters, you use the keyboard. If you prefer to unlock iPad using the numeric keypad, set up a longer passcode using numbers only. Allow access to features when iPad is locked. Go to Settings > Passcode.
Find My iPad Find My iPad can help you locate and secure your iPad using the free Find My iPhone app (available in the App Store) on another iPad, iPhone, or iPod touch, or using a Mac or PC web browser signed into www.icloud.com/find. Find My iPhone includes Activation Lock, which is designed to prevent anyone else from using your iPad if you ever lose it. Your Apple ID and password are required to turn off Find My iPad or to erase and reactivate your iPad. Turn on Find My iPad.
See proportion of battery used by each app. Tap Settings > General > Usage, then tap Battery Usage. The battery icon in the upper-right corner of the status bar shows the battery level or charging status. Display the percentage of battery charge. Go to Settings > General > Usage, then turn on Battery Percentage. Important: If iPad is very low on power, it may display an image of a nearly depleted battery, indicating that iPad needs to charge for up to twenty minutes before you can use it.
4 Siri Use Siri Siri lets you speak to iPad to send messages, schedule meetings, make FaceTime calls, and much more. Siri understands natural speech, so you don’t have to learn special commands or keywords. Ask Siri anything, from “set the timer for 3 minutes” to “what movies are showing tonight?” Open apps, and turn features like Airplane Mode, Bluetooth, Do Not Disturb, and Accessibility on or off.
Tell Siri about yourself If you tell Siri about yourself—including things like your home and work addresses, and your relationships—you can get personalized service like, “remind me to call my wife” or “get directions to home.” Tell Siri who you are. Fill out your contact card in Contacts, go to Settings > General > Siri > My Info, then tap your contact card. Note: Siri uses Location Services when your requests require knowing your location. See Privacy on page 39.
Messages 5 iMessage service With the Messages app and the built-in iMessage feature, you can send text messages over Wi-Fi to others using iOS 5 or later, or OS X Mountain Lion or later. Messages can include photos, videos, and other info. You can see when people are typing, and let them know when you’ve read their messages.
Send and receive messages Tap the compose button to start a new conversation. Get info, make a voice or FaceTime call, share your location, or mute notifications. Blue indicates an iMessage conversation. Send a photo or video. Add your voice to the conversation. Start a conversation. Tap , then enter a phone number or email address, or tap , then choose a contact.
Block unwanted messages. On a contact card, tap Block this Caller. You can see someone’s contact card while viewing a message by tapping Details, then tapping . You can also block callers in Settings > Messages > Blocked. You won’t receive FaceTime calls or text messages from blocked callers. For more information about blocking calls, see support.apple.com/kb/HT5845. Manage conversations Conversations are saved in the Messages list. A blue dot conversation to view or continue it.
Send your current location. Tap Details, then tap Send My Current Location to send a map that shows where you are. Share your location. Tap Details, tap Share My Location, then specify the length of time. The person you’re texting can see your location by tapping Details. To turn Share My Location on or off, or to select the device that determines your location, go to Settings > iCloud > Share My Location (under Advanced). Send items from another app.
6 Mail Write messages Mail lets you access your email accounts, on the go. WARNING: For important information about avoiding distractions that could lead to dangerous situations, see Important safety information on page 146. Change mailboxes or accounts. Search for messages. Delete, move, or mark multiple messages. Compose a message. Change the preview length in Settings > Mail, Contacts, Calendars. Insert a photo or video. Tap the insertion point, then tap Insert Photo or Video.
Change a recipient from Cc to Bcc. After you enter recipients, you can drag them from one field to another or change their order. Mark addresses outside certain domains. When you’re addressing a message to a recipient that’s not in your organization’s domain, Mail can color the recipient’s name red to alert you. Go to Settings > Mail, Contacts, Calendars > Mark Addresses, then define the domains that you do not want marked. You can enter multiple domains separated by commas, such as “apple.
See important messages Mark person as a VIP. Get notified of replies to a message or thread. Tap , then tap Notify Me. While you’re writing a message, you can also tap in the Subject field. To change how notifications appear, go to Settings > Notifications > Mail > Thread Notifications. Gather important messages. Add important people to your VIP list, so all their messages appear in the VIP mailbox. Tap the sender’s name in a message, then tap Add to VIP.
Work with multiple messages Delete, mark, or move a message. While viewing a list of messages, swipe a message to the left to reveal a menu of actions. Swipe all the way to the left to select the first action. You can also swipe a message to the right to reveal another action. Choose the actions you want to appear in Settings > Mail, Contacts, Calendars > Swipe Options. Delete, move, or mark multiple messages. While viewing a list of messages, tap Edit.
Mail settings Go to Settings > Mail, Contacts, Calendars, where you can: •• Create a different mail signature for each account •• Add mail accounts •• Set Out of Office replies for Exchange email accounts •• Bcc yourself on every message you send •• Turn on Organize by Thread to group related messages together •• Turn off confirmation for deleting a message •• Turn off Push delivery of new messages, to save on battery power •• Temporarily turn off an account Chapter 6 Ma
7 Safari Safari at a glance Use Safari on iPad to browse the web, use Reading List to collect webpages to read later, and add page icons to the Home screen for quick access. Use iCloud to see pages you have open on other devices, and to keep your bookmarks, history, and reading list up to date on your other devices. See your bookmarks, reading list, and shared links. Enter a web address or search item, or get quick access to your Favorites. View open tabs. Your open tabs Open a new tab.
Search the web Spotlight Search showing results in the App Store Enter what you’re searching for, then tap Go. Or tap a suggestion. Tap to search the current page. Search the web. Enter a URL or search term in the smart search field at the top of the page, then tap a search suggestion, or tap Go on the keyboard to search for exactly what you typed. If you don’t want to see suggested search terms, go to Settings > Safari, then (under Search) turn off Search Engine Suggestions.
View tabs open on your other devices. If you turn on Safari in Settings > iCloud, you can view tabs that you have open on your other devices. Tap , then scroll to the lists at the bottom of the page. Close a tab. Tap on the tab. View recently closed tabs. Touch and hold . Get back to the top. Tap the top edge of the screen to quickly return to the top of a long page. See more. Turn iPad to landscape orientation. See the latest. Tap next to the address in the search field to update the page.
Save a reading list for later Save interesting items in your reading list so you can return to them later. You can read pages in your reading list even when you’re not connected to the Internet. Add the current page to your reading list. Tap , then tap Add to Reading List. Add a linked page without opening it. Touch and hold the link, then tap Add to Reading List. View your reading list. Tap , then tap . Delete something from your reading list.
Spread the news. Tap . Tap to share with someone nearby using AirDrop. Other sharing options Fill in forms Whether you’re logging in to a website, signing up for a service, or making a purchase, you can fill in a web form using the onscreen keyboard or have Safari fill it in for you using AutoFill. Tap AutoFill instead of typing your contact info. Tired of always having to log in? When you’re asked if you want to save the password for the site, tap Yes.
Avoid clutter with Reader Use Safari Reader to focus on a page’s primary content. Tap to view the page in Reader. Focus on content. Tap at the left end of the address field. If you don’t see the icon, reader isn’t available for the page you’re looking at. Share just the good stuff. To share just the article text and a link to it, tap page in Reader. while viewing the Return to the full page. Tap the reader icon in the address field again.
Safari settings Go to Settings > Safari, where you can: •• Choose your search engine •• Provide AutoFill information •• Choose which favorites are displayed when you search •• Have new tabs open in the background •• Display your Favorites at the top of the page •• Block pop-ups •• Tighten privacy and security •• Clear your history, cookies, and data Chapter 7 Safari 60
Music 8 Get music Get music and other audio content onto iPad: •• Purchase music from the iTunes Store: Go to iTunes Store. While browsing playlists and albums in Music, you can tap Store. See Chapter 22, iTunes Store, on page 103. •• iCloud: Get access to all your iTunes songs, no matter which device you used to purchase them. Use iTunes Match to include CDs and other music you import. See iCloud and iTunes Match on page 64.
Note: iTunes Radio may not be available in all areas. For more information about iTunes Radio, see support.apple.com/kb/HT5848. Create, share, fine-tune, rename, or delete a station. Play more like this song, never play it, or add it to your wish list. Skip to the next song. Options for browsing your music library When you pick a station and play a song, the Now Playing screen shows the album art and the playback controls.
The Now Playing screen provides playback controls and shows you what’s playing. Track list Back Tap to create a Genius Playlist or an iTunes Radio station. Playhead Volume Skip to any point in a song. Drag the playhead. Slow down the scrub rate by sliding your finger down the screen. Shuffle. Tap Shuffle on the Now Playing screen to play your tunes in random order. See all tracks from the album containing the current song. Tap . To play a track, tap it. Search music.
iCloud and iTunes Match With iCloud, you can access all of the music you purchase in the iTunes Store on all of your devices. The icon shows the songs you have in iCloud. Just click a song to play it. Automatically download music purchased on another device. Go to Settings > iTunes & App Store, sign in using your Apple ID, then turn on Music under Automatic Downloads. Download music if you’re going somewhere you won’t have Wi-Fi. Click next to the songs you’ll want to play.
Clear or delete a playlist you created on iPad. Select the playlist, then tap Clear or Delete. Remove a song from iPad. Tap Songs, swipe the song, then tap Delete. The song is deleted from iPad, but not from your iTunes library on your Mac or PC, or from iCloud. Genius—made for you A Genius playlist is a collection of songs from your library that go together. Genius is a free service, but it requires an Apple ID.
Home Sharing Home Sharing lets you play music, movies, and TV shows from the iTunes library on your Mac or PC. iPad and your computer must be on the same Wi-Fi network. Note: Home Sharing requires iTunes 10.2 or later, available at www.itunes.com/download. Bonus content, such as digital booklets and iTunes Extras, can’t be shared. Play music from your iTunes library on iPad. 1 In iTunes on your computer, choose File > Home Sharing > Turn On Home Sharing.
9 FaceTime FaceTime at a glance Use FaceTime to make video or audio calls to other iOS devices or computers that support FaceTime. The FaceTime camera lets you talk face-to-face; switch to the rear iSight camera to share what you see around you. Note: FaceTime may not be available in all areas. On iPad Wi-Fi + Cellular models, you can make FaceTime calls over a cellular data connection. Cellular data charges may apply. See Cellular settings on page 153. Drag your image to any corner.
Make and answer calls Make a FaceTime call. Make sure FaceTime is turned on in Settings > FaceTime. Tap FaceTime, then type the name or number you want to call in the entry field at the top left. Tap to make a video call, or tap to make a FaceTime audio call. Or tap to open Contacts and start your call from there. Tap an icon to start a FaceTime call. Use your voice to start the call. Press and hold the Home button, then say “FaceTime,” followed by the name of the person to call.
10 Calendar Calendar at a glance Change views. Search for events. View invitations. Change calendars or accounts. Add an event. Tap , then fill in the event details. If you add a location and choose Alert > Time to leave, Calendar reminds you of the event based on the current travel time to get there. Search for events. Tap , then enter text in the search field. The titles, invitees, locations, and notes for the calendars you’re viewing are searched. Change your view.
Invitations iCloud, Microsoft Exchange, and some CalDAV servers let you send and receive meeting invitations. Invite others to an event. Tap an event, tap Edit, then tap Invitees. Type names, or tap to pick people from Contacts. If you don’t want to be notified when someone declines a meeting, go to Settings > Mail, Contacts, Calendar > Show Invitee Declines. RSVP. Tap an event you’ve been invited to, or tap Inbox, then tap an invitation.
Share iCloud calendars With Family Sharing, a calendar shared with all the members of your family is created automatically. See Family Sharing on page 34. You can also share an iCloud calendar with other iCloud users. When you share a calendar, others can see it, and you can let them add or change events. You can also share a read-only version that anyone can view. Create an iCloud calendar. Tap Calendars, tap Edit, then tap Add Calendar in the iCloud section. Share an iCloud calendar.
11 Photos View photos and videos Photos lets you view the photos and videos that you: •• Took on iPad •• Received from others in shared albums (see iCloud Photo Sharing on page 74) •• Synced from your computer (see Sync with iTunes on page 17) •• Saved from an email, text message, webpage, or screenshot Tap to view full screen. View your photos and videos. Tap Photos. Photos automatically organizes your photos and videos by year, by collection, and by moment.
Play a video. Tap . To toggle between full screen and fit-to-screen, double-tap the display. Play a slideshow. While viewing a photo, tap , then tap Slideshow. Select options, then tap Start Slideshow. To stop the slideshow, tap the screen. To set other slideshow options, go to Settings > Photos & Camera. To stream a slideshow or video to a TV, see AirPlay on page 37. Organize your photos and videos Mark your favorites.
iCloud Photo Sharing With iCloud Photo Sharing, you can create albums of photos and videos to share, and subscribe to other people’s shared albums. You can invite others using iCloud Photo Sharing (iOS 6 or later or OS X Mountain Lion or later) to view your albums, and they can leave comments if they wish. If they’re using iOS 7 or OS X Mavericks or later, they can add their own photos and videos. You can also publish your album to a website for anyone to view.
Add items to a shared album you subscribed to. View the shared album, then tap items, then tap Done. You can add a comment, then tap Post. . Select See your Family album. When Family Sharing is set up, a shared album called “Family” is automatically created in Photos on all family members’ devices. Everyone in the family can contribute photos, videos, and comments to the album, and be notified whenever something new is added.
•• Tap , and Photos suggests an optimal crop, but you can drag the corners of the grid tool to set your own crop. Move the wheel to tilt or straighten the photo. Tap Auto to align the photo with the horizon, and tap Reset to undo alignment changes. Tap to rotate the photo 90 degrees. Tap to choose a standard crop ratio, such as 2:3 or Square. Rotate photo. Move the wheel to tilt or straighten. Choose a standard photo format.
Important: If you choose Trim Original, the trimmed frames are permanently deleted from the original video. If you choose Save as New Clip, a new trimmed video clip is saved in your Videos album and the original video is unaffected. Print photos Print to an AirPrint-enabled printer: •• Print a single photo: Tap , then tap Print. Print multiple photos: While viewing a photo album, tap Select, select the photos, tap tap Print. See AirPrint on page 37.
Photos settings Settings for Photos are in Settings > Photos & Camera.
12 Camera Camera at a glance Quick! Get the camera! From the Lock screen, just swipe edge of the screen to open Control Center, then tap . up. Or swipe up from the bottom Note: When you open Camera from the Lock screen, you can view and edit photos and videos you take while the device is locked by tapping the thumbnail at the lower-left corner of the screen. To share photos and videos, first unlock iPad.
Take photos and videos Camera offers several modes, which let you shoot stills, square-format photos, time-lapse, videos, and panoramas. Choose a mode. Drag up or down, or tap the camera mode labels to choose Time-Lapse, Video, Photo, Square, or Pano. Take a photo. Choose Photo, then tap the Take Picture button or press either volume button. A rectangle briefly appears where the exposure is set.
Zoom in or out. (iSight camera) Pinch and spread the image on the screen. With iPad Air and iPad mini with Retina display, zooming works in video mode as well as photo mode. If Location Services is turned on, photos and videos are tagged with location data that can be used by apps and photo-sharing websites. See Privacy on page 39. Use the capture timer to put yourself in the shot. Avoid “camera shake” or add yourself to a picture by using the capture timer.
Camera settings Go to Settings > Photos & Camera for camera options, which include: •• Photo stream and sharing •• Slideshow •• Grid •• HDR Adjust the volume of the shutter sound with the Ringer and Alerts settings in Settings > Sounds. Or mute the sound using the Ring/Silent switch. (In some countries muting is disabled.
13 Contacts Contacts at a glance iPad lets you access and edit your contact lists from personal, business, and other accounts. Open in Messages. Open in FaceTime. Open in Maps. Set your My Info card for Safari, Siri, and other apps. Go to Settings > Mail, Contacts, Calendars, then tap My Info and select the contact card with your name and information. Let Siri know who’s who.
•• Import your Facebook Friends: Go to Settings > Facebook, then turn on Contacts in the “Allow These Apps to Use Your Accounts” list. This creates a Facebook group in Contacts. •• Use your Google contacts: Go to Settings > Mail, Contacts, Calendars, tap your Google account, then turn on Contacts. •• Access a Microsoft Exchange Global Address List: Go to Settings > Mail, Contacts, Calendars, tap your Exchange account, then turn on Contacts.
14 Clock Clock at a glance The first clock displays the time based on your location when you set up iPad. Add other clocks to show the time in other major cities and time zones. Delete clocks or change their order. Add a clock. View clocks, set an alarm, time an event, or set a timer.
Alarms and timers Want iPad to wake you? Tap Alarm, then tap give the alarm a name (like “Good morning”). . Set your wake-up time and other options, then View and change alarms. Add an alarm. Turn the alarm on/off. Selected alarm Additional alarm Keep track of time. Use the stopwatch to keep time, record lap times, or set a timer to alert you when time’s up. If you’re soft boiling an egg, just tell Siri to “Set the timer for 3 minutes.
15 Maps Find places WARNING: For important information about navigation and avoiding distractions that could lead to dangerous situations, see Important safety information on page 146. See also Privacy on page 39. Get directions. Enter a search. Quick driving directions Get more info. Tap a pin to display the info banner. Double-tap to zoom in; tap with two fingers to zoom out. Or pinch. Show your current location. Choose the view, drop a pin, or show traffic.
•• Zip code •• Business (“movies,” “restaurants san francisco ca,” “apple inc new york”) Maps may also list recent locations, searches, or directions that you can choose from. Find the location of a contact, or of a favorite or recent search. Tap Favorites. Choose your view. Tap , then choose Standard, Hybrid, or Satellite. Manually mark a location. Touch and hold the map until the dropped pin appears. Get more info Get info about a location. Tap a pin to display its banner, then tap .
3D and Flyover On iPad 3rd generation or later, you can see three-dimensional views and even fly over many of the world’s major cities. View 3D map. Tap , then tap Show 3D Map. Or, drag two fingers up. Adjust the angle. Drag two fingers up or down. Take a Flyover Tour. An aerial tour is available for select cities, indicated by next to the city name. Tap the name of the city to display its banner, then tap Tour to begin the tour.
16 Videos Videos at a glance Open the Videos app to watch movies, TV shows, and music videos. To watch video podcasts, open the Podcasts app—see Podcasts at a glance on page 114. To watch videos you record using Camera on iPad, open the Photos app. Add to your library. Choose a category. Tap to play. This video hasn’t been downloaded to iPad. WARNING: For important information about avoiding hearing loss, see Important safety information on page 146.
Stream videos from your computer to iPad. Turn on Home Sharing in iTunes on your computer. Then, on iPad, go to Settings > Videos and enter the Apple ID and password you use for Home Sharing on your computer. Then open Videos on iPad and tap Shared at the top of the list of videos. Convert a video to work with iPad. If you try to sync a video from iTunes and a message says the video can’t play on iPad, try converting the video.
Select a different audio language. If the video offers other languages, tap language from the Audio list. Show subtitles or closed captions. Tap , then choose a . Not all videos offer subtitles or closed captions. Customize the appearance of closed captions. Go to Settings > General > Accessibility > Subtitles & Captioning.
17 Notes Notes at a glance Type notes on iPad, and iCloud makes them available on your other iOS devices and Mac computers. You can also read and create notes in other accounts, such as Gmail or Yahoo!. Tap a note to view it. Delete the note. Print or share the note. Add a new note. Tap the text to edit it. See your notes on your other devices. If you use icloud.com, me.com, or mac.com for iCloud, go to Settings > iCloud, then turn on Notes.
Share notes in multiple accounts Share notes with other accounts. You can share notes with other accounts, such as Google, Yahoo!, or AOL. Go to Settings > Mail, Contacts, Calendars, add the account if it’s not already there, then turn on Notes for the account. Create a note in a specific account. Tap Accounts and select the account, then tap don’t see the Accounts button, tap the Notes button first. . If you Choose the default account for new notes. Go to Settings > Notes.
18 Reminders Reminders at a glance Reminders lets you keep track of all the things you need to do. Mark the reminder as completed. Scheduled items Add a reminder. Add a list. Add a reminder. Tap a list, then tap a blank line. Share a list. Tap a list, then tap Edit. Tap Sharing, then tap Add Person. The people you share with also need to be iCloud users. After they accept your invitation to share the list, you’ll all be able to add, delete, and mark items as completed.
Scheduled reminders Scheduled reminders notify you when they’re due. Scheduled reminder Schedule a reminder. While editing a reminder, tap , then turn on “Remind me on a day.” Tap Alarm to set the date and time. Tap Repeat to schedule the reminder for regularly occurring intervals. See all scheduled reminders. Tap Scheduled to show the list of reminders that have a due date. Don’t bother me now. You can turn off Reminders notifications in Settings > Notifications.
Reminders settings Go to Settings > Reminders, where you can: •• Set a default list for new reminders •• Sync past reminders Keep your reminders up to date on other devices. Go to Settings > iCloud, then turn on Reminders. To keep up to date with Reminders on OS X, turn on iCloud on your Mac, too. Some other types of accounts, such as Exchange, also support Reminders. Go to Settings > Mail, Contacts, Calendars, then turn on Reminders for the accounts you want to use.
19 Photo Booth Take photos It’s easy to take a photo with Photo Booth and spice it up with effects. Tap an option to change the effect. Tap the center image to return to Normal view. When you take a photo, iPad makes a shutter sound. You can use the volume buttons on the side of iPad to control the volume of the shutter sound, or mute it by setting the Side Switch to silent. See Volume buttons and the Side Switch on page 11.
Manage photos The photos you take with Photo Booth are saved to your Recently Added album in the Photos app on iPad. Delete a photo. Select a thumbnail, then tap . Share or copy a photo. Tap a thumbnail, tap Twitter, or Facebook) or Copy. , then tap a share option (Message, Mail, iCloud, View photos in the Photos app. In Photos, tap Photos, then tap Today, or tap Albums, then Recently Added, then tap a thumbnail. To see the next or previous photo, swipe left or right.
20 Game Center Game Center at a glance Game Center lets you play your favorite games with friends who have an iOS device or a Mac (OS X Mountain Lion or later). You must be connected to the Internet to use Game Center. WARNING: For important information about avoiding repetitive motion injuries, see Important safety information on page 146. See who’s the best. Find someone to play against. Play, share, or remove this game. Explore game goals.
Play games with friends Invite friends to a multiplayer game. Tap Friends, choose a friend, choose a game, then tap in the upper right. If the game allows or requires additional players, choose the players to invite, then tap Next. Send your invitation, then wait for the others to accept. When everyone is ready, start the game. If a friend isn’t available or doesn’t respond, you can tap Auto-Match to have Game Center find another player for you, or tap Invite Friend to invite someone else.
21 Newsstand Newsstand organizes your magazine and newspaper apps, and automatically updates them when iPad is connected to Wi-Fi. Touch and hold a publication to rearrange. Find Newsstand apps. Note: You need an Internet connection and an Apple ID to download Newsstand apps, but you can read downloaded content without an Internet connection. Newsstand is not available in all areas. Find Newsstand apps. While viewing the shelf, tap Store.
22 iTunes Store iTunes Store at a glance Use the iTunes Store to add music, movies, TV shows, and more to iPad. Browse Download purchases again. Change categories. Note: You need an Internet connection and an Apple ID to use the iTunes Store. The iTunes Store is not available in all areas.
Browse or search Browse by category or genre. Tap one of the categories (Music, Movies, TV, or Audiobooks). Tap Genres to see a list of genres to choose from. Tap a genre to see more about it. If you know what you’re looking for, tap Search. You can tap a search term that’s trending among other iTunes users, or enter info in the search field, then tap Search on the keyboard. Access family members’ purchases.
Discover great new music on iTunes Radio. When you listen to iTunes Radio, songs you play appear in the Radio tab in the iTunes Store so you can preview or purchase them. Tap Music, tap , then tap Radio. Preview a song or video. Tap it. Add to your Wish List. When you hear something you hope to buy from the iTunes Store, tap , then tap Add to Wish List. To view your Wish List in the iTunes Store, tap Music, Movies, or TV Shows, tap , then tap Wish List.
iTunes Store settings To set options for the iTunes Store, go to Settings > iTunes & App Store. View or edit your account. Tap your Apple ID, then tap View Apple ID and log in. To change your password, tap the Apple ID field, then tap the Password field. Sign in with a different Apple ID. Tap your account name, then tap Sign Out. You can then enter a different Apple ID. Subscribe to or turn on iTunes Match. You can subscribe to iTunes Match, a service that stores your music and more in iCloud.
23 App Store App Store at a glance Use the App Store to browse, purchase, and download apps specifically designed for iPad, or for iPhone and iPod touch. Your apps update automatically over Wi-Fi (unless you turn off this feature), so you can keep up with the latest improvements and features. See your Wish List and other suggestions for you. Download purchases again. Note: You need an Internet connection and an Apple ID to use the App Store. The App Store is not available in all areas.
Use Wish List. To track an app you might want to purchase later, tap tap Add to Wish List. See your Wish List. After you add items to your Wish List, tap on the app page, then on the Purchased screen. Search apps by category. Tap Explore, then tap Categories to focus on the apps you want, for example, Education, Medical, or Sports. Tap subcategories to further refine your results.
Note: Age restrictions for Ask to Buy vary by area. In the United States, the family organizer can enable Ask to Buy for any family member under age 18; for children under age 13, it’s enabled by default. Find out more about the requested app. Hide individual purchases. Using iTunes on a computer, family members can hide any of their purchases so other family members can’t view or download them. For more information, see Family Sharing on page 34. Use a gift card or code.
24 iBooks Get books Get books from the iBooks Store. In iBooks, use the buttons at the bottom of the screen to access the iBooks Store. Tap Featured to browse the latest releases, or Top Charts to view the most popular. To find a specific book, tap the Search field that appears after you access the iBooks Store. Read a book Contents, bookmarks, and notes Bookmark Search in book. Go to a page. Open a book. Tap the book you want to read.
Go to a specific page. Use the page navigation controls at the bottom of the screen. Or, tap and enter a page number, then tap the page number in the search results. Get a definition. Double-tap a word, then tap Define in the menu that appears. Definitions aren’t available for all languages. Remember your place. Tap to add a bookmark, or tap again to remove it. You can have multiple bookmarks—to see them all, tap , then tap Bookmarks.
Study notes and glossary terms In books that support it, you can review all of your highlights and notes as study cards. See all your notes. Tap in that chapter. Delete notes. Tap . You can search your notes, or tap a chapter to see notes you’ve made , select some notes, then tap Delete. Review your notes as study cards. Tap Study Cards. Swipe to move between cards. Tap Flip Card to see its back. Shuffle your study cards. Tap , then turn on Shuffle. Study glossary terms.
Read PDFs Sync a PDF. On a Mac, add the PDF to iBooks for OS X, then open iTunes, select the PDF, then sync. In iTunes on your Windows computer, choose File > Add to Library, select the PDF, then sync. See iTunes Help for more info about syncing. Add a PDF email attachment to iBooks. Open the email message, then touch and hold its PDF attachment. Choose “Open in iBooks” from the menu that appears. Print a PDF. With the PDF open, tap then choose Print. You’ll need an AirPrint-compatible printer.
25 Podcasts Podcasts at a glance Open the Podcasts app, then browse, subscribe to, and play your favorite audio or video podcasts on iPad. Delete or rearrange podcasts. New episodes Tap a podcast to view and play episodes. Swipe down to update or search. See your subscriptions and downloaded podcasts. Organize and automatically update your favorites. Browse for podcasts. Get podcasts and episodes Discover more podcasts. Tap Featured or Top Charts at the bottom of the screen.
Preview or stream an episode. Tap the podcast, then tap an episode. View unplayed episodes. View available episodes. Subscribe or adjust subscription preferences. Download the episode. Select episodes to mark, delete, or save. Get more info. Tap open them in Safari. to get episode details. Tap any link in podcast or episode descriptions to Find new episodes. Tap Unplayed to find episodes you haven’t yet heard. Browse episodes. Tap Feed to see episodes available to download or stream.
Control playback Tap to speed up or slow down. See a list of episodes. Tap to see more info. Drag to skip forward or back. Tap to start over, or double-tap to go to the previous episode. Skip to the next episode. See podcast info while you listen. Tap the podcast image on the Now Playing screen. Skip forward or back with greater accuracy. Move your finger toward the top of the screen as you drag the playhead left or right.
Pull together episodes from different podcasts. Add episodes to your On-The-Go station. Tap My Stations, tap On-The-Go, then tap Add. Or tap next to any episode in your library. You can also touch and hold any episode, then tap Add to On-The-Go. Create a station. Tap My Stations, then tap . Change the order of the station list or the podcasts in a station. Tap My Stations, tap Edit above the station list or the episode list, then drag up or down.
Accessibility A Accessibility features iPad offers these accessibility features: Vision •• VoiceOver •• Support for braille displays •• Zoom •• Invert Colors and Grayscale •• Speak Selection •• Speak Screen •• Speak Auto-Text •• Large, bold, and high-contrast text •• Button Shapes •• Reduce screen motion •• On/off switch labels •• Assignable tones •• Video Descriptions Hearing •• Hearing aids •• Mono audio and balance •• Subtitles and closed captions Interaction •• Siri •• Wi
Accessibility Shortcut Use the Accessibility Shortcut. Press the Home button quickly three times to turn any of these features on or off: •• VoiceOver •• Invert Colors •• Grayscale •• Zoom •• Switch Control •• AssistiveTouch •• Guided Access (The shortcut starts Guided Access if it’s already turned on. See Guided Access on page 134.) •• Hearing Aid Control (if you have paired Made for iPhone hearing aids) Choose the features you want to control.
•• Select the item above or below: Set the rotor to Vertical Navigation, then swipe up or down with one finger. If you don’t find Vertical Navigation in the rotor, you can add it; see Use the VoiceOver rotor on page 123. •• Select the first or last item on the screen: Tap with four fingers at the top or bottom of the screen. •• Select an item by name: Triple-tap with two fingers anywhere on the screen to open the Item Chooser.
•• Choose which dialects are available in the rotor: Go to Settings > General > Accessibility > VoiceOver > Speech > Rotor Languages. To adjust voice quality or speaking rate, tap next to the language. To remove languages from the rotor or change their order, tap Edit, tap the delete button or drag the Reorder button up or down, then tap Done. •• Set the default dialect for the current iPad language: Go to Settings > General > Accessibility > VoiceOver > Speech.
Speak iPad status information. Tap the status bar at the top of the screen, then swipe left or right to hear information about the time, battery state, Wi-Fi signal strength, and more. Speak notifications. Go to Settings > General > Accessibility > VoiceOver, then turn on Always Speak Notifications. Notifications, including the text of incoming text messages, are spoken as they occur, even if iPad is locked. Unacknowledged notifications are repeated when you unlock iPad.
Activate •• Double-tap: Activate the selected item. •• Triple-tap: Double-tap an item. •• Split-tap: As an alternative to selecting an item and double-tapping to activate it, touch and hold an item with one finger, then tap the screen with another. •• Double-tap and hold (1 second) + standard gesture: Use a standard gesture. The double-tap and hold gesture tells iPad to interpret the next gesture as standard.
•• Touch typing: Touch a key on the keyboard to select it, then lift your finger to enter the character. If you touch the wrong key, slide your finger to the key you want. VoiceOver speaks the character for each key as you touch it, but doesn’t enter a character until you lift your finger. •• Direct Touch typing: VoiceOver is disabled for the keyboard only, so you can type just as you do when VoiceOver is off.
Write with your finger Handwriting mode lets you enter text by writing characters on the screen with your finger. In addition to normal text entry, use handwriting mode to enter your iPad passcode silently or open apps from the Home screen. Enter handwriting mode. Use the rotor to select Handwriting. If Handwriting isn’t in the rotor, go to Settings > General > Accessibility > VoiceOver > Rotor, then add it. Choose a character type.
Select an item on the Home screen. Start entering the name of the item. If there are multiple matches, continue to spell the name until it is unique, or swipe up or down with one finger to select a partial match. Launch the selected app. Swipe right with two fingers. Translate immediately (when contractions are enabled). Swipe down with two fingers. Stop entering braille. Do a two-finger scrub, or set the rotor to another setting.
•• Return to the previous screen: Escape •• Switch apps: Command–Tab or Command–Shift–Tab Quick Nav Turn on Quick Nav to control VoiceOver using the arrow keys.
•• Go to the top or bottom of the text field: Command–Up Arrow or Command–Down Arrow •• Select text as you move: Shift + any of the insertion point movement commands above •• Select all text: Command–A •• Copy, cut, or paste the selected text: Command–C, Command–X, or Command–V •• Undo or redo last change: Command–Z or Shift–Command–Z Support for braille displays You can use a Bluetooth braille display to read VoiceOver output, and you can use a braille display with input keys an
Read math equations VoiceOver can read aloud math equations encoded using: •• MathML on the web •• MathML or LaTeX in iBooks Author Hear an equation. Have VoiceOver read the text as usual. VoiceOver says “math” before it starts reading an equation. Explore the equation. Double tap the selected equation to display it full screen and move through it one element at a time. Swipe left or right to read elements of the equation.
Get information about a location. With a pin selected, double-tap to display the information flag. Swipe left or right to select the More Info button, then double-tap to display the information page. Hear location cues as you move about. Turn on Tracking with heading to hear street names and points of interest as you approach them. Edit videos with VoiceOver You can use VoiceOver gestures to trim Camera videos. Trim a video.
Zoom in on your typing without magnifying the keyboard. Go to Settings > General > Accessibility > Zoom, then turn on Follow Focus and turn off Zoom Keyboard. Now when you zoom in while typing (in Messages or Notes, for example), the text you type is magnified but all of the keyboard remains visible. Display the magnified part of the screen in grayscale or inverted color. Triple-tap with three fingers, then tap the Filters button in the controls that appear.
Large, bold, and high-contrast text Display larger text in apps such as Settings, Calendar, Contacts, Mail, Messages, and Notes. Go to Settings > General > Text Size, then adjust the slider. For even larger text, go to Settings > General > Accessibility > Larger Text, then turn on Larger Accessibility Sizes. Display bolder text for items on iPad. Go to Settings > General > Accessibility, then turn on Bold Text. Increase the contrast of text where possible.
Pair with iPad. If your hearing aids aren’t listed in Settings > General > Accessibility > Hearing Aids, you need to pair them with iPad. To start, open the battery door on each hearing aid. Next, on iPad, go to Settings > Bluetooth and make sure Bluetooth is turned on. Then go to Settings > General > Accessibility > Hearing Aids. Close the battery doors on your hearing aids and wait until their name appears in the list of devices (this could take a minute).
Subtitles and closed captions The Videos app includes an Alternate Track button you can tap to choose subtitles and captions offered by the video you’re watching. Standard subtitles and captions are usually listed, but if you prefer special accessible captions, such as subtitles for the deaf and hard of hearing (SDH), you can set iPad to list them instead if they’re available.
•• Disable app controls and areas of the app screen: Draw a circle or rectangle around any part of the screen you want to disable. Drag the mask into position or use the handles to adjust it’s size. •• Enable the Sleep/Wake button and Volume buttons: Tap Options below Hardware Buttons. •• Keep iPad from switching from portrait to landscape or from responding to other motions: Tap Options and turn off Motion. •• Prevent typing: Tap Options and turn off Keyboards.
Turn on Switch Control. Go to Settings > General > Accessibility > Switch Control, or use the Accessibility Shortcut—see Accessibility Shortcut on page 119. Turn off Switch Control. Use any scanning method to select and tap Settings > General > Accessibility > Switch Control. Or, triple-click the Home button. Basic techniques Whether you use item scanning or point scanning, the Switch Control basics are the same. Select an item.
•• Shake iPad •• Press the Home and Sleep/Wake buttons simultaneously to take a screenshot •• Swipe down from the top with two fingers to speak the screen (if you have Speak Screen turned on) Item scanning Item scanning alternately highlights each item or group of items on the entire screen until you trigger your Select Item switch. If there are many items, Switch Control highlights them in groups. When you select a group, highlighting continues with the items in the group.
Settings and adjustments Adjust basic settings.
Turn on AssistiveTouch. Go to Settings > General > Accessibility > AssistiveTouch, or use the Accessibility Shortcut. See Accessibility Shortcut on page 119. When Assistive Touch is on, the floating menu button appears on the screen. Show or hide the menu. Tap the floating menu button, or click the secondary button on your accessory. Simulate pressing the Home button. Tap the menu button, then tap Home. Lock or rotate the screen, adjust iPad volume, or simulate shaking iPad.
Accessibility in OS X Take advantage of the accessibility features in OS X when you use iTunes to sync information and content from your iTunes library to iPad. In the Finder, choose Help > Help Center, then search for “accessibility.” For more information about iPad and OS X accessibility features, go to www.apple.com/accessibility.
iPad in Business B iPad in the enterprise With support for secure access to corporate networks, directories, and Microsoft Exchange, iPad is ready to go to work. For detailed information about using iPad in business, go to www.apple.com/ipad/business. Mail, Contacts, and Calendar To use iPad with your work accounts, you need to know the settings your organization requires. If you received your iPad from your organization, the settings and apps you need might already be installed.
Your organization can also purchase App Store app licenses that are assigned to you for a period of time, but which the organization retains. You’ll be invited to participate in your organization’s program in order to access these apps. After you enroll with your Apple ID, you’re prompted to install these apps as they’re assigned to you. You can also find them in your Purchased list in the App Store. An app you receive this way is removed if the organization assigns it to someone else.
International Keyboards C International keyboards let you type text in many different languages, including Asian languages and languages written from right to left. Use international keyboards International keyboards let you type text in many different languages, including Asian languages and languages written from right to left. For a list of supported keyboards, go to www.apple.com/ipad, choose your iPad, click Tech Specs, then scroll to Languages. Manage keyboards.
Turn shortcuts on or off. Go to Settings > General > Keyboard > Shortcuts. Shortcuts are available for: •• Simplified Chinese: Pinyin •• Traditional Chinese: Pinyin and Zhuyin •• Japanese: Romaji and 50 Key Reset your personal dictionary. Go to Settings > General > Reset > Reset Keyboard Dictionary. All custom words and shortcuts are deleted, and the keyboard dictionary returns to its default state. Special input methods You can use keyboards to enter some languages in different ways.
You can type some complex characters, such as 鱲 (part of the name for the Hong Kong International Airport), by writing two or more component characters in sequence. Tap the character to replace the characters you typed. Roman characters are also recognized. Type Japanese kana. Use the Kana keypad to select syllables. For more syllable options, tap the arrow key and select another syllable or word from the window. Type Japanese romaji. Use the Romaji keyboard to type syllables.
Safety, Handling, & Support D Important safety information WARNING: Failure to follow these safety instructions could result in fire, electric shock, injury, or damage to iPad or other property. Read all the safety information below before using iPad. Handling Handle iPad with care. It is made of metal, glass, and plastic and has sensitive electronic components inside. iPad can be damaged if dropped, burned, punctured, or crushed, or if it comes in contact with liquid.
Charging Charge iPad with the included USB cable and power adapter, or with other thirdparty “Made for iPad” cables and power adapters that are compatible with USB 2.0 or later, or power adapters compliant with applicable country regulations and with one or more of the following standards: EN 301489-34, IEC 62684, YD/T 1591-2009, CNS 15285, ITU L.1000, or another applicable mobile phone power adapter interoperability standard.
Radio frequency interference Observe signs and notices that prohibit or restrict the use of mobile devices (for example, in healthcare facilities or blasting areas). Although iPad is designed, tested, and manufactured to comply with regulations governing radio frequency emissions, such emissions from iPad can negatively affect the operation of other electronic equipment, causing them to malfunction.
Using connectors, ports, and buttons Never force a connector into a port or apply excessive pressure to a button, because this may cause damage that is not covered under the warranty. If the connector and port don’t join with reasonable ease, they probably don’t match. Check for obstructions and make sure that the connector matches the port and that you have positioned the connector correctly in relation to the port.
iPad may be low on power. Connect iPad to the USB power adapter to charge. See Charge and monitor the battery on page 41. Force an app to quit. Hold down the Sleep/Wake button on top of iPad for a few seconds until a red slider appears, then hold down the Home button until the app closes. If you can’t turn off iPad or if the problem continues, you may need to reset iPad. Do this only if you’re unable to restart iPad. Reset iPad.
Get information about your iPad See information about iPad. Go to Settings > General > About.
VPN settings A VPN (virtual private network) provides secure access over the Internet to private networks, such as the network at your organization. You may need to install a VPN app from the App Store that configures iPad to access a network. Contact your system administrator for information about the app and settings you need. Profiles settings Configuration profiles define settings for using iPad with corporate or school networks or accounts.
Music not purchased in iTunes isn’t backed up in iCloud. Use iTunes to back up and restore that content. See Sync with iTunes on page 17. Important: Backups for music, movies, or TV show purchases are not available in all countries. Previous purchases may not be restored if they are no longer in the iTunes Store, App Store, or iBooks Store. Purchased content, iCloud Photo Sharing, and My Photo Stream content don’t count against your 5 GB of free iCloud storage.
Turn Cellular Data on or off. If Cellular Data is off, all data services will use only Wi-Fi—including email, web browsing, push notifications, and other services. If Cellular Data is on, carrier charges may be incurred. For example, using certain features and services that transfer data, such as Messages, could result in charges to your data plan. Monitor and manage your cellular data network usage. You can see which apps use cellular data and turn off the option, if you want.
If a song or video in your iTunes library isn’t supported by iPad, you may be able to convert it to a format iPad supports. For example, you can use iTunes for Windows to convert nonprotected WMA files to a format iPad supports. For more information, open iTunes, then choose Help > iTunes Help. No video or sound when using AirPlay To send video or audio to an AirPlay device such as an Apple TV, iPad and the AirPlay device must be connected to the same wireless network.
Learning more, service, and support Refer to the following resources to get more iPad-related safety, software, service, and support information. To learn about Do this Using iPad safely See Important safety information on page 146. iPad service and support, tips, forums, and Apple software downloads Go to www.apple.com/support/ipad. The latest information about iPad Go to www.apple.com/ipad. Managing your Apple ID account Go to appleid.apple.com. Using iCloud Go to help.apple.
Important: Changes or modifications to this product not authorized by Apple could void the electromagnetic compatibility (EMC) and wireless compliance and negate your authority to operate the product. This product has demonstrated EMC compliance under conditions that included the use of compliant peripheral devices and shielded cables between system components.
European Union—Disposal Information The symbol above means that according to local laws and regulations your product and/or its battery shall be disposed of separately from household waste. When this product reaches its end of life, take it to a collection point designated by local authorities.
KK Apple Inc. © 2014 Apple Inc. All rights reserved. Apple, the Apple logo, AirDrop, AirPlay, AirPort, Apple TV, FaceTime, Finder, GarageBand, Guided Access, iBooks, iMessage, iPad, iPhone, iPod, iPod touch, iSight, iTunes, Keychain, Keynote, Mac, Numbers, OS X, Pages, Photo Booth, Safari, Siri, Smart Cover, and Spotlight, are trademarks of Apple Inc., registered in the U.S. and other countries. ENERGY STAR® is a U.S. registered trademark.