iPad User Guide For iOS 7 Software
Contents 7 7 8 9 9 10 10 11 12 Chapter 1: iPad at a Glance 13 13 13 14 14 14 15 16 17 17 17 18 18 Chapter 2: Getting Started 19 19 21 23 26 27 28 28 29 29 30 30 31 31 32 32 32 33 Chapter 3: Basics iPad Overview Accessories Multi-Touch screen Sleep/Wake button Home button Volume buttons and the Side Switch SIM card tray Status icons Set up iPad Connect to Wi-Fi Apple ID Set up mail and other accounts Manage content on your iOS devices iCloud Connect iPad to y
33 34 35 Security Charge and monitor the battery Travel with iPad 36 36 37 37 37 Chapter 4: Siri 38 38 38 39 40 40 Chapter 5: Messages 41 41 42 42 42 43 43 44 44 44 Chapter 6: Mail 45 45 46 46 47 48 48 49 49 49 50 Chapter 7: Safari 51 51 52 52 54 54 55 55 56 Chapter 8: Music Use Siri Tell Siri about yourself Make corrections Siri settings iMessage service Send and receive messages Manage conversations Share photos, videos, and more Messages set
57 57 58 58 Chapter 9: FaceTime 59 59 60 60 61 61 Chapter 10: Calendar 62 62 63 63 64 65 65 66 66 66 Chapter 11: Photos 67 67 68 68 68 69 Chapter 12: Camera 70 70 71 71 Chapter 13: Contacts 72 72 72 Chapter 14: Clock 73 73 74 74 75 75 Chapter 15: Maps 76 76 76 77 78 Chapter 16: Videos FaceTime at a glance Make and answer calls Manage calls Calendar at a glance Invitations Use multiple calendars Share iCloud calendars Calendar settings Vi
79 79 80 Chapter 17: Notes 81 82 82 83 Chapter 18: Reminders 84 84 85 Chapter 19: Photo Booth 86 86 87 87 Chapter 20: Game Center 88 88 Chapter 21: Newsstand 89 89 89 90 90 Chapter 22: iTunes Store 91 91 91 92 92 Chapter 23: App Store 93 93 93 94 104 104 104 104 104 105 105 105 105 105 106 106 106 109 110 Appendix A: Accessibility Notes at a glance Share notes in multiple accounts Scheduled reminders Location reminders Reminders setting
110 Accessibility in OS X 111 111 111 111 111 Appendix B: iPad in Business iPad in the enterprise Mail, Contacts, and Calendar Network access Apps 113 Appendix C: International Keyboards 113 Use international keyboards 114 Special input methods 116 116 118 118 119 119 119 120 120 120 120 120 121 121 122 122 123 124 124 125 126 126 127 Appendix D: Safety, Handling, & Support Important safety information Important handling information iPad Support site Restart or reset
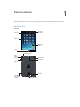
1 iPad at a Glance This guide describes iOS 7 for iPad 2, iPad (3rd generation and 4th generation), and iPad mini.
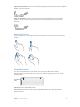
iPad (4th generation) FaceTime HD camera Status bar App icons Multi-Touch display Home Sleep/Wake button Microphone iSight camera Headset jack Micro-SIM tray (cellular models) Side Switch Volume buttons Speaker Lightning connector Your features and apps may vary depending on the model of iPad you have, and on your location, language, and carrier. To find out which features are supported in your area, see www.apple.com/ios/feature-availability.
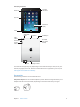
Lightning to USB Cable. Use this to connect iPad (4th generation) or iPad mini to the USB power adapter or to your computer. 30-pin to USB Cable. Use this to connect iPad 2 or iPad (3rd generation) to the USB power adapter or to your computer. Use the cable with the optional iPad Dock, or plug it directly into iPad. Multi-Touch screen A few simple gestures—tap, drag, swipe, and pinch/stretch—are all you need to use iPad and its apps.
Turn iPad on. Hold down the Sleep/Wake button until the Apple logo appears. Turn iPad off. Hold down the Sleep/Wake button for a few seconds until the red slider appears onscreen, then drag the slider. If you don’t touch the screen for two minutes, iPad locks itself. You can change how long iPad waits to lock itself, or set a passcode to unlock iPad. Set the auto-lock time. Go to Settings > General > Auto-Lock. Set a passcode. Go to Settings > General > Passcode Lock.
Use the Side Switch to lock the screen orientation. Go to Settings > General, then tap Lock Rotation. You can also use Do Not Disturb to silence FaceTime calls, alerts, and notifications. Set iPad to Do Not Disturb: Swipe up from the bottom edge of the screen to open Control Center, then tap . Do Not Disturb keeps alerts and notifications from making any sounds or lighting up the screen when the screen is locked. Alarms, however, still sound. If the screen is unlocked, Do Not Disturb has no effect.
Status icons The icons in the status bar at the top of the screen give information about iPad: Status icon What it means Wi-Fi iPad has a Wi-Fi Internet connection. The more bars, the stronger the connection. See Connect to Wi-Fi on page 13. Cell signal iPad (Wi-Fi + Cellular models) is in range of the cellular network. If there’s no signal, “No service” appears. Airplane Mode Airplane Mode is on—you can’t access the Internet, or use Bluetooth® devices. Non-wireless features are available.
Getting Started 2 Read this chapter to learn how to set up iPad, set up mail accounts, use iCloud, and more. · WARNING: To avoid injury, read Important safety information on page 116 before using iPad. Set up iPad Set up iPad. Turn on iPad and follow the Setup Assistant.
Manage your AirPort network. If iPad is connected to an AirPort base station, go to Settings > Wi-Fi, tap next to the network name, then tap Manage this Network. If you haven’t yet downloaded AirPort Utility, tap OK to open the App Store and download it (this requires an Internet connection). Apple ID Your Apple ID is the user name for a free account that lets you access Apple services, such as the iTunes Store, the App Store, and iCloud. You need only one Apple ID for everything you do with Apple.
Note: Don’t sync items in the Info pane of iTunes (such as contacts, calendars, and notes) and also use iCloud to keep that information up to date on your devices. Otherwise, you may see duplicated data on iPad. iCloud iCloud stores your content, including music, photos, contacts, calendars, and supported documents. Content stored in iCloud is pushed wirelessly to your other iOS devices and computers set up with the same iCloud account.
Buy more iCloud storage. Go to Settings > iCloud > Storage & Backup, then tap Buy More Storage or Change Storage Plan. For information about purchasing iCloud storage, see help.apple.com/icloud. Turn on Automatic Downloads for music, apps, or books. Go to Settings > iTunes & App Store. View and download previous purchases. •• iTunes Store: You can access your purchased songs and videos in the Music and Videos apps. Or, in iTunes Store, tap Purchased .
Sync with iTunes Syncing with iTunes copies information from your computer to iPad, and vice versa. You can sync by connecting iPad to your computer with the included USB cable, or you can set up iTunes to sync wirelessly using Wi-Fi. You can set iTunes to sync music, photos, videos, podcasts, apps, and more. For information about syncing iPad, open iTunes on your computer, then select iTunes Help from the Help menu. Sync wirelessly. Connect iPad to your computer using the included USB cable.
International settings Go to Settings > General > International to set: •• The language for iPad •• The keyboards you use •• The region format (for dates, times, and telephone numbers) •• The calendar format View this user guide on iPad You can view the iPad User Guide on iPad in Safari, and in the free iBooks app. View the user guide in Safari. In Safari, tap help.apple.com/ipad. , then tap the iPad User Guide bookmark. Or go to Add an icon for the user guide to the Home screen.
Basics 3 Use apps All the apps that come with iPad—as well as the apps you download from the App Store—are on the Home screen. Start from home Tap an app to open it. Press the Home button anytime to return to the Home screen. Swipe left or right to see other screens. iPad lets you run many apps at the same time. View running apps. Double-click the Home button to reveal the multitasking display. Swipe left or right to see more. To switch to another app, tap it. Quit an app.
If you have lots of apps, you can use Spotlight to find and open them. Pull down the center of the Home screen to get the search field. See Search on page 27. Look around Drag a list up or down to see more. Swipe to scroll quickly; touch the screen to stop it. Some lists have an index—tap a letter to jump ahead. Drag a photo, map, or webpage in any direction to see more. To quickly jump to the top of a page, tap the status bar at the top of the screen.
Switch apps. Swipe left or right with four or five fingers. Turn multitasking gestures on or off. Go to Settings > General > Multitasking Gestures. Change the screen orientation Many apps give you a different view when you rotate iPad. Lock the screen orientation. Swipe up from the bottom edge of the screen to open Control Center, then tap . The orientation lock icon appears in the status bar when the screen orientation is locked.
Start over. Go to Settings > General > Reset, then tap Reset Home Screen Layout to return the Home screen and apps to their original layout. Folders are removed and the original wallpaper is restored. Organize with folders Create a folder. While arranging apps, drag one app onto another. Tap the name of the folder to rename it. Drag apps to add or remove them. Press the Home button when you finish. You can have multiple pages of apps in a folder. Delete a folder.
Adjust the screen brightness Adjust the screen brightness. Go to Settings > Wallpapers & Brightness and drag the slider. If Auto-Brightness is on, iPad adjusts the screen brightness for current light conditions using the built-in ambient light sensor. You can also adjust the screen brightness in Control Center. Type text The onscreen keyboard lets you enter text when needed. Enter text Tap a text field to see the onscreen keyboard, then tap letters to type.
Tap Shift to type uppercase, or touch the Shift key and slide to a letter. Double-tap Shift for caps lock. To enter numbers, punctuation, or symbols, tap the Number key or the Symbol key . To quickly end a sentence with a period and a space, just double-tap the space bar. Enter accented letters or other alternate characters. Touch and hold a key, then slide to choose one of the options. Hide the onscreen keyboard. Tap the Keyboard key .
Select text. Tap the insertion point to display the selection options. Or double-tap a word to select it. Drag the grab points to select more or less text. In read-only documents, such as webpages, touch and hold to select a word. Grab points You can cut, copy, or paste over selected text. With some apps, you can also get bold, italic, or underlined text (tap B/I/U); get the definition of a word; or have iPad suggest an alternative. You may need to tap to see all the options. Undo the last edit.
Add or change keyboards You can turn typing features, such as spell checking, on or off; add keyboards for writing in different languages; and change the layout of your onscreen keyboard or Apple Wireless Keyboard. Set typing features. Go to Settings > General > Keyboard. Add a keyboard for another language. Go to Settings > General > Keyboard > Keyboards > Add New Keyboard. Switch keyboards.
Add punctuation or format text. Say the punctuation or format.
Control Center Control Center gives you instant access to the camera, AirDrop, AirPlay, timer, audio playback controls, and other handy features. You can adjust the brightness, lock the screen in portrait orientation, turn wireless services on or off, and turn on AirDrop to exchange photos and other items with nearby iOS 7 devices that support AirPlay. See AirDrop, iCloud, and other ways to share on page 30. Open Control Center. Swipe up from the bottom edge of any screen (even the Lock screen).
Open Notification Center. Swipe down from the top edge of the screen. Set notification options. Go to Settings > Notification Center. Tap an app to set its notification options. You can also tap Edit to arrange the order of app notifications. Touch and drag it to a new position. Close Notification Center. Swipe up. Sounds and silence You can change or turn off the sounds iPad plays when you get a FaceTime call, text message, email, tweet, Facebook post, reminder, or other event. Set sound options.
AirDrop, iCloud, and other ways to share In many apps, you can tap Share or depending on the app you’re using. to see sharing and other options. The options vary AirDrop lets you share your photos, videos, websites, locations, and other items wirelessly with other nearby iOS 7 devices that support AirDrop. AirDrop requires an iCloud account, and transfers info using Wi-Fi and Bluetooth. You must be on the same Wi-Fi network, or within approximately 30 feet (10 meters) of the other device.
Personal Hotspot Use Personal Hotspot to share your iPad (Wi-Fi + Cellular models) Internet connection. Computers can share your Internet connection using Wi-Fi, Bluetooth, or a USB cable. Other iOS devices can share the connection using Wi-Fi. Personal Hotspot works only if iPad is connected to the Internet over the cellular data network. Note: This feature may not be available with all carriers. Additional fees may apply. Contact your carrier for more information. Share an Internet connection.
AirPrint Use AirPrint to print wirelessly to an AirPrint-enabled printer, from apps such as Mail, Photos, and Safari. Many apps available on the App Store also support AirPrint. iPad and the printer must be on the same Wi-Fi network. For more information about AirPrint, see support.apple.com/kb/HT4356. Print a document. Tap or (depending on the app you’re using). See the status of a print job. Double-click the Home button, then tap Print Center.
Privacy Privacy settings let you see and control which apps and system services have access to Location Services, and to contacts, calendars, reminders, and photos. Location Services lets location-based apps such as Maps, Camera, and Passbook gather and use data indicating your location. Your approximate location is determined using available information from local Wi-Fi networks (if you have Wi-Fi turned on). The location data collected by Apple isn’t collected in a form that personally identifies you.
Allow access to Control Center when iPad is locked. Go to Settings > Control Center. See Control Center on page 28. Erase data after ten failed passcode attempts. Go to Settings > General > Passcode Lock and tap Erase Data. After ten failed passcode attempts, all settings are reset, and all your information and media are erased by removing the encryption key to the data. If you forget your passcode, you must restore the iPad software. See Restore iPad on page 122.
Charge the battery. The best way to charge the iPad battery is to connect iPad to a power outlet using the included cable and USB power adapter. iPad may also charge slowly when you connect it to a USB 2.0 port on your computer. If your Mac or PC doesn’t provide enough power to charge iPad, a “Not Charging” message appears in the status bar.
4 Siri Use Siri The power of Siri is yours for the asking. Summon Siri. Press and hold the Home button, until Siri beeps. Note: To use Siri, iPad must be connected to the Internet. See Connect to Wi-Fi on page 13. Cellular charges may apply. Ask Siri anything, from “set the timer for 3 minutes” to “what movies are showing tonight?” Open apps, and turn features on or off, like Bluetooth, Do Not Disturb, and Accessibility.
Tell Siri about yourself If you let Siri know who you are, you can get personalized service—like, “tell me how to get home.” Tell Siri who you are. Fill out your contact card in Contacts, then go to Settings > General > Siri > My Info and tap your contact card. Be sure to include your home and work addresses, and your relationships. Note: Location information isn’t tracked or stored outside iPad. If you don’t want to use Location Services, go to Settings > Privacy > Location Services to turn it off.
5 Messages iMessage service With the Messages app and the built-in iMessage service, you can send unlimited text messages over Wi-Fi using iOS 5 or later, or using OS X Mountain Lion or later. Messages can include photos, videos, and other info. You can see when people are typing, and let them know when you’ve read their messages. iMessages are displayed on all of your iOS devices logged in to the same account, so you can start a conversation on one device and continue it on another.
Start a text conversation. Tap choose a contact. , then enter a phone number or email address, or tap and Note: An alert appears if a message can’t be sent. Tap the alert in a conversation to try sending the message again. Resume a conversation. Tap the conversation in the Messages list. Hide the keyboard. Tap in the lower-right corner. Use picture characters. Go to Settings > General > Keyboard > Keyboards > Add New Keyboard, then tap Emoji to make that keyboard available.
Share photos, videos, and more You can send photos, videos, locations, contact info, and voice memos. The size limit of attachments is determined by your service provider—iPad compresses photo and video attachments if necessary. Send a photo or video. Tap new one. . You can choose an existing photo or video on iPad, or take a See full-size photos or video. Tap the photo or video. To see other photos and videos in the conversation, tap . Tap to return to the conversation. Send items from another app.
6 Mail Write messages Mail lets you access your email accounts, on the go. Change mailboxes or accounts. Search for messages. Delete, move, or mark multiple messages. Compose a message. Change the preview length in Settings > Mail, Contacts, Calendars. Insert a photo or video. Tap the insertion point, then tap Insert Photo or Video. Also see Edit text on page 24. Quote some text when you reply. Tap the insertion point, then select the text you want to include. Tap , then tap Reply.
Get a sneak peek See a longer preview. Go to Settings > Mail, Contacts, Calendars > Preview. You can show up to five lines. Is this message for me? Turn on Settings > Mail, Contacts, Calendars > Show To/Cc Label. If the label says Cc instead of To, you were just copied. You can also use the To/Cc mailbox, which gathers all mail addressed to you. To show it, tap Edit while viewing the Mailboxes list. Finish a message later Save it, don’t send it.
Flag a message so you can find it later. Tap while reading the message. You can change the appearance of the flagged message indicator in Settings > Mail, Contacts, Calendars > Flag Style. To see the Flagged mailbox, tap Edit while viewing the Mailboxes list, then tap Flagged. Search for a message. Scroll to or tap the top of the message list to reveal the search field. You can search the current mailbox, or all mailboxes at once. Searching looks at the address fields, the subject, and the message body.
Create mailboxes to organize your mail. Tap Edit in the mailboxes list to make a new one, or rename or delete one. (Some built-in mailboxes can’t be changed.) There are several smart mailboxes, such as Unread, that show messages from all your accounts. Tap the ones you want to use. Recover a deleted message. Open the message in the account’s Trash mailbox, then tap and move the message. Or, if you just deleted it, shake iPad to undo. To see deleted messages in all your accounts, add the Trash smart mailbox.
7 Safari Safari at a glance Use Safari on iPad to browse the web. Add web clips to the Home screen for quick access. Use Reading List to collect sites to read later. Use iCloud to see pages you have open on other devices, and to keep your bookmarks and reading list up to date on your other devices. Revisit recent pages. Share or save. Tap to enter a search item or web address. Open a new tab. Your open tabs See pages open on other devices.
Search the web Enter what you’re searching for, then tap Go. Or tap a suggestion. Tap to search the current page. Search the web. Enter a URL or search term in the search field at the top of the page, then tap a suggested term or tap Go on the keyboard to search for exactly what you typed. Have your favorites top the list. Select them at Settings > Safari > Favorites. Search the page. Scroll to the bottom of the suggested results list and tap the entry under On This Page.
Get back to the top. Tap the top edge of the screen to quickly return to the top of a long page. See more. Turn iPad to landscape orientation. See the latest. Tap next to the address in the search field to update the page. Keep bookmarks Bookmarks Links in tweets Reading list Bookmark the current page. Tap the bookmark. , then tap Bookmark. To revisit the page, tap Get organized. To create a folder for bookmarks, tap , then tap , then tap Edit.
Share what you discover Tap to share with someone nearby using AirDrop. Other sharing options Spread the news. Tap . See who’s tweeting what. Go to Settings > Twitter and sign in, then tap see links tweeted by your friends and others you follow. and look under to Fill in forms Whether you’re logging in to a website, signing up for a service, or making a purchase, you can fill in a web form using the onscreen keyboard or have Safari fill it in for you using AutoFill.
Avoid clutter with Reader Use Safari Reader to focus on a page’s primary content. Tap to view the page in Reader. Focus on content. Tap at the left end of the address field. If you don’t see the icon, reader isn’t available for the page you’re looking at. Share just the good stuff. To share just the article text and a link to it, tap page in Reader. while viewing the Return to the full page. Tap the reader icon in the address field again.
Visit sites without making history. Tap Private on either the open pages screen or the bookmarks screen. Sites you visit will not be added to History on your iPad. Watch for suspicious websites. Turn on Settings > Safari > Fraudulent Website Warning.
8 Music iTunes Radio Featured stations provide a great way to explore and enjoy new music in a variety of genres. You can also create your own custom stations, based on your pick of artist, song, or genre. See iTunes Match on page 55. WARNING: For important information about avoiding hearing loss, see Important safety information on page 116. Note: iTunes Radio may not be available in all areas. For more information about iTunes Radio, see support.apple.com/kb/HT5848.
Create your own station. On the Now Playing screen, tap Station options. , then tap one of the New Influence upcoming song selections. Tap , then tap Play More Like This or Never Play This Song. You can also add the song to your iTunes Wish List. Skip to the next song. Tap . You can skip a limited number of songs per hour. Edit your stations. Tap Edit. You can include or exclude other artists, songs, or genres, or delete a station. See the songs you’ve heard, or view your wishlist.
The Now Playing screen provides playback controls and shows you what’s playing. Track list Back Tap to create a Genius Playlist or an iTunes Radio station. Playhead Volume Skip to any point in a song. Drag the playhead. Slow down the scrub rate by sliding your finger down the screen. Shuffle. Tap Shuffle on the Now Playing screen to play your tunes in random order. See all tracks from the album containing the current song. Tap . To play a track, tap it. Search music.
Playlists Create playlists to organize your music. View Playlists, tap New Playlist near the top of the list, then enter a title. Tap to add songs or videos. Edit a playlist. Select the playlist, then tap Edit. •• Add more songs: Tap •• Delete a song: Tap from iPad. . , then tap Remove. Deleting a song from a playlist doesn’t delete it Change the song order: Drag .
Siri You can use Siri (iPad 3rd generation or later) to control music playback. See Chapter 4, Siri, on page 36. Use Siri to play music. Press and hold the Home button. •• Play or pause music: Say “play” or “play music.” To pause, say “pause,” “pause music,” or “stop.” You can also say “next song” or “previous song.” •• Play an album, artist, or playlist: Say “play,” then say “album,” “artist,” or “playlist” and the name. •• Shuffle the current playlist: Say “shuffle.
Music settings Go to Settings > Music to set options for Music, including: •• Sound Check (to normalize the volume level of your audio content) •• Equalization (EQ) Note: EQ settings affect all sound output, including the headset jack and AirPlay. These settings generally apply only to music played from the Music app. The Late Night setting compresses the dynamic range of the audio output, reducing the volume of loud passages and increasing the volume of quiet passages.
9 FaceTime FaceTime at a glance Use FaceTime to make video or audio calls to other iOS devices or computers that support FaceTime. The FaceTime camera lets you talk face-to-face; switch to the rear iSight camera to share what you see around you. Note: FaceTime may not be available in all areas. On iPad Wi-Fi + Cellular models, you can make FaceTime calls over a cellular data connection. Cellular data charges may apply. See Cellular settings on page 122. Drag your image to any corner.
Make and answer calls Make a FaceTime call. Make sure FaceTime is turned on in Settings > FaceTime, then in FaceTime, tap Contacts and choose a contact. Tap to make a video call, or tap to make an audio call. Use your voice to start the call. Press and hold the Home button, then say “FaceTime,” followed by the name of the person to call. Want to call again? Tap Recents, then choose a name or number.
10 Calendar Calendar at a glance Change views. Search for events. View invitations. Change calendars or accounts. Search for events. Tap , then enter text in the search field. The titles, invitees, locations, and notes for the calendars you’re viewing are searched. Change your view. Tap Day, Week, Month, or Year. Tap to view upcoming events as a list. Adjust an event. Touch and hold the event, then adjust the grab points, or drag it to a new time.
Invitations If you have an iCloud account, a Microsoft Exchange account, or a supported CalDAV account, you can send and receive meeting invitations. Invite others to an event. Tap an event, tap Edit, then tap Invitees. Type names, or tap people from Contacts. to pick RSVP. Tap an event you’ve been invited to, or tap Inbox and tap an invitation. If you add comments (which may not be available for all calendars), your comments can be seen by the organizer but not by other attendees.
Share iCloud calendars You can share an iCloud calendar with other iCloud users. When you share a calendar, others can see it, and you can let them add or change events. You can also share a read-only version that anyone can view. Create an iCloud calendar. Tap Calendars, tap Edit, then tap Add Calendar in the iCloud section. Share an iCloud calendar. Tap Calendars, tap Edit, then tap the iCloud calendar you want to share. Tap Add Person and enter a name, or tap to browse your Contacts.
11 Photos View photos and videos Photos lets you view your: •• Camera Roll—photos and videos you took on iPad, or saved from an email, text message, webpage, or screenshot •• Shared photos and videos—Photos and videos that you’ve shared with iCloud Photo Sharing or that other have shared with you (see iCloud Photo Sharing on page 63) •• Photos and videos synced from your computer (see Sync with iTunes on page 17) Edit the photo. Tap the screen to display the controls. Select a photo to view.
View by location. While viewing by year or by collection, tap . Photos and videos that include location information appear on a map, showing where they were taken. While viewing a photo or video, tap to show and hide the controls. Swipe left or right to go forward or backward. Zoom in or out. Double-tap, or pinch and stretch a photo. When you zoom in, you can drag to see other parts of the photo. Play a video. Tap . To toggle between full-screen and fit-to-screen, double-tap the display. Play a slideshow.
Delete photos from a shared stream. Select the photo stream, tap Select, select the photos or videos you want to delete, then tap . You must be the owner of the stream, or the owner of the photo. Delete comments from a shared stream. Select the photo or video that contains the comment. Touch and hold the comment, then tap Delete. You must be the owner of the stream, or the owner of the comment. Rename a photo stream. While viewing Shared Streams, tap Edit, then tap the name and enter a new one.
Share photos and videos You can share photos and videos in email, text messages, and tweets, and on Facebook and Flickr. Videos can be shared in email and text messages, and on YouTube, Facebook, and Vimeo. You can also share photos and videos using Photo Sharing, described above. Share or copy a photo or video. View a photo or video, then tap screen to show the controls. . If you don’t see , tap the The size limit of attachments is determined by your service provider.
Print photos Print to an AirPrint-enabled printer: •• Print a single photo: Tap , then tap Print. Print multiple photos: While viewing a photo album, tap Select, select the photos, tap tap Print. See AirPrint on page 32. •• , then Import photos and videos You can import photos and videos directly from a digital camera, from another iOS device with a camera, or from an SD memory card.
12 Camera Camera at a glance Quick! Get the camera! Swipe up from the bottom edge of the screen to open Control Center, then tap . With iPad, you can take both still photos and videos using the front FaceTime camera or the back camera. Switch between cameras. Turn on HDR. Take a photo. View the photos and videos you’ve taken. A rectangle briefly appears where the exposure is set. When you photograph people, face detection (iPad 3rd generation or later) balances the exposure across up to 10 faces.
Take photos and videos Drag up or down to choose the Camera mode for still photos, square-format photos, or videos. Take a photo. Choose Photo, then tap the shutter button or press either volume button. A rectangle briefly appears where the exposure is set. When you photograph people, face detection (iPad 3rd generation or later) balances the exposure across up to 10 faces. A rectangle appears for each face detected.
Camera settings Go to Settings > Photos & Camera for camera options, which include: •• Photo streams •• Slideshow •• Grid Adjust the volume of the shutter sound with the Ringer and Alerts settings in Settings > Sounds. Or mute the sound using the Ring/Silent switch. (In some countries muting is disabled.
13 Contacts Contacts at a glance iPad lets you access and edit your contact lists from personal, business, and other accounts. Open in Messages. Open in FaceTime. Open in Maps. Set your My Info card for Safari, Siri, and other apps. Go to Settings > Mail, Contacts, Calendars, then tap My Info and select the contact card with your name and information. Let Siri know who’s who.
Change a label. If a field has the wrong label, such as Home instead of Work, tap Edit. Then tap the label and choose one from the list, or tap Custom Field to create one of your own. Delete a contact. Go to the contact’s card, then tap Edit. Scroll down, then tap Delete Contact. Add contacts Besides entering contacts, you can: •• Use your iCloud contacts: Go to Settings > iCloud, then turn on Contacts.
14 Clock Clock at a glance The first clock displays the time based on your location when you set up iPad. Add other clocks to show the time in other major cities and time zones. Delete clocks or change their order. Add a clock. View clocks, set an alarm, time an event, or set a timer. Alarms and timers Want iPad to wake you? Tap Alarm, then tap give the alarm a name (like “Soccer practice”). . Set your wake-up time and other options, then Keep track of time.
15 Maps Find places WARNING: For important information about navigating safely and avoiding distraction while driving, see Important safety information on page 116. Get directions. Enter a search. Quick driving directions Get more info. Tap a pin to display the info banner. Double-tap to zoom in; tap with two fingers to zoom out. Or pinch. Flyover (3D in standard view) Show your current location. Print, show traffic, list results, or choose the view.
You can search for a location in different ways: •• Intersection (“8th and market”) •• Area (“greenwich village”) •• Landmark (“guggenheim”) •• Zip code •• Business (“movies,” “restaurants san francisco ca,” “apple inc new york”) If Maps guesses where you’re headed while you’re entering a search, tap that location in the list below the search field. Find the location of a contact, or of a bookmarked or recent search. Tap Bookmarks. Choose your view.
Find out about traffic conditions. Tap , then tap Show Traffic. Orange dots show slowdowns, and red dots show stop-and-go traffic. To see an incident report, tap a marker. Report a problem. Tap , then tap Report a Problem. 3D and Flyover On iPad 3rd generation or later, you can see three-dimensional views and even fly over many of the world’s major cities. Use 3D or Flyover. Zoom in until or becomes active, then tap the button. Or, drag two fingers up.
16 Videos Videos at a glance Open the Videos app to watch movies, TV shows, and music videos. To watch video podcasts, install the free Podcasts app from the App Store. To watch videos you record using Camera on iPad, open the Photos app. Add to your library. Choose category. Tap to play. Cloud means the video hasn’t been downloaded to iPad. WARNING: For important information about avoiding hearing loss, see Important safety information on page 116.
Stream videos from your computer to iPad. Turn on Home Sharing in iTunes on your computer. Then, on iPad, go to Settings > Videos and enter the Apple ID and password you use for Home Sharing on your computer. Then open Videos on iPad and tap Shared at the top of the list of videos. Convert a video to work with iPad. If you try to sync a video from iTunes and a message says the video can’t play on iPad, try converting the video.
Show subtitles or closed captions. Tap . Not all videos offer subtitles or closed captions. Customize the appearance of closed captions. Go to Settings > General > Accessibility > Subtitles & Captioning. Want to see closed captions and subtitles for the deaf and hard of hearing? Go to Settings > General > Accessibility > Subtitles & Captioning and turn on Closed Captions + SDH. Watch the video on a TV. Tap AirPlay on page 31. .
17 Notes Notes at a glance Type notes on iPad, and iCloud makes them available on your other iOS devices and Mac computers. You can also read and create notes in other accounts, such as Gmail or Yahoo!. Tap a note to view it. Delete the note. Print or share the note. Add a new note. Tap the text to edit it. See your notes on your other devices. If you use icloud.com, me.com, or mac.com for iCloud, go to Settings > iCloud and turn on Notes.
Share notes in multiple accounts Share notes with other accounts. You can share notes with other accounts, such as Google, Yahoo!, or AOL. Go to Settings > Mail, Contacts, Calendars, add the account if it’s not already there, and turn on Notes for the account. Create a note in a specific account. Tap Accounts and select the account, then tap don’t see the Accounts button, tap the Notes button first. . If you Choose the default account for new notes. Go to Settings > Notes. See all the notes in an account.
18 Reminders Reminders lets you keep track of all the things you need to do. Mark the reminder as completed. Scheduled items Add a reminder. Add a list. Add a reminder. Tap a list, then tap a blank line. You can choose which of your Mail, Contacts, and Calendars accounts is used to save the reminder. Delete a list. While viewing a list, tap Edit, then tap Delete List. Delete a reminder. Swipe the reminder left, then tap Delete. Change the order of lists.
Scheduled reminders Scheduled reminders notify you when they’re due. See all scheduled reminders. Tap Scheduled to show the list of reminders that have a due date. Don’t bother me now. You can turn off Reminder notifications in Settings > Notification Center. To silence notifications temporarily, turn on Do Not Disturb. Location reminders On iPad Wi-Fi + Cellular models, Reminders can alert you when you arrive at or leave a location. Find an address. Adjust the geofence.
Add common locations to your My Info card. When you set a location reminder, locations in the list include addresses from your My Info card in Contacts. Add your work, home, and other favorite addresses to your card for easy access in Reminders. Reminders settings Go to Settings > Reminders, where you can: •• Set the tone played for notifications •• Set a default list for new reminders •• Sync past reminders Keep your reminders up to date on other devices.
19 Photo Booth Take photos It’s easy to take a photo with Photo Booth and spice it up with effects. Tap an option to change the effect. Tap the center image to return to Normal view. When you take a photo, iPad makes a shutter sound. You can use the Volume buttons on the side of iPad to control the volume of the shutter sound, or mute it by setting the Side Switch to silent. See Volume buttons and the Side Switch on page 10.
Manage photos The photos you take with Photo Booth are saved in your Camera Roll album in the Photos app on iPad. Delete a photo. Select a thumbnail, then tap Email or copy photos. Tap . , tap one or more thumbnails, then tap Email or Copy. View photos in your Camera Roll album. In Photos, tap an album, then tap a thumbnail. To see the next or previous photo, swipe left or right. See View photos and videos on page 62. Upload photos to your computer.
20 Game Center Game Center at a glance Game Center lets you play your favorite games with friends who have an iOS device or a Mac (OS X Mountain Lion or later). You must be connected to the Internet to use Game Center. WARNING: For important information about avoiding repetitive motion injuries, see Important safety information on page 116. See who’s the best. Find someone to play against. Play, share, or remove this game. Explore game goals.
Play with friends Invite friends to a multiplayer game. Tap Friends, choose a friend, choose a game, then tap Play. If the game allows or requires additional players, choose additional players to invite, then tap Next. Send your invitation, then wait for the others to accept. When everyone is ready, start the game. If a friend isn’t available or doesn’t respond to your invitation, you can tap Auto-Match to have Game Center find another player for you, or tap Invite Friend to try inviting some other friend.
21 Newsstand Newsstand at a glance Newsstand organizes your magazine and newspaper apps, and automatically updates them when iPad is connected to Wi-Fi. Touch and hold a publication to rearrange. Find Newsstand apps. Note: You need an Internet connection and an Apple ID to download Newsstand apps, but you can read downloaded content without an Internet connection. Newsstand is not available in all areas. Find Newsstand apps. While viewing the shelf, tap Store.
22 iTunes Store iTunes Store at a glance Use the iTunes Store to browse and add music, movies, TV shows, and audiobooks to iPad. Browse Download purchases again. Change categories. Note: You need an Internet connection and an Apple ID to use the iTunes Store. The iTunes Store is not available in all areas. Browse or search Browse by category or genre. Tap one of the categories (Music, Movies, TV, or Audiobooks). Tap a genre (for example, Comedy) to refine the list.
Purchase, rent, or redeem Tap an item’s price (or tap Free), then tap again to buy it. If you see instead of a price, you’ve already purchased the item and you can download it again without a charge. Use a gift card or code. Tap a category (like Music), scroll to the bottom, then tap Redeem. To send a gift, view the item you want to give, then tap and Gift. Bought something on another device? Go to Settings > iTunes & App Store to set up automatic downloads to your iPad.
23 App Store App Store at a glance Use the App Store to browse, purchase, and download apps specifically designed for iPad, or for iPhone and iPod touch. Browse Wish List Download purchases again. Note: You need an Internet connection and an Apple ID to use the App Store. The App Store is not available in all areas. When you first open App Store, you’re prompted to download recommended free Apple apps, including iBooks, iTunes U, Podcasts, Find My Friends, and Find My iPhone.
See your Wish List. After you add items to your Wish List, tap can purchase an app or edit your Wish List. on the App Store screen. You What apps are being used nearby? Tap Near Me to find out the most popular apps others around you are using (Location Services must be on in Settings > Privacy > Location Services). Try this at a museum, sporting event, or when you’re traveling, to dig deeper into your experience.
A Accessibility features iPad incorporates these accessibility features: •• VoiceOver •• Support for braille displays •• Siri •• Zoom •• Invert Colors •• Speak Selection •• Speak Auto-Text •• Large, bold, and high-contrast text •• Reduced screen motion •• On/off switch labels •• Subtitles and closed captions •• Mono audio and balance •• Assignable tones •• Guided Access •• Switch Control •• AssistiveTouch •• Widescreen keyboards Turn on accessibility features.
•• Guided Access (The shortcut starts Guided Access if it’s already turned on. See Guided Access on page 106.) •• Switch Control •• AssistiveTouch Not so fast. To slow down the triple-click speed, go to Settings > General > Accessibility > Home-click Speed. VoiceOver VoiceOver describes aloud what appears onscreen, so you can use iPad without seeing it. VoiceOver tells you about each item on the screen as you select it.
•• Turn spoken hints on or off: Go to Settings > General > Accessibility > VoiceOver > Speak Hints. •• Use phonetic spelling: Go to Settings > General > Accessibility > VoiceOver > Phonetic Feedback. •• Speak the entire screen from the top: Swipe up with two fingers. •• Speak from the current item to the bottom of the screen: Swipe down with two fingers. •• Pause speaking: Tap once with two fingers. Tap again with two fingers to resume. Speaking resumes when you select another item.
Double-tap the selected item. Triple-tap the screen. Adjust a slider. Select the slider, then swipe up or down with one finger. Use a standard gesture. Double-tap and hold your finger on the screen until you hear three rising tones, then make the gesture. When you lift your finger, VoiceOver gestures resume. Scroll a list or area of the screen. Swipe up or down with three fingers. •• Scroll continuously through a list: Double-tap and hold until you hear three rising tones, then drag up or down.
If a gesture doesn’t work, try a quicker movement, especially for a double-tap or swipe gesture. To swipe, try brushing the screen quickly with your finger or fingers. Practice VoiceOver gestures. Go to Settings > General > Accessibility > VoiceOver, then tap VoiceOver Practice. When you finish practicing, tap Done. If you don’t see the VoiceOver Practice button, make sure VoiceOver is turned on. Here’s a summary of key VoiceOver gestures: Navigate and read •• Tap: Select and speak the item.
Use the VoiceOver rotor Use the rotor to choose what happens when you swipe up or down with VoiceOver turned on. Operate the rotor. Rotate two fingers on the iPad screen around a point between them. Change the options included in the rotor. Go to Settings > General > Accessibility > VoiceOver > Rotor, then select the options you want to be available in the rotor. The available rotor positions and their effects depend on what you’re doing.
When moving the insertion point by line, VoiceOver speaks each line as you move across it. When moving forward, the insertion point is placed at the beginning of the next line (except when you reach the last line of a paragraph, when the insertion point is moved to the end of the line just spoken). When moving backward, the insertion point is placed at the beginning of the line that’s spoken. Change typing feedback. Go to Settings > General > Accessibility > VoiceOver > Typing Feedback.
Use a table index to skip through a long list. Select the table index to the right of the table (for example, next to your Contacts list or in the VoiceOver Item Chooser), then write the letter. Set the rotor to a web browsing element type. Write the first letter of a page element type. For example, write “l” to have up or down swipes skip to links, or “h” to skip to headings. Exit handwriting mode. Turn the rotor to a different selection.
Follow a road. Hold your finger down on the road, wait until you hear “pause to follow,” then move your finger along the road while listening to the guide tone. The pitch increases when you stray from the road. Select a pin. Touch a pin, or swipe left or right to select the pin. Get information about a location. With a pin selected, double-tap to display the information flag. Swipe left or right to select the More Info button, then double-tap to display the information page.
•• Adjust the setting specified by the speech rotor: VO–Command–Up Arrow or VO–Command– Down Arrow •• Turn the screen curtain on or off: VO–Shift–S •• Return to the previous screen: Escape •• Switch apps: Command–Tab or Command–Shift–Tab Quick Nav Turn on Quick Nav to control VoiceOver using the arrow keys.
•• Go to the beginning or end of the line: Command–Left Arrow or Command–Down Arrow •• Go to the beginning or end of the paragraph: Option–Up Arrow or Option–Down Arrow •• Go to the previous or next paragraph: Option–Up Arrow or Option–Down Arrow •• Go to the top or bottom of the text field: Command–Up Arrow or Command–Down Arrow •• Select text as you move: Shift + any of the insertion point movement commands above •• Select all text: Command–A •• Copy, cut, or paste the selected text: C
Siri With Siri, you can do things such as opening apps just by asking, and VoiceOver can read Siri responses to you. For information, see Use Siri on page 36. Zoom Many apps let you zoom in or out on specific items. For example, you can double-tap or pinch to expand webpage columns in Safari. But, there’s also a Zoom feature that lets you magnify the entire screen, no matter what you’re doing. And, you can use Zoom together with VoiceOver. Turn Zoom on or off.
Large, bold, and high-contrast text Display larger text in apps such as Calendar, Contacts, Mail, Messages, and Notes. Go to Settings > General > Accessibility > Larger Type, where you can turn on Larger Dynamic Type and adjust the font size. Display bolder text for items on iPad. Go to Settings > General > Accessibility and turn on Bold Text. Increase the contrast of text where possible. Go to Settings > General > Accessibility and turn on Increase Contrast.
Assignable tones You can assign distinctive ringtones to people in your contacts list for audible FaceTime caller ID. You can also assign distinct tones to alert you of a variety of other events, including new voicemail, new mail, sent mail, Tweet, Facebook Post, and reminders. See Sounds and silence on page 29. You can purchase ringtones from the iTunes Store on iPad. See Chapter 22, iTunes Store, on page 89. Guided Access Guided Access helps someone using iPad to stay focused on a task.
If you use multiple switches, you can set up each switch to perform a specific action and customize your item selection method. For example, instead of automatically scanning screen items, you can set up switches to move to the next or previous item on demand. You can adjust the behavior of Switch Control in a variety of ways, to suit your specific needs and style. Add a switch and turn on Switch Control You can use any of these as a switch: •• An external adaptive switch.
•• Press the Sleep/Wake button to lock iPad •• Rotate iPad •• Flip the Side Switch •• Press the Volume buttons •• Hold down the Home button to open Siri •• Triple-click the Home button •• Shake iPad •• Press the Home and Sleep/Wake buttons simultaneously to take a screenshot Item scanning Item scanning alternately highlights each item or group of items on the screen until you trigger your Select Item switch. When you select a group, highlighting continues with the items in the group.
•• Set whether and how long you need to hold a switch down before it’s accepted as a switch action •• Have Switch Control ignore accidental repeated switch triggers •• Adjust the point scanning speed •• Turn on sound effects or speech •• Select the items you want to see in the menu •• Make the selection cursor larger or a different color •• Set whether items should be grouped while item scanning •• Save custom gestures that you can choose from the Action portion of the control menu Fine-tune
Example 1: To create the rotation gesture, go to Settings > Accessibility > AssistiveTouch > Create New Gesture. On the gesture recording screen that prompts you to touch to create a gesture, rotate two fingers on the iPad screen around a point between them. If it doesn’t turn out quite right, tap Cancel and try again. When it looks right, tap Save and give the gesture a name—maybe “Rotate 90.
B iPad in the enterprise With support for secure access to corporate networks, directories, and Microsoft Exchange, iPad is ready to go to work. For detailed information about using iPad in business, go to www.apple.com/ipad/business. Mail, Contacts, and Calendar To use iPad with your work accounts, you need to know the settings your organization requires. If you received your iPad from your organization, the settings and apps you need might already be installed.
Your organization can also purchase App Store app licenses that are assigned to you for a period of time, but which the organization retains. You’ll be invited to participate in your organization’s program in order to access these apps. After you enroll with your iTunes account, you’re prompted to install these apps as they’re assigned to you. You can also find them in your Purchased list in the App Store. An app you receive this way is removed if the organization assigns it to someone else.
C International keyboards let you type text in many different languages, including Asian languages and languages written from right to left. Use international keyboards International keyboards let you type text in many different languages, including Asian languages and languages written from right to left. For a list of supported keyboards, go to www.apple.com/ipad/specs. Manage keyboards. Go to Settings > General > International > Keyboards.
Turn shortcuts on or off. Go to Settings > General > Keyboard > Shortcuts. Shortcuts are available for: •• Simplified Chinese: Pinyin •• Traditional Chinese: Pinyin and Zhuyin •• Japanese: Romaji and 50 Key Special input methods You can use keyboards to enter some languages in different ways. A few examples are Chinese Cangjie and Wubihua, Japanese Kana, and Facemarks. You can also use your finger or a stylus to write Chinese characters on the screen.
Type Japanese romaji. Use the Romaji keyboard to type syllables. Alternative choices appear along the top of the keyboard, tap one to type it. For more syllable options, tap the arrow key and select another syllable or word from the window. Type facemarks or emoticons. Use the Japanese Kana keyboard and tap the key. Or you can: •• Use the Japanese Romaji keyboard (QWERTY-Japanese layout): Tap •• Use the Chinese (Simplified or Traditional) Pinyin or (Traditional) Zhuyin keyboard: Tap tap the key.
D Important safety information WARNING: Failure to follow these safety instructions could result in fire, electric shock, or other injuries, or damage to iPad or other property. Read all the safety information below before using iPad. Handling Handle iPad with care. It is made of metal, glass, and plastic and has sensitive electronic components inside. iPad can be damaged if dropped, burned, punctured, or crushed, or if it comes in contact with liquid.
Hearing loss Listening to sound at high volumes may damage your hearing. Background noise, as well as continued exposure to high volume levels, can make sounds seem quieter than they actually are. Turn on the audio and check the volume before inserting anything in your ear. For more information about hearing loss, see www.apple.com/sound. For information about how to set a maximum volume limit on iPad, see Music settings on page 56.
Important handling information Cleaning Clean iPad immediately if it comes in contact with anything that may cause stains— such as dirt, ink, makeup, or lotions. To clean: •• Disconnect all cables and turn iPad off (press and hold the Sleep/Wake button, then slide the onscreen slider). •• Use a soft, lint-free cloth. •• Avoid getting moisture in openings. •• Don’t use cleaning products or compressed air.
Restart or reset iPad If something isn’t working right, try restarting iPad, forcing an app to quit, or resetting iPad. Restart iPad. Hold down the Sleep/Wake button until the red slider appears. Slide your finger across the slider to turn off iPad. To turn iPad back on, hold down the Sleep/Wake button until the Apple logo appears. iPad may be low on power. Connect iPad to the USB power adapter to charge. See Charge and monitor the battery on page 34. Force an app to quit.
Onscreen keyboard doesn’t appear If iPad is paired with a Bluetooth keyboard, the onscreen keyboard doesn’t appear. To make the onscreen keyboard appear, press the Eject key on a Bluetooth keyboard. You can also make the onscreen keyboard appear by moving the Bluetooth keyboard out of range or turning it off. Get information about your iPad See information about iPad. Go to Settings > General > About.
Profiles settings Configuration profiles define settings for using iPad with corporate or school networks or accounts. You might be asked to install a configuration profile that was sent to you in an email, or one that is downloaded from a web page. iPad asks for your permission to install the profile, and displays information about what it contains, when you open the file. You can see the profiles you have installed in Settings > General > Profiles.
Update and restore iPad software You can update iPad software in Settings, or by using iTunes. You can also erase iPad, and then use iCloud or iTunes to restore a backup. Deleted data is no longer accessible through the iPad user interface, but it isn’t erased from iPad. For information about erasing all content and settings, see Restart or reset iPad on page 119. Update iPad You can update iPad software in Settings or by using iTunes. Update wirelessly on iPad. Go to Settings > General > Software Update.
Set whether cellular data is used for apps and services. Turn cellular data on or off for any app that can use cellular data. If a setting is off, iPad uses only Wi-Fi for that service. The iTunes setting includes both iTunes Match and automatic downloads from the iTunes Store and the App Store. Activate, view, or change your cellular data account. Tap View Account, then follow the onscreen instructions. Lock the SIM card.
•• If the Apple TV has been set up to require a passcode, you must enter it on iPad when asked, in order to use AirPlay. •• Make sure the speakers on the AirPlay device are turned on and turned up. If you’re using an Apple TV, make sure the TV’s input source is set to Apple TV. Make sure the volume control on iPad is turned up. •• When iPad is streaming with AirPlay, it must remain connected to the Wi-Fi network. If you take iPad out of range, playback stops.
To learn about Do this Using iTunes Open iTunes and choose Help > iTunes Help. For an online iTunes tutorial (not available in all areas), go to www.apple.com/support/itunes. Using other Apple iOS apps Go to www.apple.com/support/ios. Obtaining warranty service First follow the advice in this guide. Then go to www.apple.com/support/ipad. Viewing iPad regulatory information On iPad, go to Settings > General > About > Legal > Regulatory. Battery replacement service Go to www.apple.
Canadian regulatory statement This device complies with Industry Canada licence-exempt RSS standard(s). Operation is subject to the following two conditions: (1) this device may not cause interference, and (2) this device must accept any interference, including interference that may cause undesired operation of the device. Le présent appareil est conforme aux CNR d’Industrie Canada applicables aux appareils radio exempts de licence.
Brasil—Informações sobre descarte e reciclagem O símbolo indica que este produto e/ou sua bateria não devem ser descartadas no lixo doméstico. Quando decidir descartar este produto e/ou sua bateria, faça-o de acordo com as leis e diretrizes ambientais locais. Para informações sobre o programa de reciclagem da Apple, pontos de coleta e telefone de informações, visite www.apple.com/br/environment.
KKApple Inc. © 2013 Apple Inc. All rights reserved. Apple, the Apple logo, AirDrop, AirPlay, AirPort, AirPort Express, AirPort Extreme, Aperture, Apple TV, FaceTime, Finder, iBooks, iCal, iLife, iMessage, iPad, iPhone, iPhoto, iPod, iPod touch, iSight, iTunes, Keynote, Mac, Mac OS, Numbers, OS X, Pages, Passbook, Photo Booth, Safari, Siri, Smart Cover, Spotlight, and Time Capsule are trademarks of Apple Inc., registered in the U.S. and other countries.