
Specifications


Procedure
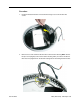
1. Remove the old thermal pads (shown below) from the bottom housing. Note: If you
don’t see all three thermal pads on the bottom housing, check the bottom side of the
logic board. The thermal pads may stick to the logic board. Either way, remove the old
thermal pads.
2. Using the thermal pad kit, remove the clear protective backing from the new thermal
pads.
3. Place the new thermal pads on the bottom housing. Press down on the blue protective
backing to make sure the thermal pad has even contact with the bottom housing.
There should be no air pockets.
4. Remove the blue protective backing from the new thermal pad. Note: Avoid
unnecessary contact with either side of the thermal pad as dirt and body oils reduce
the thermal pad's conductivity.
5. Holding the logic board by the battery retainer and the internal drive cable connector,
slide the logic board back into the bottom housing (make sure the I/O port covers are
on the logic board). Important: Do not push on the heatsink for leverage, as you could
knock it off the chip.
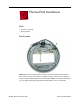
Thermal Pad Installation
iMac (Flat Panel) Take Apart - 31