
User guide

3i>clicker User Guide Windows/PC
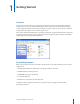
2 The Welcome screen appears with no courses listed. Click Add Course.
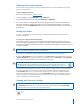
3 An Add Course window appears. Enter your Course Name, Course Number, and Section Number.
This combined information will serve as the unique identier for your course.
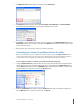
4 Click Create. i>clicker automatically creates a new course folder in your iclicker Win\Classes folder. The
Add Course window closes and you are returned to the Welcome screen where you will see your course
name in the list of courses.
5 Repeat steps 2–4 to create as many courses or sections as you need.
Converting from i>clicker 5.3 and Earlier Versions of i>clicker
With i>clicker 5.4 and 5.5, you no longer have to make a separate copy of the MyCoursePC folders for
each course/section in which you are using i>clicker. Because of the changes to the folder structure in
i>clicker 5.4, the steps to upgrade your software are a little dierent from previous versions.
To use i>clicker 5.5 with 5.3 and earlier course data, take the following steps:
1 Locate the MyCoursePC folders that contain your older course data (You may have changed the name
of the folder to match your course title). Copy and paste (or drag‐and‐drop) your MyCoursePC folders
into the Classes folder within your new iclicker Win folder. (If you have more than one i>clicker course,
copy the folders for each of your courses into the Classes folder.)
2 Within the iclicker Win folder, double‐click the i>clicker icon. Your older course folders will appear in
the new Welcome screen. Select your course and click Choose.