
User guide

31i>clicker User Guide Windows/PC
allowing you to title the question (the default titles are Question 1, Question 2, etc.) and assign a correct
answer. The correct answer will not display in the Answer eld; your students will only see an asterisk (*)
regardless of the letter choice you enter.
TIP: You may also assign titles and correct answers to your questions ahead of time by setting up a
le and adding it to your course folder. For instructions, please see Pre-Assigning Question Titles and
Answers on page 36. To pre-assign question titles and answers, you MUST choose the Show question
information before each question radio button.
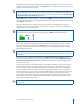
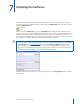
Polling Timer: When you start polling (i.e., when you click START), the software automatically launches
a timer. The default i>clicker timer counts upwards, beginning with zero. In the default setting, you must
select STOP to end polling.
Through Settings/Preferences, you may choose instead to dene a countdown time, choosing any
length of time in 15 seconds increments from 15 second up to 4 minutes. The timer will automatically
stop at zero and end the polling period.
TIP: In the countdown mode, the + and - buttons to the left of the timer allow you to add or subtract
20 seconds as needed. You can still stop polling by pressing STOP on the oating menu bar.
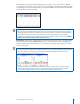
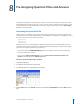
Response Grid: This option allows you to display (or hide) a grid of your students’ voting entries each
time you ask a question. The voting results grid gives students an additional opportunity to conrm
their votes were received. (Note that the Vote Status light on each remote ashes green each time
a vote is received by the i>clicker base, so your students can conrm that their votes were recorded
without displaying this grid.)
TIP: While this is a comfort to students, the voting results grid can be distracting if used extensively.
You can minimize the voting results grid during a polling session by clicking on the top right corner
of the grid.
There are two ways to display the voting results grid. Conrm response was received only allows
students to see their vote was received but doesn’t indicate their choice, while Conrm response was
received and show response choice allows students to see both their vote receipt and last received
response on the screen.
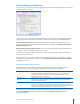
In order for an ID to appear, the student must have responded successfully to at least one question in
the session. The rst time the voting grid displays in a polling session, all of the remote ID responses
will be either blue or green. (The student’s rst response is colored blue, the second is colored green,
and any subsequent responses to that same question toggle between these colors.) For subsequent
questions in the same lecture, however, the grid will initially display all remote IDs that have been used
in the session, in white. When those remotes have voted in response to the question, the color will
change to blue. If they do not vote during a particular question, the remote IDs will remain on screen
but stay white. For example, the student with remote ID FFFF0 has voted in previously in this session,
but has not yet voted for this question.
NOTE: To help a student nd their response, their ID will always be in the exact same location for that
lecture only.