
User guide

29i>clicker User Guide Windows/PC
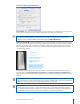
Toolbar: This option allows you to choose the size of the oating toolbar that will sit on top of your
presentation materials. The default size of the oating toolbar is small as it is the least obtrusive/
distracting when projected on screen. However, if you have a very large lecture hall (auditorium), the
larger toolbar projects the timer and vote count more easily.
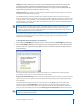
Frequency Code: The i>clicker 2-way radio frequency student response system operates on one of 16
channels in the 915 MHz frequency range.
The default frequency channel for both the base and the student remotes is AA. If you are the only
professor using i>clicker at a given time you should not modify this frequency. However, if someone else
is using i>clicker in close proximity, one of you will want to use a dierent channel (such as AD, as in the
example below). i>clicker has sixteen dierent frequencies available (AA, AB, AC, AD, BA, BB, BC, BD, CA,
CB, CC, CD, DA, DB, DC, and DD).
TIP: If you know you will be using i>clicker near another professor using i>clicker for the term, we
recommend you set your default frequency for the entire term. If i>clicker is in use across your
institution, you may also need to coordinate frequencies with your IT administrator. They may have
already assigned channels to each classroom.
If you change your frequency from the default, your students will need to change their remote
frequency at the beginning of each session. When you begin polling, an alert will appear with
instructions for your students.
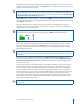
To change their remote frequencies, ask students to:
1 Press and hold the On/O (power) button on their i>clicker until the blue Power light begins ashing.
2 Press the two-letter code (that you’ve designated in your Settings/Preferences). In the example below,
that new code is AD. A green Vote Status light will indicate your students have successfully reset their
remote frequency.
This remote frequency will be set for as long as the remote is on. Students will need to repeat this
procedure for every session or each time they turn on the remote..
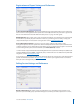
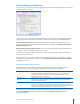
Freqency Code Alert Message: You may alter the length of time that the frequency code alert warning
appears on your screen, or you may choose to disable the warning/change alert completely (so that it
never displays).
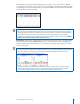
If you prefer that the warning remain on screen until you click the Close button at the lower right,
choose the option to Close Manually. If you do not want to see the warning pop up before each
question in the session (but do want the alert to appear the rst time you ask a question), wait for the
pop up to appear and then un-check the option Warn again on next question below the instructions.
NOTE: The receiver must be plugged in and the i>clicker application must be running to enable
students to perform this procedure.