
User guide


15i>clicker User Guide Windows/PC
4
Using i>grader to Assign Credit for Sessions
and Questions
TIP: Remember to check for software updates to i>clicker and i>grader using the
WebUpdate tool.
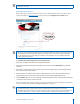
1 Before launching i>grader, always make sure to exit the i>clicker application. Then open the iclicker
Win folder on your ash drive or computer, and double-click the i>grader icon.
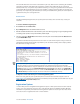
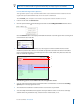
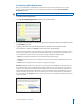
2 The i>grader application will start and you will see a screen similar to this one:
A list of students will display in the left-most column, and a list of your voting sessions will display across
the top row. You will see all students as listed in your Roster.txt le (or other gradebook le if you have
chosen to use i>clicker with your course management system). You may view the students by StudentID
or by last name, using the drop-down menu directly above the column of students.
Registered students will appear in blue, and unregistered student names or IDs will appear in red. The
recorded votes of your students who have not yet registered are stored under their i>clicker remote ID.
These numbers appear in red at the end of the student list.
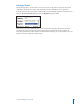
By default, each Lecture column is labeled by polling session date. If you conduct two polling sessions
on the same day, those two sessions will be shown separately on the main i>grader screen. The example
screen above indicates that clickers were used in just one lecture to date (on November 29, 2007) and
two sessions were held during this lecture. Of the student names appearing on the screen, one has
registered their clicker (Foxtrot) while the other two have not. The three remote serial IDs (#11A674C3,
#28AF87, and #28E7CF) at the bottom of the list belong to unregistered students who have participated
in voting sessions.
TIP: If you choose Resume Last Session from the Main Menu screen, your additional polling data will
be included in the previous session, thereby eliminating separate entries in i>grader.
i>grader
Icon