
User guide


13i>clicker User Guide Windows/PC
NOTE: If students’ names scroll o the screen before they are able to complete the registration, they
must wait for their names to reappear as the list loops around. Names will continue to scroll on the
screen in a continuous loop until either all students have registered or you click the Close button at
the bottom of the screen.
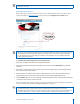
TIP: Students accidentally registering their clicker to the wrong name should press the D button on
their i>clicker remote twice to clear the incorrect registration and restart the registration process.
In-Class “Individual” Registration (Option 3)
If only a few students need to register, an individual registration option is available. This registration
process is typically used when new students join your class after you’ve already completed Roll
Call registration. Because this option is limited to registering a single student at a time, it is not
recommended for registering a large number of students.
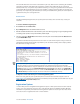
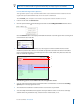
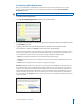
1 From the i>clicker oating toolbar, click on the down arrow to open the Options menu and select Loan/
Register Clickers. Be sure that For the Term (Permanent) is selected from the Register drop down
menu
2 Now enter the student’s Remote ID, the eight-character code on the back of their i>clicker. This can be
done by just typing it into the Remote eld, or by having the student hold the On/O button on the
remote until the blue light starts ashing (around two seconds) and pushing the A button twice. This
will send the clicker ID to the computer and the Remote ID will appear in the Remote eld as if you had
typed it.
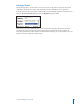
3 Select the student’s ID from the drop down menu labeled Student. The names in this list are taken from
your Roster.txt le. Click OK. The student’s ID will be associated with the corresponding i>clicker remote
ID.
This registration process assigns the remote to the student for the duration of the course. In the
example, Remote ID 11A53185 is permanently assigned to Echo Student with ID 56789.