User Guide Windows/PC Version Modified August 2010
Congratulations on your adoption of i>clicker, the easiest-to-use classroom response system available. This guide will enable you to quickly start using i>clicker’s fundamental functions, as well as learn to use its more advanced features. • The upgrade to i>clicker 5.5 is not required. You may continue to use your current version of i>clicker if you prefer not to upgrade. You may also continue to download i>clicker 5.5 from the Downloads page at www.iclicker.com.
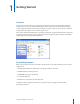
Contents Chapter 1: Getting Started Overview ������������������������������������������������������������������������������������������������������������������������������������������������������������������������������������������������������������������������1 System Requirements ������������������������������������������������������������������������������������������������������������������������������������������������������������������������������������������������1 Obtaining the i>clicker Software
Performance (Question-Based) Points ��������������������������������������������������������������������������������������������������������������������������������������������������� 33 Chapter 6: Resuming Your Last Session Chapter 7: Updating the Software Chapter 8: Pre-Assigning Question Titles and Answers Formatting the Questionlist File ����������������������������������������������������������������������������������������������������������������������������������������������������������������������
1 Getting Started Overview Using i>clicker to poll your class can significantly change the way you and your students interact by enabling you to assess your students’ knowledge, keep their attention, provide immediate feedback, and encourage all students to participate. An audience response system can also be used in conference settings to poll the audience on the content of your choice. The i>clicker software for Windows/PC is completely packaged in a single folder.
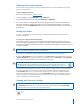
Obtaining the i>clicker Software Don’t have the i>clicker software yet? You may download the latest i>clicker software free of charge from the i>clicker web site. To get i>clicker from the web: 1 Go to the i>clicker website at www.iclicker.com. 2 In the top navigation, select Downloads and click Instructor. 3 In the Instructor Downloads section under i>clicker 5.5, click Windows. 4 The i>clicker software is downloaded and extracted.
2 The Welcome screen appears with no courses listed. Click Add Course. 3 An Add Course window appears. Enter your Course Name, Course Number, and Section Number. This combined information will serve as the unique identifier for your course. 4 Click Create. i>clicker automatically creates a new course folder in your iclicker Win\Classes folder. The Add Course window closes and you are returned to the Welcome screen where you will see your course name in the list of courses.
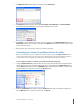
2 Polling Your Students in Class Polling Students 1 Double-click the i>clicker icon to start the program. 2 The Welcome screen will appear. Select the desired course from the list of available courses and click Choose. If you do not see your course listed, see the previous section Creating Your Courses in i>clicker. 3 The Main Menu screen will appear. Click start session in the center of the screen.
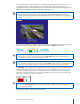
You can reposition the toolbar anywhere on your desktop. The floating toolbar allows you to run i>clicker with your presentation application(s). For example, if you use PowerPoint, both your presentation and the i>clicker toolbar will be active (see example below). The toolbar floats above any application including Word, Acrobat, Web browsers, Mathematica, etc. TIP: If you reposition the toolbar on your desktop, the system will remember its placement and retain the new location until you change it again.
NOTE: Students can turn on their i>clicker remotes and vote at any time while polling is active by pressing the ON/OFF button on the remote. We recommend students keep their remotes on during the lecture. This is particularly important if a frequency other than the default AA is in use. For more information regarding frequency, see page 29. The remotes will automatically shut off after 90 minutes of inactivity to save battery power.
6 To stop displaying the graph, click HIDE. TIP: You can also display or hide the student response graph by pressing the B button on the instructor’s remote. You can designate a correct answer by cycling through the choices with the E button on the instructor’s remote. Your receiver’s LCD screen also displays voting results and is updated every second when polling is active.
Asking Questions On The Fly By selecting Question On the Fly, you can ask a question spontaneously and have it recorded in a screen capture, without closing out of your presentation application. For example, you could be using PowerPoint in slide show mode, decide to ask an unplanned question mid-lecture, and ask it using the On the Fly option without ever having to exit or close your PowerPoint slide show.
3 Registering Your Students’ Remotes The i>clicker system may be used as a simple tool to give you instant, anonymous feedback in class, in which case no registration procedure is necessary. However, if you (like most instructors) want to go a bit further and give credit to your students for class participation and/or performance, you will need to: 1 Associate each of your students with the unique serial number on their i>clicker remotes (i.e. Registration).
The roster file must have one line for each student in your class, with each line containing the student’s Last Name, First Name, and Student ID, separated by commas. The Student ID may be a college ID number, email alias, or any other easily readable text string—as long as it is guaranteed to be unique for each student.
TIP: In-class and online registration are not mutually exclusive, and both can be used to register students in one class. Web Registration (Option 1) Online registration is recommended, especially for classes of fifty students or more. To register online, send your students to www.iclicker.com and have them click the Register Your i>clicker button.
TIP: Students can use a single i>clicker remote for multiple classes and only need to register on the web once. If a student makes a registration mistake they can simply register a second time. In-Class/Roll Call Registration (Option 2) This registration option is only recommended for small classes with fewer than 50 students. The two registration options (Web and Roll Call) can also be used in combination. To use Roll Call, your computer screen needs to be projected so that all students can see it.
NOTE: If students’ names scroll off the screen before they are able to complete the registration, they must wait for their names to reappear as the list loops around. Names will continue to scroll on the screen in a continuous loop until either all students have registered or you click the Close button at the bottom of the screen.
Loaning a Clicker If students forget their i>clicker remote, you can loan one for a single lecture. To associate the loaned clicker with a student for one lecture only, you should perform a temporary or loaner registration. To do this, follow the exact same steps as outlined above for an individual registration, but make sure to select the For one Session (Loan) option from the Register drop-down menu.
4 Using i>grader to Assign Credit for Sessions and Questions TIP: Remember to check for software updates to i>clicker and i>grader using the WebUpdate tool. 1 Before launching i>grader, always make sure to exit the i>clicker application. Then open the iclicker Win folder on your flash drive or computer, and double-click the i>grader icon.
Synchronizing Web Registrations Once your students have completed the registration form and you have held at least one i>clicker session, you may now update your course registration information using the Synchronize Web Registrations feature. NOTE: You will must be connected to the Internet to synchronize web registrations. To synchronize web registrations: 1 Click Synchronize Web Registrations from the main i>grader window.
TIP: Students can register multiple times without affecting the synchronization process. If you are unsure if a web registration matches the student’s roster, you can always ignore the registration, ask your student to register online again, and run another web synchronization process at a later time. Any unregistered clicker IDs that remain after this step (i.e., you continue to see records with red clicker ID numbers), likely belong to students who have not yet registered online.
The View and Select Unregistered Clickers screen details votes from clickers that have not been registered to any student in your roster. You may see votes from unregistered clickers if students have not yet registered successfully, if students accidentally brought a friend or roommate’s i>clicker remote to class with them, or if students voted in only a few sessions and then dropped the class.
i>grader Functions i>grader’s three main editing functions available from the opening screen include: • Editing a Student • Editing a Session • Setting Scores Editing a Student This feature allows you to modify which remote IDs are associated with a particular student ID. 1 Locate and click on the student ID or name. You will see the pop-up dialog shown below.
Setting Session Scores To assign credit and establish the points for any given polling session, locate the relevant lecture session and click on the Set Scores button under the name of the session. This screen allows you to delete and modify question data and award Participation/Attendance Points and Performance Points for this lecture. Participation/Attendance Points are used to credit students for attending class and for participating in the voting activities.
Since you may not remember the details of each question you asked in lecture, i>clicker takes a screen capture for you every time you begin a question by clicking START on the floating menu bar. To view this image in i>grader, click on View Screenshot/Image next to the question title field. The button changes to Hide Screenshot and can be clicked again to return to the Set Scores screen.
The reports can be opened and printed using any web browser. They can also be posted to a course web site or course management system (We recommend using Adobe Acrobat to post the reports, but you can also post as HTML files/pages with a little bit of work). The Term/Session Summary and Review report and the Student Voting Data report are both placed directly in your course folder within the iclicker Win\Classes folder. You may access and open them from that location at any time.
For each individual question you may review a screen capture of the question, voting results graph, and the number of students who selected each answer. TIP: The Session Summary reports are ideal to share with your students after class. Your Student Voting Data report is similar to the Term Summary Report, only instead of links to individual Session Summary reports, you will now see links to a detailed report of student responses for each session.
The Cumulative Student Scores link will bring you to the Student Term Report. Note that the student data displayed here includes: • • • • Student last name, first name, student ID Their total number of points for the term Their point average The number of points received for each individual polling session To view your students responses click on the session title/date at the top of the column and you will quickly receive a complete review of each student’s activity during the session.
TIP: If you are using Internet Explorer to view the HTML reports, you can right-click on any blank space within a table in your report and select Export to Microsoft Excel. This will open an Excel spreadsheet containing information from the table you selected. To export information from more than one table in the report, click on a blank space outside of the report and you will be prompted to select tables to export to Excel. Exporting Grade Data You can export student grade data as CSV files.
After you’ve selected the data you’d like to export, you will receive a message that your students’ scoring data has been saved into your course folder located in the iclicker Win\Classes folder. The name of the file will vary depending on whether or not you are formatting your data for a particular course management system. The default file name, however, is UploadFile.csv. The default UploadFile.csv file will include the data that you select for export. Below is a sample file, opened with Microsoft Excel.
5 Customizing i>clicker and i>grader You can use the Settings and Preferences options to customize i>clicker and i>grader. Select Your Settings and Preferences from the i>clicker Main Menu screen to change the Settings and Preferences. The default settings for both the i>clicker and i>grader applications are chosen to make this classroom response system the easiest to learn and quickly use. However, you may alter the default to best meet your individual needs.
General Settings/Preferences Course Name: The course name field shows the course name that you entered when you created your course. You can change your course name by editing the text in the course name field. NOTE: Editing the course name in General Preferences only affects the course name that appears in i>grader, on the Main Menu screen, and on your reports. To change the course name on the Welcome screen you must edit the course folder name in i>clicker Win\Classes.
Toolbar: This option allows you to choose the size of the floating toolbar that will sit on top of your presentation materials. The default size of the floating toolbar is small as it is the least obtrusive/ distracting when projected on screen. However, if you have a very large lecture hall (auditorium), the larger toolbar projects the timer and vote count more easily. Frequency Code: The i>clicker 2-way radio frequency student response system operates on one of 16 channels in the 915 MHz frequency range.
Registration and Export Settings and Preferences In-Class (Roll Call) Registration: This setting modifies the way that student names appear on the Roll Call screen for in class registration. This option does not modify the format of your roster or grade book file. For more information about the Roll Call feature please see page 12 of this guide. Web Registration: The security code is only needed if your students are registering via a locally hosted web site that is specifically for your institution.
allowing you to title the question (the default titles are Question 1, Question 2, etc.) and assign a correct answer. The correct answer will not display in the Answer field; your students will only see an asterisk (*) regardless of the letter choice you enter. TIP: You may also assign titles and correct answers to your questions ahead of time by setting up a file and adding it to your course folder. For instructions, please see Pre-Assigning Question Titles and Answers on page 36.
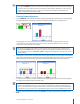
Confirmed Receipt and Vote Selection displays both the students i>clicker remote ID and a different color depending on their last received response. In the grid below, A is yellow, B is Blue, C is purple, D is red, and E is green. The student with remote ID 11617 answered B for this question, while students with remotes EF0FE and 13637 answered C. TIP: During polling, your students can freely change their votes at any time until you select STOP (their last vote is recorded).
Scoring Settings and Preferences In this section, you are able to establish the point values earned for actively participating in class and for answering questions correctly. Participation (Session-Based) Points Participation points are awarded to students who attend and vote during lecture (encouraging student engagement). Participation points are awarded by overall session activity, not by individual question.
6 Resuming Your Last Session In addition to Your Settings and Preferences on the Main Menu screen, there is also the option to Resume Last Session. This allows you to resume a lecture, rather than starting a new one. This option is useful if you accidentally exited the i>clicker application or had a computer crash.
7 Updating the Software From time to time there will be improvements made to the i>clicker and i>grader programs. These updated versions can be downloaded free of charge using the WebUpdate application which you will find in the iclicker Win folder. WebUpdate Icon Double-click on the WebUpdate icon in your iclicker Win folder, making sure the computer you are using has access to the internet.
8 Pre-Assigning Question Titles and Answers If you’d like to assign titles to your questions and/or the correct answer before your lecture (instead of the default Q1, Q2 assignments given by i>clicker), you may create a question list file and save it in your course folder. If you are teaching multiple sections or courses, you will need to include a questionlist. csv file in each course folder.
IMPORTANT: Do not name your question list questionlist.csv in the File Name field. If you do this and save the file as a CSV file, it will not work properly with your i>clicker application. 5 Before clicking the Save button, verify that you are saving the questionlist file in your iclicker Win\ Classes folder. 6 If a previous questionlist file exists, you will see an alert asking if you wish to replace it. Veify that you do not need the existing file then click the Yes button.