Macintosh User’s Guide Congratulations on your adoption of i-clicker, the easiest-to-use classroom response system available! The following guide will enable you to quickly start using i-clicker’s fundamental applications, as well as options to use some of the more advanced software tools. Want to learn more about i-clicker software through live training? Visit us at http://iclicker.webex.com to sign up for a training session, where we review the software in its entirety. Or email us at sales@iclicker.
i>clicker User Guide (Macintosh Application) (08/08) Table of Contents Section One – Using I>Clicker: How To Poll Your Students In Class ........................................ 5 • Setting Up Your Course Folders ……………………………………………………………..5 • Displaying a graph (or histogram) of responses ............................................................ 7 • Keynote Tips .................................................................................................................. 7 • Comparing two graphs .....
• • o CMS (Course Management System) in Use ................................................... 38 o Web Registration...............................................................................................39 Question and Polling Settings and Preferences o Set Polling Timer ............................................................................................. 39 o Chart Display Options .....................................................................................
Section One-Using i>clicker: How to Poll Your Students in Class 1. Connect the i-clicker receiver (or base) to your computer through the USB port. The LCD screen on the receiver will light up. If it doesn’t, be sure to plug the receiver directly into the computer (and not through the keyboard or a non-powered USB hub). Your computer should tell you that it has recognized new hardware and inform you when it is ready to use it (this takes a few seconds). 2. Place your i-clicker flash drive (a.k.a.
Tip: i-clicker software can be copied to another computer (or computers) rather than residing only on your flash drive. For example, many institutions are placing i-clicker on the college network drive (or H drive) and a number of individual professors are placing the i-clicker software on their laptop computers. The benefit of the flash drive is that the i-clicker software is fully portable; just insert the flash drive into any computer to access your course folder.
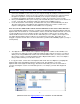
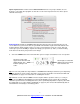
7. Click on Start Session in the center of the Welcome Screen. The Welcome Screen will disappear and you will see the following floating menu bar appear in the top left corner of your computer desktop. You can move the menu bar anywhere you choose on your desktop. Close Start/Stop Polling Minimize Display/Hide Results Graph New Options Tool New upgrade! The overall menu bar is smaller and also has a minimize option.
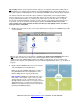
Tip for Keynote users: In order for the i-clicker menu bar to float over your presentation, be sure Keynote is set to allow other programs to share the screen. In the Keynote Preferences menu, please follow the below steps: New upgrade! By default, the i-clicker floating menu bar appears in the top left hand corner of your screen.
9. Click on the STOP button on the menu bar when you feel that enough time has elapsed. New upgrade! The floating menu bar will be restored to the smaller size after polling has stopped. The counter and timer will disappear so the floating menu bar will become less obtrusive. Note: i-clicker will only begin collecting your students’ votes after you’ve clicked Start and will stop collecting votes after you’ve clicked Stop. If you have not selected Start, the i-clicker will not accept or record any votes.
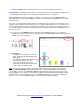
Tip: You may designate one answer in the graph as correct by simply pointing your mouse to and clicking on the correct letter that appears when you mouse-over the graph. This will change your selected bar (i.e. the answer you’ve designated as correct) to green and the remaining bars to red to clearly delineate the question’s ‘correct’ answer. See the example below. Similarly, clicking the “?” on the far left will clear the correct answer selection and the display will return to the default mode.
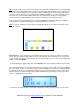
New upgrade! Floating Menu bar OPTIONS The floating menu bar now is revised to have three functions: start/stop, hide/display, and OPTIONS (marked with ). Roll your mouse over and select the to review and use the menu bar OPTIONS. Currently, there are three options you may access: 1. By selecting Loan/Register Clickers, you can manually register an individual clicker (permanently or for just one session) or start In-Class/Roll-Call registration.
When your class is over, click on the small white square at the top right corner of the menu bar to exit iclicker. You will be asked if you really want to quit i-clicker and, if so, click on OK. Each student’s response to each question will be saved in your course folder. Remember: You must run the i-clicker program from the same folder each time in order to keep a complete record of your students’ responses.
Section Two - Registering Your Students: How To Give Your Students Credit The i-clicker system may be used as a simple tool to give you instant, anonymous feedback in class, in which case no registration is necessary. However, if you (like most instructors) want to go a bit further and give credit to your students for class participation and/or performance, you will need to: 1. Associate each of your students with the unique serial number on their i-clicker remotes (i.e. Registration). 2.
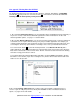
The TextEdit.app application (or any other plain text editor) can be used to easily create the Roster.txt file. To create a txt file using TextEdit: 1. Go to the “Applications” folder and open“TextEdit.” 2. Enter the student information, or Copy and Paste it from an existing roster file into TextEdit. Note: If you copy/paste the file, you may still need to modify the contents so that each line contains student information in the correct format. 3. Save this as “Roster.txt” within your course folder.
i-clicker offers you three straightforward registration options: an in-class option (for your entire class), a manual option (for individual students), and an “online/web” option. Minimal information is required of your students and all registration options are tied to your class roster. There are no site license or registration fees for i-clicker software. Tip: In-class and online registrations are not mutually exclusive, and both can be used to register students in one class.
The ROLL CALL screen will appear as below. Your student’s information (from the Roster.txt file you have placed into your course folder) will begin scrolling as shown below: The instructions for students to register are outlined on the screen and are easy to follow. 1. Step One: The student locates his/her name or ID as read from the Roster.txt file. 2. Step Two: The student must wait until his/her ID has scrolled down into the central blue region of the Step Two screen.
Tip: If a student accidentally registers his/her clicker to the wrong name, s/he should push the D button on his/her i-clicker remote twice to clear the incorrect registration and restart the registration process. Option Two -Web Registration: Your students can also register through a simple Web registration process. To do this, send your students to the following web site: www.iclicker.com/registration. Once your students have arrived at the site, each student must: 1.
Tip: Students can use one i-clicker remote for multiple classes, and only need to register on the web once. If the student makes a mistake they can simply register a second time. Tip: i>clicker offers institutions the option to host their own registration site or use their own LDAP authentication with our national database; we can provide the requisite scripts and administration support. If your institution has standardized on i-clicker, your registration may already be hosted locally.
Loaning a clicker (Temporary Registration) If a student forgets his/her i-clicker remote, you can loan one for a single lecture. To associate the loaned clicker with a student for one lecture only, you should perform a temporary (or loaner) registration. To do this, follow the exact same steps as outlined above for an individual registration, BUT make sure to select the “For one Session (Loan)” option from the Register drop down menu (as shown here).
Section Three -Using i>grader After Class: Assigning Credit for Sessions and Questions Note: You may want to take the time right before starting i-grader to check for updates to the software. This process is quick and free of charge, and can be done by using the WebUpdate application in your course folder. Please see Section Six of this guide for more information on Web Update. Before opening i-grader, always make sure to exit the i-clicker application.
Tip: If you choose Resume Last Session from the Welcome Screen, your additional polling data will be included in the previous session (thereby eliminating the second session in our example). Synchronizing Web Registrations Let’s suppose you have chosen to have your students register through the Web site registration option.
Example: In the screen below, a student tried to register his i-clicker online (remote ID 11AA6BD0) with a student ID (bstudent001) which was not in your Roster.txt file. You realize that the student likely mistyped some information. As a result, you select the correct student from the list of students in the roster (on the right), and click the “Accept” button to associate “bstudent” with i-clicker remote ID 11AA6BD0.
If any unassociated clicker ID’s remain after this step (i.e. if you continue to see any red clicker ID numbers in the left column), they likely belong to students who have not yet registered online. Check with your students and synchronize again later. If there are problems synchronizing only one or two students who have registered online, you can also run a Roll Call registration or register these students manually. You can repeat these steps as often as necessary.
The View and Select Unregistered Clickers screen allows you to quickly see votes from only those clickers that have not been registered to any student in your roster. You may see votes from unregistered clickers if students have not yet registered successfully, if students accidentally brought a friend or roommate’s i-clicker remote to class with them, or if students voted in only a few sessions and then dropped the class.
i-grader Functions From the main screen of i-grader, you can edit student registrations as well as session and scoring information. Editing a Student This feature allows you to modify which remote IDs are associated with a particular student/student ID. 1. Locate and click on the student ID or name that you wish to modify. You will see the pop up dialog shown here. 2. To remove the association of a particular clicker to that student, highlight the clicker remote ID in the pop up, and then click Remove.
Setting Session Scores i-grader scoring tools allow you to designate correct answers and set scoring options for each individual session. However, you can save time by setting default scoring settings for all sessions in your course using the i-clicker Settings and Preferences, described in Section Four. If you do not modify these settings, i-grader will automatically assign point values based on the default settings in i-clicker.
Participation/Attendance Points are used to credit students for attending class and for participating in the voting activities. Participation points are not given for answering the questions correctly; the student only needs to place a vote for least the minimum number of questions to receive these points. These points are awarded by session, not by question—the student either answers the minimum number of questions and receives all participation points, or does not and receives zero participation points.
You will now see the following adjusted scores: Notice that i-grader has updated the summary for this lecture and the column of averages. Deleting a Question: To delete a question, open the session (by clicking the session name or date) containing the questions you wish to delete. Use the Previous and Next arrows to review your questions/screen shots. When you’ve located the question you wish to delete, select “Yes” in answer to the question “Delete this Question?” under the question title.
The Student Voting Data report contains grades for your individual students, by session and by question. From here you can also access a report of Cumulative Scores, which provides you with a review of each student’s performance for each i-clicker session. When you select the Run/Update HTML Reports button, you will see a Report Summary window appear with links to these three reports. The reports are accessible from the links shown here. They can be opened and printed using any web browser.
To view more detailed session information, click on Session Summary and Question Data for any session, to display the Session Summary report. The Session Summary data is displayed at the top of this report, followed by information about individual questions. Scroll down, or click a question title, to jump to the question information (including the question screen shot and histogram of your students’ results). Click on your Course Title to return to the main Term Summary report.
Please note that when you copy or upload a report to a new location using this method, the links to other report pages will no longer work. You will need to be sure that any data you wish to share is on the report page you are viewing. Your Student Voting Data report will be very similar to the Term Summary Report. Instead of links to individual Session Summary reports, you will now see links to a detailed report of student responses for each session.
Tip: If you are using Internet Explorer to view the HTML reports, you can right-click (control click) on any blank space within the table in your report and select “Export to Microsoft Excel” (provided Excel is installed on your machine). This will open an Excel worksheet containing information from the table you selected. To export information from more than one table in the report, click on a blank space outside of the report itself and you will be prompted to select tables to export to Excel.
Export Selected Session(s): This function allows you to select specific sessions to export. In the below example, Lecture 1 has been selected by checking the box to the left of that session’s name. Tip: Remember that session names can be edited from the top of the Set Scores screen for each session in i-grader. You may select just one session or multiple sessions.
Note that you can include additional student information or your file may be saved/named slightly differently if you are using i-clicker with your campus course management system (and have followed the steps required to enable i-clicker files to be formatted for your particular course management system). Tip: Each time a file is exported, the same filename (UploadFile.csv) is used. This will overwrite any existing files of the same name from previous exports.
To customize our system to meet your specific teaching goals/needs, locate and select Your Settings and Preferences from the main i-clicker Welcome Screen. The default settings for both the i-clicker and i-grader applications are chosen to make this classroom response system easy to learn and use. However, you may alter the default timer settings, graph display, point values, and many other features to best meet your individual needs.
1. Enter Your Course Name: The course name you enter here is used in i-grader, HTML reports and on the Welcome Screen of the i-clicker program. It does not have to match the name of your iclicker course folder. (Note: Entering a new course name is not the same as creating new i-clicker folders for each course or section. Remember that you will need a separate copy of the “MyCoursePC” folder for each section or course for which you are using i-clicker.) 2.
you may also need to coordinate frequencies with your IT administrator. They may have already assigned channels to each classroom. If you change your frequency from the default, your students will need to change their remote frequency at the beginning of each session. When you begin polling, an alert will appear with instructions for your students. They will need to: A. Press and hold the On/Off (power) button on their iclicker until the blue Power light begins flashing. B.
moves between slides in your presentation software, allowing you freedom to move around the room while conducting i-clicker polling sessions. Rather than counting the five choices (A, B, C, D, E,) as student votes, the buttons control certain functions of the i-clicker polling software. The image below illustrates each selection’s functionality on an Instructor’s Remote. Tip/Upgrade! Your Instructor’s Adopter Kit included the base, flash drive with software, USB cable, and two blue remotes.
Registration/Export: Settings and Preferences 1. Roll Call / In Class Registration: This setting modifies the way that student names appear on the Roll Call screen for in class registration. This option does not modify the format of your roster or Gradebook file. For more information about the Roll Call feature please see pages 14-15. 2. Roster/Export – Course Management System in Use: If you plan to record/report iclicker grades using your school’s course management system, select the system here.
3. Web Registration: Earlier versions of i-clicker required instructors to request and enter a code specific to their institution. This requirement has been phased out of the software. If your students are registering in class or on www.iclicker.com, leave this space blank. The security code is only needed if your students are registering via a locally hosted web site that is set up specifically for students at your institution. In this case, you will be given a security code or URL by your campus IT.
Tip: In the countdown mode, the “+” and “-" buttons to the left of the timer allow you to add or subtract 20 seconds as needed. You can still stop polling (even if you selected the “count down” option) by pressing STOP on the floating menu bar. 2. Chart Display Options: During polling, a graph is generated showing the results of each question in your session. The graphs can be displayed by clicking the “Display” button on the i-clicker floating menu bar or by using B on the Instructor’s Remote.
Confirmed Vote Receipt Only (shown below) displays the ID of each participating clicker. The color automatically changes from blue to green each time a vote is changed. So, in the example below, remote ID 0028E7CF has voted but has also changed his/her vote, while remote ID 11AE05BA has voted once. Confirmed Receipt and Vote Selection displays both the students i-clicker remote ID and a different color depending on their last received response.
Scoring Settings and Preferences In this section, you can to establish the point values students can earn for actively participating in class and for answering questions correctly. You may choose to set these preferences for the entire term (course) or session. Your choices and selections on the Scoring Options page will appear in the igrader Set Session Scoring window for subsequent lecture(s).
2. Participation Requirement: To earn the point value established above, students must respond to a certain percentage of questions in a session. New upgrade! Two new levels have been added to the Participation Requirement; you may now choose levels of Very Lenient (one question answered) and Very Strict (all questions answered). Depending upon the total number of questions, i-clicker will automatically calculate the minimum number of responses needed.
Section Five -Resuming Your Last Session In addition to “Your Settings and Preferences” on the main Welcome Screen, you also have the option to “Resume Last Session.” This allows you to resume a lecture, rather than starting a new one. This option is useful if you accidentally exit the i-clicker application or your computer crashed. 44 Questions? Contact us at support@iclicker.com or call toll-free at 1-866-209-5698.
Section Six –WebUpdater: Updating Your Software Occasionally, we will make improvements made to the Macintosh software. These updated versions can be downloaded free of charge using the WebUpdate application which you will find in each of your course folders (see below). Simply double-click on the WebUpdate_V2 icon in your class folder, making sure the computer you are using has access to the internet.
Section Seven -Pre-Assigning Question Titles and Correct Answers: Questionlist.csv If you’d like to assign titles to your questions (and the correct answer) before your lecture (instead of the default Q1, Q2 assignments given by i-clicker), you may create a Questionlist file and save it in your course folder. If you are teaching multiple sections or courses, you will need to include a questionlist.csv file in each course folder. Tip: i-clicker can only identify and utilize one questionlist.
Creating a Questionlist.csv in TextEdit 1. 2. 3. 4. 5. From the Applications folder, locate and open TextEdit. Enter the title of the question followed by a comma and then the correct answer. Select “Save As” and name the file “questionlist.csv.” Under “File Type,” select “All Files” and click Save. If you are not able to save the file in CSV format, cancel the Save and go to the Format menu. Select the option “Make Plain Text.