
User guide


1 - The Basics: Setting Up and Starting i>clicker
Start a Polling Session
After creating a course you are ready to start a session and begin polling. Once polling is started, students can begin
answering your polling questions with their i>clicker remotes.
NOTE: If any of your students are using web>clicker in your class, you must enable web>clicker before you
begin polling (see web>clicker/SPS Setup in General Settings).
To begin polling:
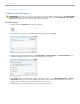
1. Create or select a course from the Welcome to i>clicker window.
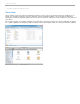
2. The i>clicker Home Page appears. Click the Start Session button.
Select Start Session from the i>clicker Home Page
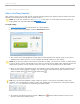
3. The i>clicker Home Page disappears and the Session Toolbar appears in the top-left corner of your screen,
indicating that i>clicker is active. You can reposition the toolbar anywhere on your desktop.
NOTE: If you are using a base receiver with 3.03 firmware or earlier, you will see the "classic" i>clicker toolbar.
If you are using a receiver with firmware 4.05 or later you will see the new toolbar which supports numeric and
alphanumeric questions. For the purposes of this user guide, we will use illustrations of the new toolbar.
4. When you are ready to start polling, advise your students to turn on their clickers, present the question and
answer choices (either verbally or visually), and click the button that matches the type of question you are
asking: multiple choice , numeric , or alphanumeric .
i>clicker Session Toolbar ready to start
TIP: If you are using the standard i>clicker remotes (A-E only) or only plan to ask multiple choice (A-E)
questions, you can customize the toolbar so that it only displays the A-E, Results Chart, and Options buttons.
See My Settings for instructions on customizing the session toolbar.
i>clicker Session Toolbar with A-E polling only
5. The Question Type button toggles to become a Stop button and the toolbar expands to show a timer
and vote counter when polling is active.
i>clicker v6.1 User Guide 9