
User guide


1 - The Basics: Setting Up and Starting i>clicker
Create Your Course(s)
IMPORTANT: For i>clicker 5.3 users, it is no longer necessary to make a separate copy of the MyCoursePC or
MyCourseMac folder for each i>clicker class or section. A single copy of the new iclicker Win and iclicker
Mac folder now gives you access to all your courses and sections.
To create a course:
1. Double-click the i>clicker icon to start the program.
i>clicker icon
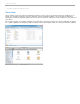
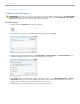
2. The Welcome to i>clicker window appears with no courses listed. Click New.
Welcome to i>clicker / Choose your course window
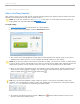
3. A New Course window appears. Enter your Course Name, Course Number, and Section Number. This
combined information will serve as the unique identifier for your course.
New Course Window
4. Click Create. i>clicker automatically creates a new course folder in your iclicker Win\Classes or iclicker
Mac:Classes folder. The New Course window closes and you are returned to the Welcome to i>clicker
window where you will see your course name in the list of courses.
5. Repeat steps 2–4 to create as many courses or sections as you need.
i>clicker v6.1 User Guide 8