
User guide
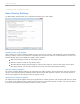
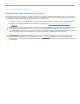


5. When a remote is registered, the remote ID appears next to the students name/ID (e.g., Song, Patrick, 90B,
#1A081909B).
6. When registration is complete, click Close to end the registration.
The registration window will continue cycling through the student names until all registrations are complete or you
decide to close the registration window.
You can control the speed at which your students’ names appear by changing the number in the Allow __ seconds for
viewing option in the bottom right corner. You can also change the student information that displays on screen in the
My Settings, CMS/Registration tab. (You must close the Roll Call Registration window before changing the student
information.)
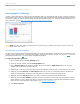
NOTE: The student list will change to greeen and yellow five seconds before students names disappear. This
gives students warning that a new batch of names is about to be displayed. It is best for students to wait until
their names appear again rather than try to register when the screen is green and yellow.
TIP: Students that accidentally register their clicker to the wrong name should press DD to clear the incorrect
registration and restart their registration process.
In-Class “Individual” Registration (Option 3)
If only a few students need to register, an individual registration option is available. This registration process is typically
used when new students join your class after you’ve already completed Roll Call Registration. Because this option is
limited to registering a single student at a time, it is not recommended for registering a large number of students.
To register an individual remote:
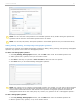
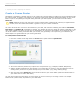
1. From the i>clicker Home Page, click the Loan Clicker button or start a session and click the Options
button and then the Loan Clicker menu option.
2. The Loan Clicker window appears.
Loan Clicker window with Register for The Term (Permanent) selected
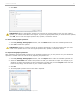
3. Enter the student's remote ID, select the student name from the Student: drop-down menu, and select
The Term (Permanent) from the Register for: drop-down menu.
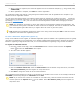
4. Click Save to assign the remote ID to the selected student.
This registration process assigns the remote to the student for the duration of the course. In the example, Remote ID
1FC6528B is permanently assigned to Julia Desai with ID 0C3.
NOTE: If you wish to loan a clicker to a student for one session only, start the session and access the Loan
Clickers option for the Options button on the toolbar. Select One Session (Loan) from the Register for:
drop-down menu.
i>clicker v6.1 User Guide 30