
User guide
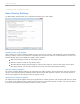
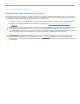


Sample i>clicker remote ID
4. Enter the letters or numbers in the captcha security image on the screen. This verification image is a slightly
distorted series of characters used to prevent spam bots from submitting the form.
5. Click the Enter button. An on-screen message confirms that registration was successful. The student’s ID is
now tied to their unique i>clicker remote ID.
After your students have registered online, you need to synchronize i>grader to update the information in your class
folder (see Synchronizing Web Registrations).
NOTE: If a student has not voted with their i>clicker remote, the online registration will not synchronize with
your i>grader application. The student must vote at least once in class. We recommend that you ask at least
one clicker question, such as an attendance or ice-breaker question, on the first day of class in order to capture
remote IDs before requiring your students to register.
TIP: Students can use a single i>clicker remote for multiple classes and only need to register on the web once.
If a student makes a registration mistake they can simply register a second time.
In-Class/Roll Call Registration (Option 2)
This registration option is only recommended for small classes with fewer than 50 students. The two registration
options (Web and Roll Call) can also be used in combination.
To use Roll Call Registration:
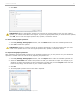
1. From the i>clicker Home Page, click the Start Session button to start a session.
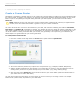
2. The i>clicker Session Toolbar appears. Click the Options button .
3. Select the Roll Call Registration menu option. The roll call window appears.
Roll Call Registration window
4. Instruct students to press the letters on their i>clicker remotes that correspond to the letters in the columns
to the right of their names in the Register Now window. The letters must be pressed in left to right sequence.
i>clicker v6.1 User Guide 29