i>clicker v6.
i>clicker v6.1 User Guide Table of Contents Introduction to i>clicker 4 1 - The Basics: Setting Up and Starting i>clicker Overview 5 (Optional) Download and Update the i>clicker Software 6 Connect i>clicker to Your Computer 7 Create Your Course(s) 8 Start a Polling Session 9 2 - Preparing For Class 2.
i>clicker v6.1 User Guide Managing Unregistered Clicker and Student Data 58 i>grader Functions 60 Reporting 63 Exporting Grade Data 67 Searching for Student Data 69 5 - For Administrators Managing Default Settings 70 Modifying the Config File 71 6 - Additional Support System Requirements 72 Frequenty Asked Questions 73 Converting From i>clicker 5.
i>clicker v6.1 User Guide 4 Introduction to i>clicker Version 6.1 Congratulations on your adoption of i>clicker, the easiest-to-use classroom response system available. This guide will enable you to quickly start using i>clicker’s basic functions, as well as learn to use its more advanced features. Before you begin using i>clicker, please read the important How to Use This Guide section below for information on how to quickly get started. i>clicker version v6.
i>clicker v6.1 User Guide 5 1 - The Basics: Setting Up and Starting i>clicker Overview Using i>clicker to poll your class can significantly change the way you and your students interact by enabling you to assess your students’ knowledge, keep their attention, provide immediate feedback, and encourage all students to participate. An audience response system can also be used in conference settings to poll the audience on the content of your choice.
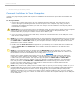
i>clicker v6.1 User Guide 6 1 - The Basics: Setting Up and Starting i>clicker (Optional) Download the i>clicker Software The i>clicker software is provided on a flash drive as part of your instructor kit. If you don’t have the i>clicker software, you may download the latest version free of charge from the i>clicker web site. To download the i>clicker software: 1. Go to iclicker.com. 2. In the top navigation, select Support and click Downloads. 3. In the Downloads section under i>clicker v6.
i>clicker v6.1 User Guide 7 1 - The Basics: Setting Up and Starting i>clicker Connect i>clicker to Your Computer i>clicker is a plug-and-play system that requires no installation and minimal set-up for both the hardware and software. To set up i>clicker: 1. Connect the i>clicker base receiver to your computer through a USB port. The LCD screen on the receiver will light up indicating that the receiver has power.
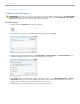
i>clicker v6.1 User Guide 8 1 - The Basics: Setting Up and Starting i>clicker Create Your Course(s) IMPORTANT: For i>clicker 5.3 users, it is no longer necessary to make a separate copy of the MyCoursePC or MyCourseMac folder for each i>clicker class or section. A single copy of the new iclicker Win and iclicker Mac folder now gives you access to all your courses and sections. To create a course: 1. Double-click the i>clicker icon to start the program. i>clicker icon 2.
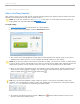
i>clicker v6.1 User Guide 9 1 - The Basics: Setting Up and Starting i>clicker Start a Polling Session After creating a course you are ready to start a session and begin polling. Once polling is started, students can begin answering your polling questions with their i>clicker remotes. NOTE: If any of your students are using web>clicker in your class, you must enable web>clicker before you begin polling (see web>clicker/SPS Setup in General Settings). To begin polling: 1.
i>clicker v6.1 User Guide 10 i>clicker Session Toolbar with multiple choice (A- E) polling active TIP: If you use presentation software to display your questions (e.g., PowerPoint or Keynote), make sure it's the active application when you start polling by clicking on the presentation window. Each time polling begins, i>clicker captures a screenshot of the active window and stores it along with polling results for later review in i>grader. 6.
i>clicker v6.1 User Guide 11 2 - Preparing for Class > Changing your Settings My Settings Overview You can use the My Settings options to customize i>clicker and i>grader. Select My Settings from the i>clicker Home Page to change your settings. My Settings can also be accessed from the i>clicker Session Toolbar by clicking the Options Button and selecting My Settings.
i>clicker v6.1 User Guide 12 2 - Preparing for Class > Changing your Settings General Settings The General Settings allow you to edit a course name, add an instructor remote, change the frequency of the response system, show/hide the response grid, add a Welcome Message, and setup web>clicker. General Settings tab in My Settings window Course Name The course name field shows the course name that you entered when you created your course. The course name can be edited in the New Course window.
i>clicker v6.1 User Guide 13 TIP: Many teachers use the blue standard i>clicker remote as their instructor's remote. There are no technical differences between a blue standard i>clicker instructor's remote and a standard white student remote. The color is designed to make it easier for you to keep track of your individual and loaner remotes. The i>clicker2 instructor remotes are designed specifically for use by instructors. These remotes cannot be used as student remotes.
i>clicker v6.1 User Guide 14 i>clicker2 remote: The i>clicker2 remote saves the last frequency that the student entered. Students will only have to enter their frequency once for your class (unless they use their i>clicker2 remote in a different class that requires them to change frequencies).
i>clicker v6.1 User Guide 15 1. In the My Settings, General tab click the web>clicker/SPS Setup... button. NOTE: See the IMPORTANT message above if your web>clicker/SPS Setup... button is disabled. 2. Complete the web>clicker and Satellite Polling System Setup form. For Your Institution and Zip Code, enter the zip code where your course will be taught. Your students will use the same zip code to locate your course. Click the Lookup button to locate your school.
i>clicker v6.1 User Guide 16 2 - Preparing for Class > Changing your Settings CMS/Registration Settings The CMS/Registration settings allow you to change the roll call and web registration options as well as choose your course management system. CMS/Registration tab in the My Settings window Course Management System If you plan to record i>clicker grades in your institution's course management system, select the system here.
i>clicker v6.1 User Guide 17 2 - Preparing for Class > Changing your Settings Polling Settings The Polling Settings allow you to customize the session toolbar and set the polling timer as count up or count down. Polling tab in My Settings window Customize Toolbar The size of the session toolbar and the question type buttons can be customized to meet your specific needs. Click the drop-down menu to select the toolbar size.
i>clicker v6.1 User Guide 18 2 - Preparing for Class > Changing your Settings Scoring Settings The Scoring Settings allows you to establish the point values earned for actively participating in class and for answering questions correctly. Scoring tab in My Settings window Participation (Session-Based) Points Participation points are awarded to students who attend and vote during lecture (encouraging student engagement).
i>clicker v6.1 User Guide 19 2 - Preparing for Class > Changing your Settings Results Settings The Results Settings allows you to customize the results charts for each question type. Results tab in My Settings window Multiple Choice (A-E) Results During polling, a graph displays the results of each question in your session. The graphs can be displayed by clicking the Results button on the i>clicker Session Toolbar or pressing B on the instructor's remote.
i>clicker v6.1 User Guide 20 appear in the students' responses. For example, The response 21111 with significant figures set to 2 would appear as 21000. Histogram: The histogram chart displays the student responses in a histogram. Use the Number of bins drop-down menu to adjust the number of vertical bars that appear in the histogram. You may also choose to show the mean and standard deviation.
i>clicker v6.1 User Guide 21 2 - Preparing for Class > Changing your Settings Base Display Settings The Base Display Settings allow you to customize the base/receiver LCD display. Base Display tab in My Settings window Multiple Choice (A-E) Display During polling, the i>clicker responses display on the receiver LCD in real-time. The LCD display is useful in situations where you want to see how your audience is responding but don't want to make the results viewable to everyone.
i>clicker v6.1 User Guide 22 2 - Preparing for Class > Changing your Settings Demographic Settings i>clicker includes the option to collect student demographic data. The demographic data is easy to collect and can be used in class to filter (slice) the student polling results. Filtering polling results can help facilitate classroom discussion by allowing students to view the Results Charts filtered by demographic data such as Gender, Political Affiliation, etc.
i>clicker v6.1 User Guide 23 My Settings > Demographics tab NOTE: You can view each of the questions in the Available Questions list by double-clicking the question title. Questions must be moved to the Available Questions list to be edited. NOTE: You can add, edit, delete, and import questions in the Available Questions list (see instructions below).
i>clicker v6.1 User Guide 24 3. Click Save. Edit a demographic question in the Demographics Editor IMPORTANT: Editing a demographic question will overwrite the original question. Once you have edited a question, you cannot revert back to the original. To get the original question back you must select the question, click Edit, and re-enter the original question title, question, and answer choices. To delete a demographic question: 1.
i>clicker v6.1 User Guide 25 2 - Preparing for Class > Registering Your Students Registering Your Students’ Remotes The i>clicker system may be used as a simple tool to give you instant, anonymous feedback in class, in which case no registration procedure is necessary. However, if you (like most instructors) want to go a bit further and give credit to your students for class participation and/or performance, you will need to: 1.
i>clicker v6.1 User Guide 26 2 - Preparing for Class > Registering Your Students Create a Course Roster Associating or registering a student with his or her remote ID is required before a student can receive individual credit for voting in class. To register your students, you must first create a file containing student information in your course folder. If you are not planning to integrate voting data with your CMS system, you will create a text file named Roster.txt.
i>clicker v6.1 User Guide 27 Sample Roster.txt file in Notepad TIP: If you have your course roster in Excel format, you can avoid re-typing your entire roster. Make sure the columns in your roster follow the format in the example above (last name, first name, student ID) and that there is only one student per row. Then save the document as a .csv file, name it Roster.csv, and save it to your iclicker Win\Classes\[course name] or iclicker Mac:Classes:[course name] folder.
i>clicker v6.1 User Guide 28 2 - Preparing for Class > Registering Your Students Registration Options i>clicker offers you three straightforward registration options: a web option that can be done outside of class, an inclass option for your entire class, and a manual option for individual students. Minimal information is required of your students and all registration options are tied to your class roster. There are no site license or registration fees for the i>clicker software.
i>clicker v6.1 User Guide 29 Sample i>clicker remote ID 4. Enter the letters or numbers in the captcha security image on the screen. This verification image is a slightly distorted series of characters used to prevent spam bots from submitting the form. 5. Click the Enter button. An on-screen message confirms that registration was successful. The student’s ID is now tied to their unique i>clicker remote ID.
i>clicker v6.1 User Guide 30 5. When a remote is registered, the remote ID appears next to the students name/ID (e.g., Song, Patrick, 90B, #1A081909B). 6. When registration is complete, click Close to end the registration. The registration window will continue cycling through the student names until all registrations are complete or you decide to close the registration window.
i>clicker v6.1 User Guide 31 2 - Preparing for Class > Registering Your Students Loaning a Clicker If students forget their i>clicker remote, you can loan one for a single lecture. To associate the loaned clicker with a student for one lecture only, you should perform a temporary or loaner registration. NOTE: When loaning a clicker for one session, you must first start the session and then select the Loan Clicker option from the Session Toolbar Options drop-down menu.
i>clicker v6.1 User Guide 32 2 - Preparing for Class > Creating a Question List Question List Overview Creating a question list allows you to customize the settings for each individual clicker question ahead of class. For example, you may have a presentation that you plan to use in your class and would like to assign a correct answer to each of the i>clicker questions in the presentation.
i>clicker v6.
i>clicker v6.1 User Guide 34 2 - Preparing for Class > Creating a Question List Create a Question List Question lists are created using the Question List Editor in the i>clicker software. Only question lists created with the Question List Editor are recognized by i>clicker. Therefore, modifying the .csv files to create different versions of the same question list is not recommended. Adding Question Information The Question List Editor is used to create and edit question lists.
i>clicker v6.1 User Guide 35 Question List Editor showing multiple choice question type NOTE: The number of characters available in the text fields are limited and punctuation or special characters (e.g., @#$%&*) are not allowed in the Question Title or Results Chart Labels fields. To create a numeric question: 1. Enter the Question Title. 2. Enter a correct answer in the New Answer to Add field and add the number of points for the correct answer in the Points field.
i>clicker v6.1 User Guide 36 3. (Optional) If the question is an Anonymous question, mark the checkbox in front of this option. This will prevent submitted responses from being associated with a particular clicker (see Anonymous Polling). 4. Click Add. 5. (Optional) Repeat steps 2 - 4 to add additional correct answers.
i>clicker v6.1 User Guide 37 list, click the Delete button. Sample questions in the Question List Editor During a polling session, in the Question List window the Select Question: menu and Answer: field are displayed. The Select Question: menu will automatically display the first question in the question list. Any question from the list may be selected at any time. Click the question type button that matches the selected question to begin polling.
i>clicker v6.1 User Guide Question List Available information window 5. In the Open Question List File: window select the appropriate question list (.csv file). The i>clicker main screen will close and the i>clicker Toolbar and Question List window will appear in the upper left corner.
i>clicker v6.1 User Guide 39 2 - Preparing for Class > Creating a Question List Edit a Question List After a question list has been created and saved, it may be edited. All of the fields and settings in the Question List Editor may be modified. Any changes to the question list will be saved to the same .csv file. The question list with the changes will then appear during the polling session. To make changes to an existing Question List: 1.
i>clicker v6.1 User Guide 40 3 - Using i>clicker in the Classroom Polling Students 1. Double-click the i>clicker icon to start the program. 2. The Welcome screen appears. Select the desired course from the list of available courses and click Choose. If you do not see your course listed, see Create Your Course(s). Welcome to i>clicker window with courses listed 3. The i>clicker Home Page appears. Click Start Session. i>clicker Home Page 4.
i>clicker v6.1 User Guide 41 Keynote Slidehow Preferences window 5. When you are ready to pose a question, advise your students to turn on their clickers. Then present the question and answer choices (either verbally or visually) and click the question type buttons on the toolbar that matche the type of question you are asking. A timer begins indicating that polling is now active. A counter displays how many students have voted.
i>clicker v6.1 User Guide 42 3 - Using i>clicker in the Classroom Viewing Student Responses The i>clicker Session Toolbar includes a Results Chart that you can use to view your students' responses in a horizontal bar chart (multiple choice only), vertical bar chart, pie chart (multiple choice only), or histogram (numeric only). To view student results in the Results Chart: 1. Click the Results Chart button on the toolbar to show a graph of your students’ responses for the current question.
i>clicker v6.1 User Guide 43 answer is also deleted from i>grader and no point adjustments will occur. 4. To display data for the previous question, click Previous click the Next button button. To display data for the next question, . 5. To change the chart type, click the Chart Type menu. button and select a chart type from the drop-down 6. Numeric Results Charts: For numeric questions, you have the option of viewing the results as a vertical bar chart (default) or a histogram.
i>clicker v6.1 User Guide 44 Results Chart with 5 significant characters selected and the same chart with 1 significant character selected 8. To stop displaying the Results Chart, click the Win/Mac Close button or click the Results Chart button on the Session Toolbar. TIP: You can also display or hide the student response graph by pressing the B button on the instructor’s remote. You can designate a correct answer by cycling through the choices with the E button on the instructor’s remote.
i>clicker v6.1 User Guide 45 3 - Using i>clicker in the Classroom Session Toolbar Options The i>clicker Session Toolbar contains buttons for three key functions: Start/Stop polling for each question type, View/Hide the Results Chart, and access the Session Toolbar Options. Click the Options button Session Toolbar Options menu.
i>clicker v6.1 User Guide 46 3 - Using i>clicker in the Classroom Asking Questions On The Fly By selecting Question On the Fly, you can ask a question spontaneously and have it recorded in a screen capture, without closing out of your presentation application. For example, you could be using PowerPoint or Keynote in slide show mode, decide to ask an unplanned question mid-session, and ask it using the Question On the Fly option without ever having to exit or close your PowerPoint or Keynote slide show.
i>clicker v6.1 User Guide 47 3 - Using i>clicker in the Classroom Anonymous Polling Anonymous polling questions are ideal for allowing students to answer sensitive questions without worrying that you will link their responses to their student IDs later. When you poll students anonymously, their answers are not associated with their student names or IDs in the course roster.
i>clicker v6.1 User Guide 48 3 - Using i>clicker in the Classroom Collecting Demographic Data Once you have selected your demographic questions, you can collect student demographic data by asking the demographic questions in class and having students answer with their clickers. There are two ways to ask demographic questions: (1) ask all demographic questions at once or (2) ask each demographic question individually. Each option has its advantages as described below.
i>clicker v6.1 User Guide 49 Demographic questions complete window When the demographic questions are complete the student demographic data is saved and can be used to filter student results. NOTE: You may ask demographic questions at any time and as frequently as you wish. Each time you ask demographic questions the older demographic data is overwritten by the new demographic data.
i>clicker v6.1 User Guide 50 3 - Using i>clicker in the Classroom Filtering Student Results by Demographics If you have collected student demographic data you can filter any polling question that you ask in class by that data. Filtering by demographic data is easy and is a great way to stimulate class discussion. To filter student results by demographics: 1. Start an i>clicker session by clicking the green Start Session button on the i>clicker Home Page. 2. Start polling 3.
i>clicker v6.1 User Guide 51 3 - Using i>clicker in the Classroom Load Question List If you have created a question list ahead of class, you can open it during your lecture and presentation. Opening a Question List To open a question list at the beginning of a polling session: 1. Click the Start Session button on the i>clicker Home Page. 2. At the prompt to open a question list, click Yes. Question List Available information window 3.
i>clicker v6.1 User Guide 52 3. Polling begins for the question showing in the Question List window. i>clicker Toolbar and Question List window 4. Click the Stop button on the Session Toolbar. 5. The next question in the question list automatically appears in the Question List window. 6. (Optional) click the Results button to view the results chart. If you have added a question title and chart labels they will appear on the results chart. Results Chart with question title and chart labels 7.
i>clicker v6.1 User Guide 53 3 - Using i>clicker in the Classroom Resuming Your Last Session In addition to the option to start a new session, there is also the option to Resume Last Session from the i>clicker Home Page. Choosing this option allows you to resume a session rather than starting a new one. This option is especially useful if you accidentally exit the i>clicker application or have a computer crash.
i>clicker v6.1 User Guide 54 Using i>clicker with Presentation Software The i>clicker software is designed to be used with any presentation software. However, as is typically the case, not all third-party software applications work the same way. The following is a list of "tips and tricks" that can be used for the best experience using i>clicker with your presentation software.
i>clicker v6.1 User Guide 55 4 - Grading and Viewing Results Using i>grader to Assign Credit for Sessions and Questions TIP: Remember to check for software updates to i>clicker and i>grader using the WebUpdate tool. 1. Before launching i>grader, always make sure to exit the i>clicker application. Open the iclicker Win or iclicker Mac folder on your flash drive or computer, and double-click the i>grader icon. i>grader application icon 2. The Welcome to i>grader window opens.
i>clicker v6.1 User Guide 56 Wagner, and Wallace) while the other three have not. The four remote IDs (#00004141, #000005A5A, #00008080, and #00009D9D) at the bottom of the list belong to unregistered students who have participated in voting sessions. TIP: If you choose Resume Last Session from the i>clicker Home Page, your additional polling data will be included in the previous session, thereby eliminating separate entries in i>grader.
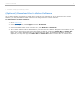
i>clicker v6.1 User Guide 57 4 - Grading and Viewing Results Synchronizing Web Registrations Once your students have completed the registration form at iclicker.com and you have held at least one i>clicker session, you may update your course registration information using the Sync... button. NOTE: You must be connected to the Internet to synchronize web registrations. To synchronize web registrations: 1. Click the Sync... button in the bottom right corner of the i>grader Home Page.
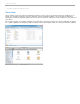
i>clicker v6.1 User Guide 58 4 - Grading and Viewing Results Managing Unregistered Clicker and Student Data i>grader contains tools that allow you to search and delete batches of unregistered clicker records and generate reports of unregistered students. To access these tools, click the Unregistered Students & Remotes icon . Unregistered i>clicker(s) The View and Select Unregistered i>clicker(s) to be deleted window appears.
i>clicker v6.1 User Guide 59 Search Options window For example, let's say that several students voted only once or twice before dropping your class, and never registered. You can use the Search option to search for unregistered remotes with averages or total points in a very low range (such as between 0 and 10 total points). When you click Search, the Search Options window will disappear and all remotes matching your criteria will have a check in the Remote ID column.
i>clicker v6.1 User Guide 60 4 - Grading and Viewing Results i>grader Functions i>grader's editing functions available from the i>grader Home Page include: Editing a Student Editing the Session Information Editing a Student This feature allows you to modify which remote IDs are associated with a particular student ID. To modify the student remote ID: 1. Double-click the student ID or name on the i>grader Home Page. The Student Details window appears. 2.
i>clicker v6.1 User Guide 61 least the minimum number of questions to receive participation points. They do not have to answer the questions correctly. These points are awarded by session, not by question--the student either answers the minimum number of questions and receives all participation points, or does not and receives zero participation points. NOTE: Students can receive participation points for Anonymous Polling questions.
i>clicker v6.1 User Guide 62 Because you may not remember the details of each question you asked in lecture, i>clicker takes a screen capture for you every time you start polling for a question. To view this image in i>grader, click View Screenshot. The screenshot opens in a new window. The screen shot function allows you to ask on-the-fly questions easily by providing you with an automatic record of your lecture questions. To scroll through the questions, click the Previous or Next buttons .
i>clicker v6.1 User Guide 63 4 - Grading and Viewing Results Reporting The i>grader Reports option creates summary information in an easily readable and printable format. Clicking the Reports button generates the reports listed below: Report Summary window Term/Session Summary and Review The Term/Session Summary and Review report provides a breakdown of polling data, both for your term to date and for individual sessions.
i>clicker v6.1 User Guide 64 To view more detailed session information, click Session Summary and Question Data for any session, to display the Session Summary report. The Session Summary data is displayed at the top of this report, followed by information about individual questions. Scroll down, or click a question title to jump to the question information. Session Summary Report Click your Course Title to return to the Term Summary report.
i>clicker v6.1 User Guide 65 Report Settings window The Cumulative Student Scores link will bring you to the Student Term Report.
i>clicker v6.1 User Guide 66 The table shown below lists each student's answer to each question. Clicking the question titles in this report will show you the relevant information from the Session Summary and Question Data report described above. Student answer choices TIP: Clicking on any of the session titles will bring you to the same report as the Student Reponses link for that session in the Student Data report.
i>clicker v6.1 User Guide 67 4 - Grading and Viewing Results Exporting Grade Data You can export student grade data as CSV files. CSV (comma separated value) is a simple file type that can be read by nearly all text editors, spreadsheet, and database programs, including Microsoft Excel and Apple Numbers. You can export grade date in General format or in a format that is ready to upload into your course management system. The General format is discussed below.
i>clicker v6.1 User Guide 68 NOTE: By changing the filename each time you save an exported file you can keep a history of your exports. For example, you might choose to add today's date at the end of each export (SessionExport_11_24_10.csv).
i>clicker v6.1 User Guide 69 4 - Grading and Viewing Results Searching for Student Data The Search Students option allows you to locate student information by searching for their name, student ID, remote ID, course average, or course total. After locating specific student data, you can export the data as a .CSV file. To search for student data: 1. Click the Search button from the i>grader Home Page. 2.
i>clicker v6.1 User Guide 70 5 - For Administrators Managing Default Settings By managing the default settings, administrators can create campus-specific preferences that will display to all instructors using i>clicker on that campus. The default settings feature is most commonly used to establish a default course management system and enter a campus web/security code for locally hosted i>clicker registration that will be distributed to all faculty. To manage the default settings: 1.
i>clicker v6.1 User Guide 71 Modifying the Config File Administrators can access the config file in i>clicker to modify settings that are not available to instructors in the My Settings window. The following options can be modified in the config file. IMPORTANT: Modifying the config file can cause i>clicker to no longer function properly and should be attempted only by expert users. To Modify the Config File: 1. Locate SessionData\Config.csv in your default class folder 2. Open config.
i>clicker v6.1 User Guide 72 6 - Additional Support System Requirements Before starting, make sure that your computer system meets or exceeds the following i>clicker system requirements. Windows Requirements: Windows XP, Windows Vista, or Windows 7 operating system (32- or 64-bit) 500MHz Pentium (or faster) processor 256MB RAM (or larger) recommended One available USB 2.0 port Minimum screen resolution of 1024 x 600 pixels Macintosh Requirements: Mac OS X version 10.4.21 or higher (including OS 10.
i>clicker v6.1 User Guide 6 - Additional Support Frequently Asked Questions Please visit our support page at iclicker.com for a continually updating FAQs page.
i>clicker v6.1 User Guide 74 6 - Additional Support Converting from i>clicker 5.3 or Earlier With i>clicker version 6.1, you do not have to make a separate copy of the MyCoursePC and MyCourseMac folders for each course/section in which you are using i>clicker. Follow the instructions below if you are upgrading to i>clicker version 6.1 from i>clicker 5.3 or earlier. To upgrade to i>clicker version 6.1 from i>clicker 5.3 or earlier: 1. Download and install the i>clicker version 6.
i>clicker v6.1 User Guide 6 - Additional Support Contact Us We'd like to hear from you. Please feel free to contact us at any of the following numbers. Sales and Ordering Information 9am – 5pm EST, M – F sales@iclicker.com 888-938-8881 Technical Support 9am – 11pm EST, M – F support@iclicker.