MacConi Front Cover Page 1 Friday, August 23, 1996 10:16 AM MacCon Family Ethernet Network Cards for the Macintosh Installation Guide ASANTÉ
Asanté MacCon Adapter Family Installation Guide Asanté Technologies, Inc. 821 Fox Lane San Jose, CA 95131 October 1994 Part Number 06-00141-00 Rev.
Copyright Notice Copyright 1994 by Asanté Technologies, Inc. All rights reserved. No part of this manual, or any associated artwork, software, product design or design concept, may be copied, reproduced or stored, in whole or in part, in any form or by any means mechanical, electronic, optical, photocopying, recording or otherwise, including translation to another language or format, without the express written consent of Asanté Technologies, Inc.
Asanté Warranty Disclaimer Asanté Technologies, Inc. makes no other warranties, express, implied or otherwise, regarding Asanté Ethernet interface card products, and specifically disclaims any warranty for merchantability or fitness for a particular purpose. The exclusion of implied warranties is not permitted in some States and the exclusions specified herein may not apply to you. This warranty provides you with specific legal rights. There may be other rights that you have which vary from State to State.
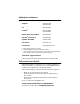
Asking for assistance To contact Asanté Technical Support: Telephone (800) 622-7464 (408) 435-0706 Fax (408) 432-6018 Fax-Backa (800) 741-8607 (408) 954-8607 Bulletin Board Service (BBS)b (408) 432-1416 ARA BBSb (guest log in) (408) 894-0765 Applelink mailc/BBSb ASANTE.TECH FTP Archiveb ftp.asante.com Internet mailc support@asante.com a Please request catalog of contents. b Download INDEX.TXT file for catalog of contents.
Table of Contents Asking for assistance i Technical support hours i Tell us what you think i Introducing the Asanté MacCon Cards 1-1 Summary of MacCon Card Features 1-2 The Math Co-processor Option 1-2 Asanté EtherTalk Installer Software 1-2 Installing Asanté MacCon Cards 2-1 Preparing for the Installation 2-1 Checking the Requirements 2-1 Observing the Safety Rules 2-2 The MacCon NuBus Card 2-3 Installing the MacCon NuBus Card 2-4 Installing the MacCon 610 Card 2-6 Installing a MacCon LC Card 2-9 Installin
Accessing Asanté MacAgent MIB 3-2 Asanté SNMP MacAgent and the TCP/IP Protocol 3-2 Asanté SNMP MacAgent as a Network Diagnostic Tool 3-3 Installing SNMP MacAgent 3-3 Configuring MacTCP 3-4 Configuring SNMP MacAgent 3-5 Asanté SNMP Configuration Parameters 3-6 AsantéView Network Management Station 3-7 Other Network Management Software 3-8 Using TroubleShooter and ADLS Diagnostic Software 4-1 Running TroubleShooter Diagnostics 4-1 Changing from EtherTalk to LocalTalk 4-1 Starting TroubleShooter Diagnostics 4-
List of Figures Figure Figure Figure Figure Figure Figure Figure 2-1 2-2 2-3 2-4 2-5 2-6 2-7 Figure 2-8 Figure 2-9 Figure 2-10 Figure 2-11 Figure 2-12 Figure Figure Figure Figure 2-13 2-14 2-15 2-16 Figure Figure Figure Figure 2-17 2-18 2-19 A-1 Selecting AUI, MacCon NuBus card 2-3 Disabling Link Integrity, MacCon-i NuBus card 2-4 Installing a MacCon 3 NuBus card 2-5 Installing MacCon NuBus card, Apple Centris 610 2-6 Selecting the AUI port, MacCon 610 card 2-7 Disabling link integrity, MacCon 610 car
MacConi ch 1 Intro Page 1 Friday, August 23, 1996 10:08 AM Chapter 2 Chapter 1 Introducing the Asanté MacCon Cards Thank you for purchasing a MacCon network interface card from Asanté Technologies. Asanté’s MacCon cards enable you to connect any Macintosh with an available expansion slot to a high speed Ethernet network. The MacCon Family consists of the MacCon and MacCon-i series.
MacConi ch 1 Intro Page 2 Friday, August 23, 1996 10:08 AM The term MacCon cards is used in this manual to refer to all cards in the MacCon Family. When text applies only to a specific card, it is identified by its name. Summary of MacCon Card Features Asanté MacCon cards offer the following features: ❏ ❏ ❏ ❏ ❏ ❏ ❏ ❏ ❏ Support for all Macintosh computers with expansion slots Compatibility with Apple® System 7, and EtherTalk Phase 1™ and Phase 2 ™ Compliance with the IEEE 802.
Chapter 2 Chapter 2 Installing Asanté MacCon Cards This chapter provides step-by-step instructions for installing Asanté MacCon Ethernet network interface cards and EtherTalk software.
❏ The appropriate Asanté card and Ethernet hardware for your cabling: Cabling Requires Comments 10BaseT Hub and RJ-45 connector 10BaseT-compliant hub requireda Thin Pair of 50-ohm One plug for each end of thin Ethernet cable terminator plugs and BNC connector Thick External media adapter and DB-15 (AUI) connector Connects Macintosh to a drop cable. One for each Macintosh connected to the network a. Asanté offers a full range of intelligent and non-intelligent 10BaseT-compliant hubs.
❏ ❏ ❏ Ground yourself by using an anti-static wrist strap. Attach it to the chassis once you have opened the Macintosh, but before handling the Asanté card or touching any component inside the system. Handle the Asanté card by the edges and avoid touching the connectors and chips. Keep the Asanté card in the anti-static bag until you are ready to install it in the Macintosh.
MacCon-i NuBus Card ∆ Note: If you wish to disable link integrity, use the JP1 jumper on the MacCon NuBus card, as shown in Figure 22. (For example, hubs made before the 10BaseT specifications were published do not support link integrity.) JP1 jumper JP1 Link integrity disabled Link integrity enabled (default) Figure 2-2 Disabling Link Integrity, MacCon-i NuBus card Installing the MacCon NuBus Card 1 2 3 4 Power down the Macintosh. Disconnect and remove the power cable. Open the Macintosh.
Asanté MacCon3 NuBus card Expansion slot Figure 2-3 Installing a MacCon 3 NuBus card — Gently press on the card until the connector is fully seated and the card is flush with the card holders at both ends. With a Centris 610 If you are installing a MacCon NuBus card in an Apple Centris 610, you need to use the Apple Centris 610 NuBus Adapter, which is not included with the MacCon NuBus card. The Apple Centris NuBus Adapter part number is M1402LL/A.
Apple Centris 610 NuBus adapter (M1402LL/A) Expansion slot Motherboard Figure 2-4 Installing MacCon NuBus card, Apple Centris 610 Installing the MacCon 610 Card If you have a Macintosh Centris 610, you can use a MacCon 610 card to connect to the Ethernet. Each card consists of two parts: ❏ ❏ The larger controller card, which plugs into the expansion slot in the Macintosh. The smaller daughter card, which is mounted on the rear access port to enable a connection to the Ethernet cable.
∆ Note: In some cases with Thick Ethernet (10Base5) cabling when your network does not have 10Base5-compliant Ethernet transceivers, you may need to force the NuBus card to select the AUI port by setting the JP1 jumper ON as shown in Figure 2-5. JP1 jumper JP1 ON to force AUI port port autosense (default) Figure 2-5 Selecting the AUI port, MacCon 610 card ∆ Note: To disable link integrity on the MacCon 610 card, set the JP2 jumper as indicated in Figure 2-6 below.
3 4 5 6 Power down the Macintosh. Disconnect and remove the power cable. Open the Macintosh and remove the access port cover. Make sure you are grounded: check that your anti-static wrist strap is properly attached to your wrist and to the Macintosh chassis. Plug the controller card (with daughter card attached) into the expansion slot on the motherboard (see Figure 2-7).
Installing a MacCon LC Card If you have a Macintosh LC, LCII, or Color Classic computer, use the MacCon LCIII or MacCon-i LC card to connect the Macintosh to the Ethernet. ! Caution Only the LC and LCII computers can accept FPUs on the LC card. If your Macintosh already has a math co-processor (or FPU), do not install the Asanté math co-processor option with the card. Refer to your Macintosh User’s Guide for illustrated instructions for opening your computer.
With the card’s components facing down, carefully angle its external connector through the Ethernet port, then line up its edge connector with the motherboard expansion slot. 5 Gently press on the card until the connector is fully seated (see Figure 2-9).
2 Remove the rear access panel case (see Figure 2-10). I O Thumbscrews Tabs Access panel Figure 2-10 The rear panel removed on the Color Classic 3 4 5 Make sure you are grounded: check that your anti-static wrist strap is properly attached to your wrist and to the Macintosh chassis. Slide out the motherboard. Insert the card into the expansion slot.
With the connectors facing down, carefully angle its external connector through the Ethernet port (see Figure 2-11). MacCon+ LC card Expansion slot Motherboard Figure 2-11 Installing the MacCon LC in the expansion slot in the Color Classic 6 Plug the card’s edge connector into the expansion slot on the motherboard. 7 Gently press on the card until the connector is fully inserted. 8 Slide the motherboard back into the Color Classic. 9 Secure the rear access panel case.
Installing the MacCon3 IIsi and MacCon 30i Cards If you have a Macintosh IIsi or a Macintosh SE/30, use a MacCon3 IIsi or a MacCon+ 30i to connect to the Ethernet. (The cards are not designed for a Macintosh SE.) Each card consists of two parts: ❏ ❏ The larger controller card, which plugs into the expansion slot in the Macintosh. The smaller daughter card, which is mounted on the rear access port to enable a connection to the Ethernet cable.
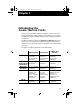
Video Options Even though the Macintosh IIsi has only one expansion slot, you can install both a MacCon3 IIsi card and the Radius video card. An external interface device is not needed and high performance is maintained. The following table shows which MacCon cards you can install with the Radius and SuperMac video cards and which ports are available for connecting to the Ethernet.
Installing the Math Co-processor If your Macintosh, or the Radius card, already has a math co-processor, do not install the Asanté math co-processor option. It will cause the Macintosh to fail at start up. The following sections, starting on the next page, describe how to install a MacCon card in a Macintosh IIsi and a Macintosh SE/30. Instructions for installing a MacCon card together with a video card are also included.
Installing in a Macintosh IIsi To install the MacCon+ 30 or a MacCon3 IIsi in a Macintosh IIsi, perform the following steps: ! Caution Be very careful when you open the case and work inside the Macintosh IIsi. Refer to your Macintosh User’s Guide for an illustrated description of how to open your computer. 1 2 3 4 5 Power down the Macintosh. Disconnect and remove the power cable. Open the Macintosh and remove the access port cover.
MacCon3 IIsi daughter card AUI part removed force AUI ON Figure 2-13 Removing the MacCon3 IIsi daughter card Radius video card Radius video cable MacCon3 IIsi controller card MacCon3 IIsi daughter card MacCon3 IIsi cable Expansion slot Motherboard Figure 2-14 Installing a MacCon3 IIsi card with a Radius card Installing Asanté MacCon Cards 2-17
Installing a MacCon3 IIsi and a Radius Pivot IIsi To install a MacCon3 IIsi card and a Radius Pivot IIsi card, perform the first three steps on page 2-17, then perform the steps below. ! Caution Handle the Asanté cards and the video cards carefully so they remain plugged together. Be careful not to bend or twist the cards, especially when they are plugged together at right angles to each other.
MacCon+ 30i controller card Expansion slot Motherboard MacCon+ 30i daughter card Figure 2-15 Installing a MacCon+ 30i card in a Macintosh SE/30 Installing a MacCon Card in a Macintosh SE/30 ! Caution Be very careful when you open the case and work inside the Macintosh SE/30. If you are unfamiliar with opening the machine, consult a trained technician. Do not install the Asanté Math co-processor option. It will cause the Macintosh to fail at start up or freeze during normal operation.
3 4 5 Make sure you are grounded: check that your anti-static wrist strap is properly attached to your wrist and to the Macintosh chassis. Disconnect the speaker, power supply, floppy drive, and hard drive cables (see Figure 2-15 on page 2-19). Slide the larger controller card into the expansion slot on the motherboard: — Line up the card’s edge connector with the expansion slot on the motherboard. The card’s component side should face the inside of the Macintosh.
Installing a MacCon+ SE Card in a Macintosh SE The MacCon+ SE network interface card allows you to connect a Macintosh SE to an Ethernet network. The card consists of two parts. ❏ ❏ The larger controller card, which plugs into the expansion slot in the Macintosh. The smaller daughter card, which is mounted on the rear access port to enable a connection to the Ethernet cable. You connect the two cards with a ribbon cable after installing them.
To install the MacCon+ SE card in the Macintosh SE, perform the following steps: MacCon+ SE controller card disconnect 4 wires MacCon cable Power supply connector MacCon+ SE daughter card Speaker connector Hard drive connector (50-pin) Expansion slot Floppy drive connectors (20-pin) Motherboard Figure 2-16 Installing the MacCon SE daughter controller card and daughter card ! Caution Be very careful opening and working inside the Macintosh SE. 1 2 3 4 2-22 Power down the Macintosh.
5 Take out the motherboard: — Lift the grounding shield (padded aluminum sheet) covering the motherboard. — Disconnect the power supply cable and the drive cables on the component side of the motherboard. ! Caution Be careful not to pull the wires out; pull only on the connectors only, not on the bundled wires. — Gently take out the motherboard and lay it down, component side up. — Remove the speaker wire connection to J11 (the speaker wire) on the motherboard.
9 10 11 12 Place the motherboard (with the MacCon+ controller card riding piggyback on it) back into the guides on the left side of the chassis. Reconnect the power supply and the disk drive cable on the component side of the motherboard. Plug the ribbon cable into the controller card’s receptacle. Make sure the white dot on the ribbon cable aligns with the white dot on the connector. (The blue wire is pin 1 on both ends of the cable.) Close the Macintosh SE: — Place the Macintosh SE face down.
1 2 Connect the “T” connector to the BNC port on the card.The connector slips on, twists, and locks in place. If the Macintosh is the last node, terminate one end of the “T” connector using a 50-ohm BNC terminator (for thin cable). With thick Ethernet cabling 1 2 3 Connect a drop cable to the thick Ethernet cable: Plug one end of the drop cable into the AUI port on the card. Plug the other end into the thick Ethernet transceiver.
The following table explains which installation to choose: Choose When Easy Install ❏ You want to install the AppleTalk version on the diskette and the Asanté Ethernet driver. ❏ Your network does not present any potential compatibility problems with the AppleTalk version on the diskette. ❏ You want access to EtherTalk Phase 2 network services. Customize Install ❏ When your network has software that may con- flict with the AppleTalk version on the Asanté diskette.
2 3 Insert the Asanté EtherTalk Installer Disk. Double-click the Installer icon and click OK when the Installer banner appears. The Easy Install dialog box appears (see Figure 2-17). ∆ Note: To properly install the EtherTalk Installer program, you must double-click the Installer icon. Do not drag the files from the diskette to the System Folder. Figure 2-17 The Easy Install dialog box 4 To perform an Easy Install, click Install.
Accessing Network Services To make the connection between your Macintosh and the Ethernet network work, you need the following: ❏ ❏ AppleTalk must be active in the Chooser dialog box EtherTalk must be active in the Control Panel Asanté EtherTalk driver software enables AppleTalk to interact with the MacCon Ethernet adapter and make a connection. 1 Open the Network control panel. The Network window contains two types of network icons, Built-in LocalTalk and EtherTalk (see Figure 2-18).
Your connection to Ethernet remains active until you switch to LocalTalk, disconnect the cable, or remove the Asanté interface card. 4 Select Chooser from the Apple menu. The Chooser dialog box displays the icons for all available device options and the AppleTalk zones you set up (see the example in Figure 2-19). Figure 2-19 An example of a user’s Chooser dialog box 5 Make sure AppleTalk is active. Click the Active button if AppleTalk is not active.
MacConi ch 3 SNMP Agent Page 1 Friday, August 23, 1996 10:11 AM Chapter 3 Chapter 2 Asanté SNMP MacAgent Introduction Asanté SNMP MacAgent provides hardware and software information from a Macintosh to an Asanté network management station running AsantéView. It works in conjunction with Apple’s MacTCP software. The SNMP MacAgent is a system extension under System 7 and an INIT under System 6 and can be installed on any Macintosh on the network.
MacConi ch 3 SNMP Agent Page 2 Friday, August 23, 1996 10:11 AM Requirements The requirements for Asanté SNMP Agent are Workstation Network Management Station SNMP MacAgent and AsantéView In-Band or MacTCP A generic SNMP Management console with MIB compiler and/or MIB browser and Asanté SNMP MacAgent MIB AsantéView In-Band Network Management Software AsantéView is powerful network management software used to manage Asanté intelligent Ethernet hubs and bridges.
MacConi ch 3 SNMP Agent Page 3 Friday, August 23, 1996 10:11 AM SNMP MacAgent forwards four types of information about the station: ❏ ❏ ❏ Station Profile, including station hardware components, system and memory Station Slot Table, identifying the network interface cards installed Station Activity, transmission statistics for the network interface card ∆ Note: The Macintosh must be equipped with an Asanté card and the Asanté EtherTalk driver to receive Station Activity information.
MacConi ch 3 SNMP Agent Page 4 Friday, August 23, 1996 10:11 AM 4 Click Customize. The Customize Install dialog box appears, shown in Figure 3-1. Figure 3-1 Customize Install dialog box 5 6 7 8 Select the SNMP MacAgent for the appropriate operating system. Select MacTCP for the appropriate operating system. Click Install. Restart. Configuring MacTCP To configure MacTCP, perform the following steps: 1 3-4 Select Control Panels from the Apple menu.
MacConi ch 3 SNMP Agent Page 5 Friday, August 23, 1996 10:11 AM 2 Double-click the MacTCP icon. The MacTCP Configuration screen appears, shown in Figure 3-2. Figure 3-2 MacTCP Configuration screen ❖ 3 4 Note: To configure MacTCP, see the MacTCP Administrator’s Guide. This guide is included with the AsantéView documentation. Double-click More... and select Manually. This allows you to manually enter your IP address.
MacConi ch 3 SNMP Agent Page 6 Friday, August 23, 1996 10:11 AM 2 Double-click the SNMP MacAgent control panel. The SNMP MacAgent Configuration screen appears, shown in Figure 3-3. Figure 3-3 Asanté SNMP MacAgent Configuration screen 3 4 Enter the configuration parameters (see the next section for parameter descriptions). Restart. Asanté SNMP Configuration Parameters System Contact The person who should be contacted regarding this workstation.
MacConi ch 3 SNMP Agent Page 7 Friday, August 23, 1996 10:11 AM ∆ Note: The defaults for Read-community and Write-community should be used unless you are told otherwise by your network administrator. Trap-community Enter public. (Trap is the SNMP term for alarm or alert.) Public is usually the default for the SNMP configuration. However, if there is any question, please contact your network administrator.
MacConi ch 3 SNMP Agent Page 8 Friday, August 23, 1996 10:11 AM A Macintosh icon displayed on the map with an “A” indicates the Asanté SNMP MacAgent is installed.
Chapter 4 Chapter 2 Using TroubleShooter and ADLS Diagnostic Software The TroubleShooter and Asanté Driver Local Statistic (ADLS) programs are included with the EtherTalk drivers on the Asanté EtherTalk Installer diskette. The TroubleShooter program runs diagnostic tests on the MacCon adapter to help you identify problems on the adapter. The ADLS program provides configuration and Ethernet traffic information about your Macintosh and your Asanté MacCon adapter.
4 Restart the Macintosh. Starting TroubleShooter Diagnostics 1 2 3 Insert the EtherTalk Installer diskette and open the diskette’s directory window. Copy the TroubleShooter software to the desktop or a folder, such as the Net Utils folder. Double-click the TroubleShooter icon to start the program and click OK in the TroubleShooter window. If you have not changed your EtherTalk connection to a LocalTalk connection, TroubleShooter warns you to do so by displaying the message shown in Figure 4-1.
• • • ❖ 5 Memory Buffer Test Writes to and reads from the packet buffer RAM to verify its addressability and operation. Network Interface Controller Test Writes to and reads from the controller register to verify its operation. Also issues a transmit command to verify the network interface controller’s integrity. Ping-Pong Test Transmits and receives special packets to verify communication with other systems on the network. If the Ping-Pong test fails, check your connectors and cables.
Running the Loopback test The Loopback test verifies the operation of the major components of the interface circuitry and the cable run to the hub by transmitting and receiving special packets. ❖ Note: The Macintosh with the MacCon adapter installed must be connected to a hub to run the Loopback test. To run the Loopback test, perform the following steps: 1 2 3 Click the Loopback test checkbox to select the test. Click TEST to start the loopback test. If the first test fails, click REPEAT.
The performance statistics are displayed in the TroubleShooter dialog box. Figure 4-3 Bandwidth Utilization Test window What the Bandwidth Utilization test displays The Bandwidth Utilization test takes a “snap shot” of the network. The test can be used in conjunction with other network analysis tools to identify network problems. A number of network criteria are tested and displayed in the window.
• CRC Error Indicates the number of packets with CRC (Cyclic Redundancy Check) errors received from the network by the adapter. When a packet is transmitted, a mathematical calculation is done on the header and data and is appended to the end of the frame. The receiver of the packet performs the same computation. If the computations are not equal, the packet is discarded and a CRC error is issued. • Frame Alignment Error Number of misaligned packets received from the network by the adapter.
If the test fails repeatedly, make a note of the error message, quit the TroubleShooter diagnostics, and call Technical Support. Quitting TroubleShooter and restarting network services To quit TroubleShooter, click the QUIT button in the TroubleShooter dialog box or quit from the menu bar. To restart network services, perform the following steps: 1 2 3 4 Activate AppleTalk in the Chooser. Select EtherTalk in the Network control panel. Restart the Macintosh.
To start the ADLS program, double-click its icon. Figure 4-4 shows an example of the screen that appears. 1.3 0 Figure 4-4 Asanté Driver Local Statistic (ADLS) table When the program opens, it automatically begins gathering statistics. The screen displays the current time and the elapsed time (the time since the ADLS program was opened). The System Information and Card Information areas give configuration information for the Macintosh, the MacCon adapter, and the Asanté EtherTalk driver.
MacConi ch 5 Tshooting Page 1 Friday, August 23, 1996 10:15 AM Chapter 5 Chapter 2 Troubleshooting This chapter addresses a few problems you may encounter when installing or using an Asanté MacCon network interface card. If you are unable to solve a problem after reading this chapter, please call Asanté Tech Support for assistance at 800-622-7464 or 408-435-0706.
MacConi ch 5 Tshooting Page 2 Friday, August 23, 1996 10:15 AM To learn the latest version number: ❏ ❏ Call 800-622-7464 and press 4 for Technical Support Then press 1 for Software Update information You will obtain the current version number as well as instructions for downloading Asanté Ethernet drivers from Applelink or InterNet. If you prefer a floppy disk be mailed to you, please leave a detailed message as instructed.
MacConi ch 5 Tshooting Page 3 Friday, August 23, 1996 10:15 AM Questions and Answers to Common Problems Q A The AppleTalk zones are not in the Chooser and I can’t connect to my remote file server. What’s wrong? ❏ ❏ ❏ Q A Q A I can’t access the network resources over our thin coaxial backbone. Check to see if your Macintosh is the last node. If so, make sure the T-connector on the Asanté Ethernet card is terminated with a 50 ohm terminating resistor.
MacConi ch 5 Tshooting Page 4 Friday, August 23, 1996 10:15 AM Q A After I restart my Macintosh, the LocalTalk icon is selected, instead of the EtherTalk. Make sure that: The Asanté EtherTalk driver is on the start-up disk or in the System folder. ❏ The Asanté card is properly seated. ❏ The network cable is properly connected. If LocalTalk is still selected, install the Asanté EtherTalk software again. ❏ Q A My system freezes intermittently when I access data on the remote file server.
MacConi Appendix A Page 1 Friday, August 23, 1996 10:06 AM Chapter 2 Appendix A 23 2 Technical Specifications MacCon Specifications The specifications for the Asanté MacCon cards are given below. Systems supported Macintosh SE, SE/30, IIsi, LC family, Color Classic, Quadra, MacII (NuBus) family, Centris, and Performa computers with an available expansion slot Standards supported IEEE 802.
MacConi Appendix A Page 2 Friday, August 23, 1996 10:06 AM Ethernet Address Each Asanté card has a 6 byte Ethernet physical address beginning with 00.00.94. In Figure A-1, an arrow points to the location of the Ethernet address on each card. You can also learn the Ethernet address using the Get Adapter Information option from the TroubleShooter File menu (see "Obtaining System Configuration Information" on page 4-5). The TroubleShooter application is available on the Installer diskette.
MacConi Appendix A Page 3 Friday, August 23, 1996 10:06 AM MacCon LEDs The LEDs for the MacCon NuBus, LC, IIsi, and SE cards are described below.
MacConi Appendix A Page 4 Friday, August 23, 1996 10:06 AM You may find the following tips useful. ❏ 10BaseT ❏ ❏ ❏ ❏ The wiring normally called for in 10BaseT is 26 to 22 AWG, which corresponds to the wire gauge of telephone twistedpair cables.You need two pairs of wiring for each node. Before you think seriously about using your existing phone wiring for an Ethernet network, be aware that older cabling may not be of sufficient quality to support the full 100 meters between a device and the hub.
MacConi Appendix A Page 5 Friday, August 23, 1996 10:06 AM Asanté FriendlyNet cards and Apple computers and printers with built-in Ethernet do not directly connect to the Ethernet cable; instead, an external transceiver, like the Asanté FriendlyNet Media adapter, is used. This approach lets you change network media by only changing the external adapter instead of the card.
MacConi Appendix A Page 6 Friday, August 23, 1996 10:06 AM 8 7 6 5 4 3 2 1 15 14 13 12 11 10 9 Figure B-1 AUI connector pin number assignments RJ-45 Connector The RJ-45 connector’s pin numbers listed below are for an Asanté 10BaseT card positioned correctly with the notch on the 8 pin modular jack oriented down. Pin 1 is the left-most pin, and Pin 8 is the right-most pin.