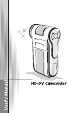
Welcome: Dear user, thanks for purchasing this product. Much investment in time and effort has gone into its development, and it is our hope that it will give you many years of trouble-free service. Safety Notice: 1. Do not drop, puncture or disassemble the camera; otherwise the warranty will be voided. 2. Avoid all contact with water, and dry hands before using. 3. Do not expose the camera to high temperature or leave it in direct sunlight. Doing so may damage the camera. 4. Use the camera with care.
Table of Contents Getting Started................................................................. 1 Knowing your camcorder parts.............................................................. 1 Installing the battery.............................................................................. 2 Charging the battery.............................................................................. 2 Inserting a memory card (optional)........................................................
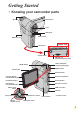
Getting Started Knowing your camcorder parts Microphone Speaker Lens LED lights Flash strobe Battery cover Strap hook Bottom view Tripod socket SD card slot (inside the battery cover) Status LED (left) / Charging LED (right) MODE button MENU button LCD monitor Shutter button Previous button/ Fast backward button Zoom (in/out) button Play/Pause button Record button Next button/ Fast forward button AV OUT connector Macro mode switch USB connector * HD OUT * Flash switch OK key/ Joystick 5-w
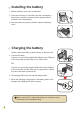
Installing the battery 1. Slide the battery cover open as indicated. 2. Place the accessory Li-Ion battery into the compartment. Note that the metallic contacts must be aligned with the contacts in the compartment. 3. After the battery is properly installed, replace the battery cover. Charging the battery Please charge the battery at least 8 hours for first time use. 1. Connect the cable. Connect one end of the supplied AC adapter to the USB port of the camcorder and the other end to a wall outlet.
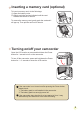
Inserting a memory card (optional) To insert a memory card, do the followings: (1) Open the battery cover. (2) Gently push the card as indicated until the card reaches the bottom of the slot. To remove the memory card, gently push the card and it will pop up. Then pull the card out of the slot. Turning on/off your camcorder Open the LCD monitor or press and hold down the Power button for 1 second to turn on the camcorder.
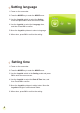
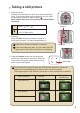
Setting language 1. Power on the camcorder. 2. Press the MODE key to enter the MODE menu. 3. Use the Joystick switch to select the Setting mode and press OK to enter the menu screen. 4. Use the Joystick to select the Language item, and then Press OK to confirm. 5. Move the Joystick up/down to select a language. 6. When done, press OK to confirm the setting. Setting time 1. Power on the camcorder. 2. Press the MODE key to enter the MODE menu. 3.
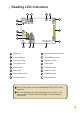
Reading LCD indicators 00:00:05 00:06:40 1 Mode icon Remaining recordable time Video resolution While Balance mode Picture resolution Exposure mode LED lights mode Flash mode Macro mode Histogram mode Battery life Selftimer mode Zoom ratio indicator NightShot mode SD card inserted Recording time The LCD will display 16:9 ratio while setting as HD (720P) video resolution. The LCD will display 4:3 ratio while setting as D1 (480P) or CIF video resolution.
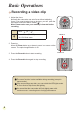
Basic Operations Recording a video clip 1. Adjust the focus: Normally the camcorder can auto focus without adjusting focus. If you want to take close-up pictures, you can push the Up button to switch to Macro mode ( ). Note: Please make sure your memory is inserted before recording. - 30cm ~ (12” ~ ) 5cm ~ 30cm (2” ~ 12”) * At 1.5X fixed zoom Zoom in 2. Zooming: Move the Zoom button up or down to zoom in or zoom out the screen. The optical magnification is 3X. 3.
Taking a still picture 1. Adjust the focus: Normally the camcorder can auto focus without adjusting focus. If you want to take close-up pictures, you can push the Up button to switch to Macro mode ( ). Note: Please make sure your memory is inserted before recording. - 30cm ~ (12” ~ ) Zoom in 5cm ~ 30cm (2” ~ 12”) * At 1.5X fixed zoom 2. Zooming: Move the Zoom button up or down to zoom in or zoom out the screen. The optical magnification is Adjust other advanced settings if necessary. 3X.
Playing back your recordings 1. Press the MODE button and use the Joystick to switch to “My Works” mode. Or press the Play/Pause button ( ) on the left side of the LCD monitor. 2. There are two folders below My works: Video and Picture. Select Video or Picture, and then press the OK key to enter the index mode. 3. Operations in playback mode: File type How to... Action Index mode Shift between Index mode and Fullscreen mode In Index mode, press the OK key to switch to Fullscreen mode.
Playing back your recordings on PC Installing software Please notice that the recorded videos are .mov format. So you need some special programs to view the recordings on PC. For first time use, please make sure you have QuickTime 7.0 player on your PC. If not, Please follow the below instructions to install the software first. Please download the QuickTime 7.0 player from the below website: http://www.apple.com/quicktime/download/win.html OR Please install the HD-DV DECODER program on the bundled CD.
Connecting the camcorder to TV Please follow the below instructions to connect your camcorder and TV via accessory AV cables for real-time display. You can display your video clips and still pictures on your TV, sharing them with your friends and family. Connecting the camcorder to HDTV HD TV hereby means the TV built-in component input ports, thus can perform HD (720P) high resolution quality while connected.
Connecting the camcorder to Standard TV TV = Traditional CRT TV AV mode AV Out AV-IN Video Audio AV cable 1. Power on the camcorder. 2. Press the MODE key to enter the Mode menu. 3. Use the Joystick switch to the Setting mode and press OK to enter the menu screen. 4. Use the Joystick to select the TV-out item, and then press OK to confirm. 5. Move the Joystick up/down to select NTSC or PAL. NTSC or PAL system is different across countries, please refer to page 14 for the Flicker Setting table. 6.
Advanced Operations Menu operation The menu items provide several options for you to fine-tune your camera functions. The following table gives details on menu operations. How to... Action Bring up the menu Press the MENU button. Move the highlight bar Use the Joystick to move up or down. Enter sub-menu/Confirm an item Press the OK key. Exit menu/Go back to upper menu Press the MENU button (when in sub-menu). Menu items in Camera mode Power-on → Press the Menu button.
Menu items in Camera mode (continued) Item Option Description On Flashlight The flash is forced to fire in every shot. Auto The flash automatically fires when the lighting is insufficient. Off Video light The flash is disabled. On/Auto/Off Normal Effect B&W Classic This setting allows you to add extra light when the lighting is insufficient during recording video clips. Make recordings in natural color. Make recordings in black and white. Make recordings in sepia-toned color.
Menu items in Setting mode Power-on → Press the MODE button → Enter the Setting ( the MENU button. Item Option Date & Time - Beep On/Off Enable/Disable beep sound. 50Hz Set flicker frequency to 50Hz*. 60Hz Set flicker frequency to 60Hz*. HDTV Set TV system compatibility to HDTV. This option is suitable for HDTV. NTSC Set TV system compatibility to NTSC. This option is suitable for America, Taiwan, Japan, and Korea areas. PAL Set TV system compatibility to PAL.
Menu items in Setting mode (continued) * Flicker settings table: Region England Germany France Italy Spain Netherlands Russia Setting 50Hz 50Hz 50Hz 50Hz 50Hz 50Hz 50Hz Region Portugal America Taiwan China Japan Korea Thailand Setting 50Hz 60Hz 60Hz 50Hz 50/60Hz 60Hz 50Hz Battery Life Indicator Icon Description Full battery life Moderate battery life Low battery life * The flash strobe and the LED lights will be disabled.
Battery Life Still picture Video clip Number of shots Recording time (minute) 110 30 * shoot every 30 seconds ** flash is off *** resolution is set to 5M (2560x1920) * resolution is set to HD (1280x720 pixels) Note: This table is for your reference only. The actual battery life depends on your battery type and recharge level. Storage Capacity Memory Video (min.
Specifications Item Description Model 5 Mega-pixel camera Image sensor 5 Mega (2592x1944 pixels) Resolution Still image: 3M/5M 1280x720 (HD) 720x480 (D1) 352x288 (CIF) Lens 3X optical zoom lens File format MOV, JPEG Video frame rate 1280x720, up to 30fps 720x480, up to 30fps 352x288, up to 30fps External memory SD (256MB ~ 4GB), speed rate 12X above LCD display 2.4” LCD TV out Component out, NTSC/PAL system supported Interface USB 2.
System Requirements System requirements are different in different video resolution settings: Video Resolution PC system requirements OS = Windows XP SP2 or above (QuickTime 7.0 or above) CPU = Pentium 4 3.0GHz or above HD (1280x720) @30fps System RAM = 512MB (1GB recommended) Display card = nvidia Geforece 7600 or ATI X1600 or above with 256MB of RAM D1 (720x480) @30fps OS = Windows 2000/XP or above (QuickTime 7.0 or above) CIF (352x288) @30fps CPU = Pentium 4 1.
82-441-90010v1.